Do you have a question about the Accurex RX Series and is the answer not in the manual?
Introduction to RX series weighing indicators and their applications.
Turns the indicator off.
Powers on the device and selects functions during operation.
Sets the zero point or enters a tare value.
The RX series Weighing Indicators are designed for various applications, including electronic platform scales and general weighing scales. This user manual outlines the functions, usage, and maintenance aspects of the device to ensure proper operation and longevity.
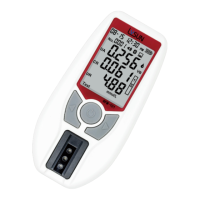
The RX series Weighing Indicators are equipped with a clear digital display and a user-friendly keypad to facilitate various weighing operations. The device indicates when mains power is applied, displaying [AC]. It can perform tare functions, showing [→T←] when a weight has been tarred and the net weight is displayed. The [→0-] indicator signifies that the display is at zero. The Σ symbol indicates that the weight is stable, ensuring accurate readings. For situations requiring higher precision, the display can be temporarily set to high resolution, indicated by ×10. The unit of weighing can be set to pounds (lb) or kilograms (kg), providing flexibility for different measurement standards.
The keypad includes several essential buttons:
Keypad Functions: The device's keypad is intuitive, with clearly labeled buttons for various operations. The OFF button powers down the unit, while the ON/* button powers it on and is crucial for navigating function selections and configurations. The →0- button is used for zeroing the scale or entering tare values, and the →T button is dedicated to the tare function, allowing for net weight measurements.
Display Status: The display provides immediate feedback on the device's status. [AC] confirms mains power is connected. [→T←] indicates that a tare has been applied and the net weight is being shown. [→0-] signifies that the scale is at zero. The Σ symbol lights up when the weight reading is stable, ensuring accuracy. For detailed measurements, ×10 temporarily increases the display resolution. The unit of measurement is clearly indicated as lb or kg.
Calibration: Calibration is a critical process to maintain the accuracy of the weighing indicator. To initiate calibration, the user must continuously press the →0- key while switching on the device. After a short beep, the key can be released. The device will then proceed through a counting cycle. Once this cycle is complete, pressing the ON/* key will display 〖CAL SP〗. Subsequently, pressing the →T key will show 〖CAL 00〗.
To perform the zeroing operation and set the calibration value, press the ON/* key. The device will display the default total capacity (e.g., 60.00). If the calibration value needs to be adjusted, press the →T key, which will display 0000.00. Use the →T key to select the digit to be modified (it will flash), and then use the →0- key to adjust it to the desired value (e.g., 10k = 0010.00). After setting the value, place the calibration weight on the scale. Once the weight is stable, press the ON/* key to complete the calibration. The device will perform the calibration, and the actual weight will appear, confirming that the calibration is completed.
A/D Counts Display: To view the A/D (Digital/Analog) counts, press the ON/* key three times. The display will show [-A-d-]. Press →T←, and the display will show |123456|, representing the A/D counts. To return to the normal weighing mode, press the ON/* key.
Select Display Mode: The unit of weighing can be easily switched between pounds and kilograms. In normal weighing status, press the ON/* key for 2 seconds to switch to pounds (lb). Pressing the ON/* key again for 2 seconds will switch the unit to kilograms (kg).
Zero Function: When the weight on the scale is stable, pressing the →0- key will zero the display, showing 〖0.00〗. The zero status LED will illuminate, indicating that the scale is at its zero point. The zero range is typically ± 2% of the full scale (FS).
Tare and Remove Tare:
→T← key will acquire the tare value and switch the display to net mode. The Tare status LED will then turn on.→T← key will switch the display back to gross mode, removing the tare. The Tare status LED will turn off.Battery Capacity: The device provides an indication of its battery capacity. After turning on the indicator, the display will show 〖bt 85〗, where 85 represents the current battery capacity percentage.
Low Battery Warning: To prevent unexpected shutdowns, the device includes a low battery warning system. When the battery capacity drops below 10% of a full charge, the display will flash, alerting the user to recharge the device. If the battery completely runs out of power, the indicator display will show 〖bAtt〗 and then turn off immediately.
LED Error Code: The device is designed to display error codes to help diagnose issues.
〖OUEr〗, it indicates that the weight on the scale exceeds the full scale plus 9 divisions (FS + 9d).〖–OUEr〗, it means the weight is below -2% of the full scale (-2% FS).〖Error〗, it indicates a calibration error, suggesting that the calibration process may need to be repeated or checked for issues.These features collectively ensure that the RX series Weighing Indicators are reliable, easy to use, and maintain, providing accurate measurements for a variety of applications.
| Category | Measuring Instruments |
|---|---|
| Measurement Range | Varies by model. Please specify the exact model number for details. |
| Accuracy | Varies by model. Please specify the exact model number for details. |
| Resolution | Varies by model. Please specify the exact model number for details. |
| Response Time | Varies by model. Please specify the exact model number for details. |
| Operating Temperature | Varies by model. Please specify the exact model number for details. |
| Power Supply | Varies by model. Please specify the exact model number for details. |
| Dimensions | Varies by model. Please specify the exact model number for details. |
| Weight | Varies by model. Please specify the exact model number for details. |