This document is the "Indoor Hemispheric Dome Hardware Manual" for ACTi cameras, specifically covering models B57, B57A, B59, B59A, B511, B511A, and Q51. It provides comprehensive instructions for the installation, configuration, and maintenance of these indoor hemispheric dome cameras.
Function Description:
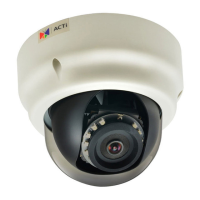
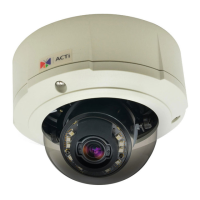
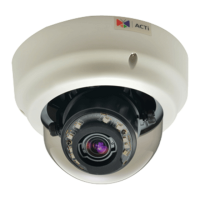
The devices are indoor hemispheric dome cameras designed for video surveillance applications. They offer various resolutions and features tailored for different monitoring needs. The models include:
- B57 / B57A: 6MP Video Analytics Indoor Hemispheric Dome with Day/Night (D/N), Adaptive IR, Extreme WDR, SLLS (Superior Low Light Sensitivity), and a Fixed lens.
- B59 / B59A: 8MP Video Analytics Indoor Hemispheric Dome with D/N, Adaptive IR, Extreme WDR, SLLS, and a Fixed lens.
- B511 / B511A: 12MP Video Analytics Indoor Hemispheric Dome with D/N, Adaptive IR, Extreme WDR, SLLS, and a Fixed lens.
- Q51: 2MP Heat Map Indoor Hemispheric Dome with D/N, Adaptive IR, Extreme WDR, SLLS, and a Fixed lens.
These cameras are equipped with video analytics capabilities, adaptive infrared for night vision, extreme Wide Dynamic Range (WDR) for challenging lighting conditions, and Superior Low Light Sensitivity (SLLS) for clear images in dim environments. The Q51 model specifically includes a heat map function, indicating its use for crowd analysis or activity monitoring.
Important Technical Specifications:
The cameras feature several physical interfaces and components:
- Reset Button: Used to restore factory default settings, including the administrator's password. It requires pressing and holding for 5 seconds or until the Power LED lights up.
- Digital Input / Output (DI/DO): Connects to external digital input or output devices such as alarm triggers, panic buttons, smoke detectors, motion-triggered lights, electric fences, or magnetic door locks. The DI/DO connector uses a terminal block.
- DI Specifications: TTL-compatible logic levels. To trigger (low): Logic level 0 (0V ~ 0.4V). Normal (high): Logic level 1 (3.1V ~ 30V). Current: 10mA ~ 100mA.
- DO Specifications: Transistor (Open Collector). Voltage & Current: < 24V DC, < 50mA.
- The camera can supply internal power (12V) to DI/DO devices if their voltage and current requirements are within the specified limits (0V ~ 30V for DI, < 24V/<50mA for DO). For high voltage DO devices (e.g., ceiling lights, motors), an external relay and power source are required.
- Memory Card Slot: Supports microSDHC and microSDXC cards for local recording.
- DC 12V Power Input: For connecting an external power adapter when using a non-PoE switch or if the PoE switch has limited power supply. This requires a terminal block connection.
- Power LED: Indicates when the camera is powered on.
- Ethernet Port: Connects to the network using an Ethernet cable, supporting Power over Ethernet (PoE) functionality.
- Audio Output: 3.5 mm audio jack connector for connecting an audio output device like a speaker.
- Audio Input: 3.5 mm audio jack connector for connecting an audio input device like a microphone.
Usage Features:
- Mounting Solutions: The manual details various mounting options to suit different installation environments:
- Surface Mount: Direct installation on a surface without additional accessories.
- Flush Mount: For discrete installation above dropped ceilings, with only the front panel visible. Requires PMAX-1011 accessory.
- Tilted Wall Mount: For high walls, allowing the camera to be tilted 10° for a larger viewing angle below the camera. Requires PMAX-0320 accessory.
- Pendant Mount: For hard and high ceilings. Requires PMAX-0101, PMAX-0103, or PMAX-0102 accessories.
- Vertical Pole Mount: For mounting on vertical poles. Requires PMAX-0320, PMAX-0503, PMAX-0313 accessories.
- Horizontal Pole Mount: For mounting on horizontal poles. Requires PMAX-0101, PMAX-0102, PMAX-0503 accessories.
- Corner Mount: For corner installations, allowing a 10° tilt for better viewing. Requires PMAX-0320, PMAX-0402 accessories.
- Installation Steps:
- Drill Holes: Use the provided drill template, considering the orientation of the connectors. Drill a cable hole if cables are to pass through the ceiling/wall.
- Prepare Camera: Detach the cover ring by twisting counter-clockwise. If cables are routed along the surface, remove a tab from the cover ring. Install a memory card if needed.
- Install Camera: Secure the camera using three supplied screws.
- Connect Cables: Connect the network cable, and optionally, audio input/output, DC 12V power, and DI/DO cables.
- Access Live View: After installation, access the camera's live view through a web browser to adjust settings or flip the image.
- Network Configuration:
- DHCP Server: If a DHCP server is present, the camera automatically obtains an IP address. The ACTi IP Utility or Windows "Network" discovery (UPnP) can be used to find the camera's IP address.
- Manual IP Assignment: If no DHCP server, the camera defaults to 192.168.0.100. The PC's IP address must be configured to match the camera's network segment (e.g., 192.168.0.99 with subnet mask 255.255.255.0).
- IP Utility: A software tool to discover cameras, view valuable information (IP/MAC addresses, firmware versions), and quickly configure multiple devices, including assigning unique IP addresses to multiple cameras simultaneously.
- Web Browser Access:
- The camera can be accessed via a web browser using its IP address (e.g.,
http://192.168.0.100).
- Full functionality is guaranteed with Microsoft Internet Explorer due to ActiveX control for video stream management.
- For non-Internet Explorer browsers (Safari, Chrome, Firefox, etc.), third-party plug-ins like QuickTime or Basic VLC Media Player are required for live video. ACTi does not guarantee compatibility with these third-party softwares.
- Default login credentials: Account:
Admin, Password: 123456.
Maintenance Features:
- Cleaning: Disconnect from power supply before cleaning.
- Servicing: Do not attempt to service the product yourself. Refer all servicing to qualified service personnel.
- Damage Requiring Service: Disconnect power immediately and refer to qualified personnel if the power cord/plug is damaged, liquid/objects have entered the product, inner parts are exposed to rain/water, or the product does not operate normally despite following instructions.
- Safety Check: After service or repair, a safety check by a service technician is recommended to ensure proper operating condition.
- Accessories and Repair Parts: Use only manufacturer-recommended accessories and repair parts.
- Installation Environment: Install the device and other related equipment (PoE injector, alarm) in a dry place protected from weather.
- Lens Protection: A thin film covers the lens when taken out of the box. This film should only be removed after the camera is securely installed and all connections are complete to prevent scratches or fingerprints.