This document provides an instruction manual for the Adexa DWASH50, DWASH50DP, and DWASH50XL dishwashers, which are designed for catering equipment.
Function Description
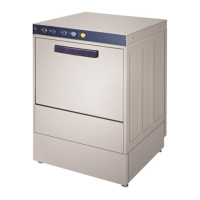
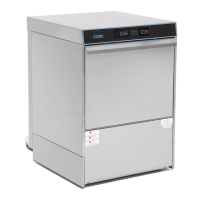
The Adexa dishwashers are fully automatic washing machines designed to clean dishes efficiently and hygienically. They operate with a 2-minute program duration, performing washing at 55 °C and rinsing at 80-85 °C using hot and fresh water. The machines are constructed with a stainless steel frame (inside/outside), chassis, panel, and boiler, ensuring durability and compliance with hygienic standards. Adjustable legs allow for proper leveling. The washing tank fills automatically, and its water level is continuously controlled. Both washing and rinsing water temperatures are independently regulated by two thermostats. The pumps are resistant to detergent and hot water, and the motors feature heat resistance and fan cooling to prevent overheating. The boiler is insulated with glass wool to minimize heat loss and energy waste. The system is equipped with thermal and electrical protectors for safety, and the electrical panel is easily accessible for maintenance and inspection.
Important Technical Specifications
Model: DW500 (NP)
Capacity:
- Plates per hour: 540
- Basket for 16 plates (50x50): 1
- Glass-cup basket (50x50): 1
Electric:
- Voltage: 220-230 AC V, 3~ N, 50Hz
- Washing tank heater: 2500 W
- Rinsing water heater: 4500 W
- Maximum power: 5000 W
- Main supply cable: 3X2.5 RNF TYPE (minimum H05RN-F type, 3x2.5 mm² diameter)
Feed Water:
- Water inlet pressure: 2-4 bar (202-404 kPa)
- Water hardness: 15 °Fr
- Water inlet temperature: 45-50 °C
- Water inlet connector diameter: 3/4"
- Water inlet connector diameter drainage height: 32 mm
- Drainage height: 35 cm
Washing:
- Temperature: 50-55 °C
- Washing tank capacity: 29 liters
- Washing pump: 0.55 HP
- Washing duration: 2 minutes
Rinsing:
- Temperature: 80-85 °C
- Rinsing water consumption: 2.5 liters/basket
Dimensions and Weight:
- Length: 60 cm
- Width: 60 cm
- Height: 83 cm
- Gross weight: 67 kg
- Volume: 0.42 m³
Usage Features
The device is designed for ease of use with a straightforward control panel.
Control Panel:
- A - Main Switch (0-1): Turns the machine ON/OFF.
- B - Cycle Start Push Button: Initiates the washing cycle (press for three seconds).
- C - Manual Rinse Push Button: For manual rinsing.
- D - Drain Pump Switch (only for DWASH50DP model): Manually drains water from the machine when pressed.
Start-up Procedure:
- Unpack the device and remove protective tapes.
- Adjust the legs to level the device on a flat, solid surface.
- Connect the supply hose to the solenoid valve and then to the tap.
- Connect the drainage hose to the machine's drainage outlet and then to the sewer system, ensuring it's not twisted or bent.
- Ensure water supply is at 50°C, 2-4 bar pressure, and 10-15 °Fr hardness (use a water softening device if necessary).
- Verify electrical connection (380-400 AC V / 50 Hz) with proper grounding and a K-automat fuses group.
- Fix the overflow pipe in place.
- Open the pressured hot water supply valve.
- Place the basket with items to be washed into the machine.
- Close the machine door.
- Press the ON/OFF switch (A). The machine will fill with water and begin heating. The Water Temperature Indicatory Lamp will illuminate when the water is ready.
- Wait for the temperature lamp to turn on.
- Press the Cycle Start Push Button (B) for three seconds to begin the washing cycle. The "It's washing" lamp will remain on during the cycle and turn off upon completion.
Daily Shut-down (for DWASH50DP):
- Turn off the machine using the ON/OFF switch (A).
- Open the door.
- Remove the drain pipe and keep the door open.
- Press the Drain Pump Switch (D) to manually drain water.
General Principles for Operation:
- Use foam-free and foam-controlled liquid detergent and polisher.
- Do not open the cover while the device is working.
- Avoid placing living bodies or objects on or inside the machine.
- Do not allow children or unauthorized persons to operate the machine.
- Clean solid wastes from dishes and pre-wash them before placing them in baskets.
- Do not overload baskets beyond stated capacity.
- Do not use detergent for pre-washing.
- Soak very dirty dishes (waiting more than 2-3 hours) under water until dissolved.
- Do not wash plastic materials.
- Do not insert hands into the hot boiler water containing detergent.
Maintenance Features
Daily Maintenance:
- Replace dirty washing tank water with fresh water by turning the main switch to "0" and closing the device.
- Switch off electricity.
- Open the cover and sponge solid wastes from inside.
Cleaning the Device:
- Replace dirty washing tank water.
- Bring "STAND BY" and "START" switches to "stop" and close the device.
- Switch off electricity.
- Carefully open the cover.
- Remove the overflow pipe.
- Remove and clean washing and rinsing nozzles.
- Remove and clean surface filters and pump suction filters with a brush under flowing water.
- Fix all parts back in their original positions.
- Close the cover.
- Open the relevant switch on the control panel to supply electricity. Bring "STAND BY" and "START" switches to the starting position.
- Run the device for 5 minutes for complete cleaning.
- Bring the "START" switch to "pause" position.
- Open the cover.
Weekly Maintenance:
The weekly maintenance procedure is identical to the daily cleaning procedure, involving water replacement, electrical shutdown, cleaning of internal components (nozzles, filters, overflow pipe), reassembly, and a 5-minute cleaning cycle.
Troubleshooting (Intervention After Failure):
The manual provides a comprehensive list of failures and their causes, along with suggested interventions:
- Device not working: Check electrical supply to the device, stand-by/start switches, level switch, and solenoid valve.
- No water filling: Check level switch, contaminants in the tube, adequate water level, and solenoid valve operation.
- Washing tank not filling or no rinsing: Check tap, drainage pipe, stand-by/start switches, main fuse, machine fuse, plugged nozzles, air in air housing, and overflow pipe.
- Washing tank slowly filling: Check tap, water pressure (use pressurizing pump if low), clean solenoid valve filter, ensure rinsing nozzles are not plugged, and overflow pipe is seated correctly.
- Machine not heating water: Check overflow pipe connection, thermostat settings (80°C for rinsing, 50°C for washing), and cable connections.
- Washing tank not emptying: Inspect drainage hose and siphon for solid wastes.
- Machine not efficiently working: Ensure pump suction filter is clean, washing nozzles are clean, adequate detergent is delivered, select longer washing programs for dirty pots, and check water temperature.
- No drying (models with drying system): Check polisher amount and rinsing water thermostat setting (80°C).
- Condensation in glasses: Do not store glasses on a flat surface, check polisher amount.
- Striped glasses: Use only foamless detergent.
- Excess foam in washing tank: Check water temperature (must not be lower than 50°C), detergent and polisher dosing apparatus, and clean the machine if foamed detergent was used.
- Stain on glass: Decrease dosed polisher amount (acceptable dosage 0.1 cc/liter).
- Washing arms not rotating correctly: Remove and clean washing arm, ensure water pressure is sufficient (mount a pressurizing pump if lower than 202 kPa).
Safe Life: The safe life of the product is 5 years.