3
2. Safety Precautions
The following guidelines shall help minimize the risk of injury through
re or electric shock.
1. Carefully read these safety notes before you use the device!
2. Keep these safety notes in a safe place.
3. Pay attention to all warnings, instructions and additional texts on
the unit.
4. Do not install or use your amp in close proximity to water or if you
are wet yourself.
5. Use your amp in a safe place where nobody can step on cables or
trip over and damage them.
6. Pay attention to an unhindered air circulation around the amp, ne-
ver obstruct the air vents or grilles.
7. Always pull the mains plug before cleaning your amp. Use only a
dry cloth for cleaning. Avoid the use of detergents and do not let
any liquids seep into the unit.
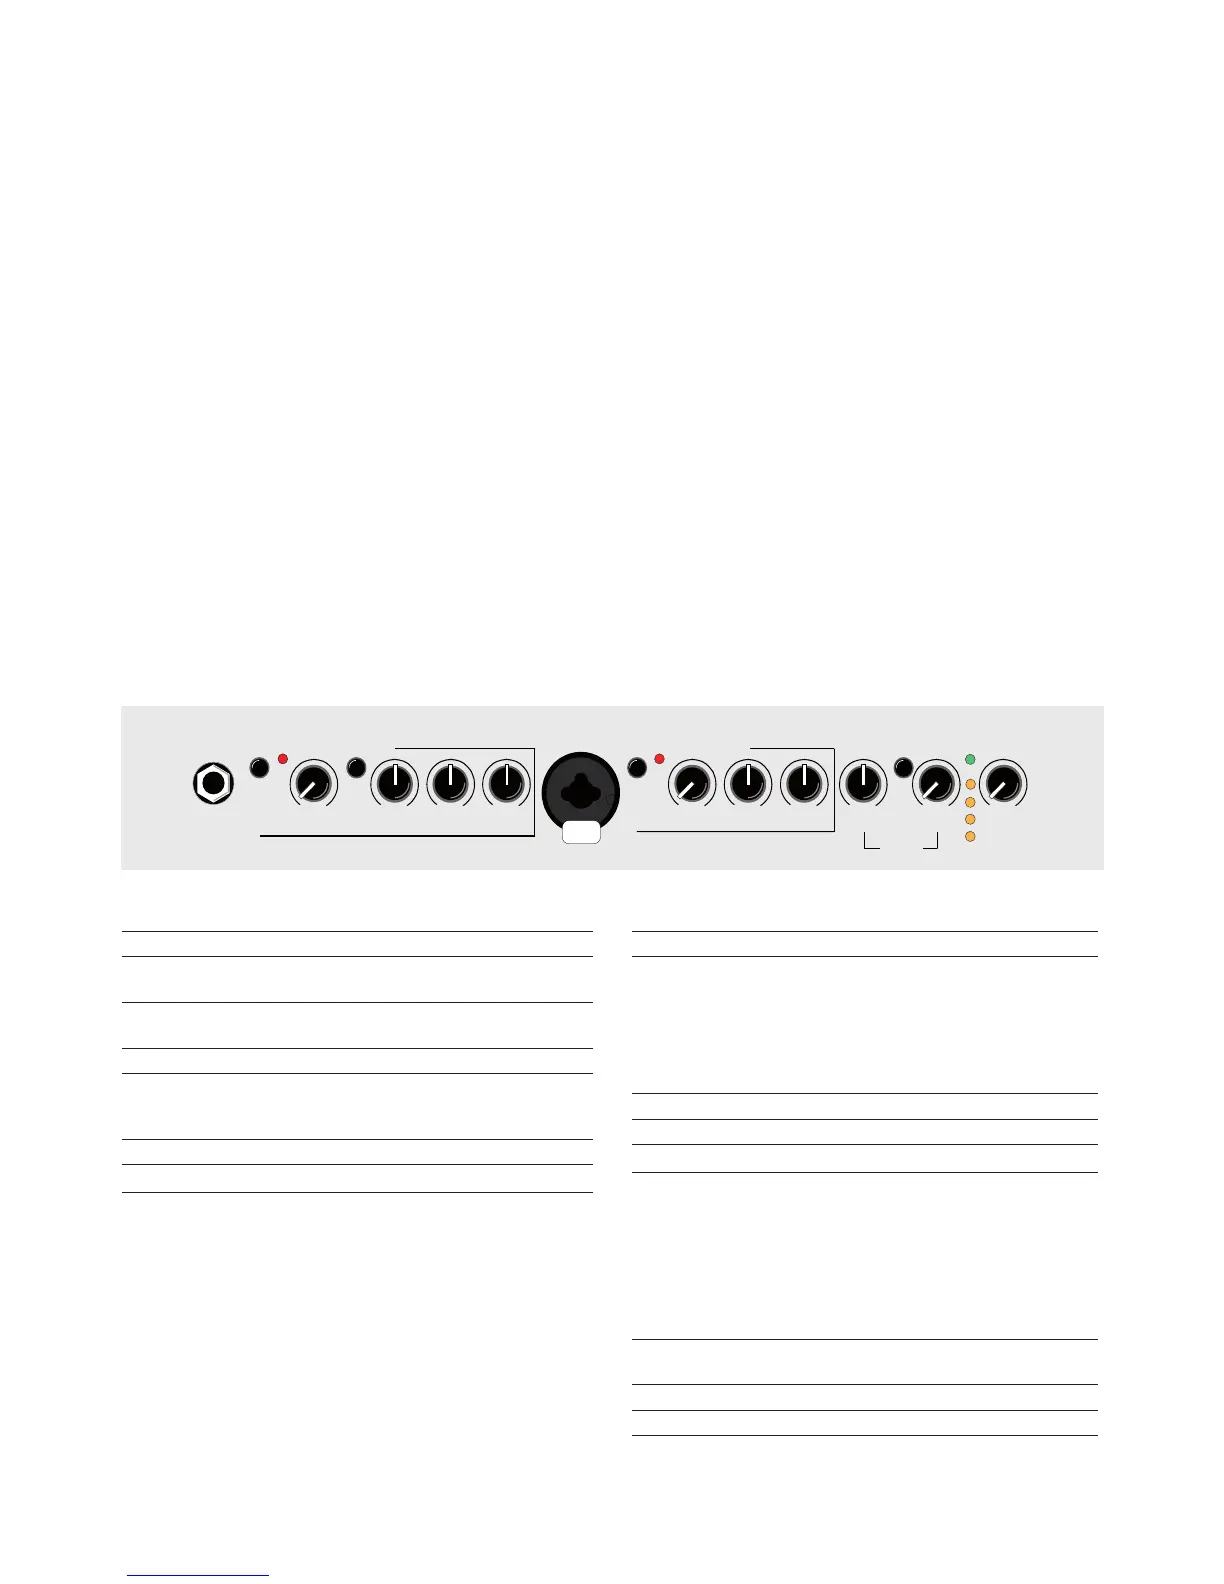
channel 1
input 6.3 mm stereo jack socket
high/low Input sensitivity selector switch
pressed = lower sensitivity
clip This indicator lights up when overload is imminent in
the respective channel.
gain Input level control
colour This switch activates the midrange contour lter.
Boosts presence and slightly cuts midrange
frequencies.
bass Bass control
middle Midrange control
treble
Treble control
channel 2
input XLR/6.3 mm jack plug combi socket
line/mic Signal source selector switch.
line: For instruments (pickups), only via jack plug.
mic: For microphones with a jack or an
XLR connector.
clip This indicator lights up when overload is imminent in
the respective channel.
gain Input level control
bass Bass control
treble
Treble control
e. pan panorama control to distribute the eects between
the channels.
left: internal eect on channel 1 & external
eect on channel 2
mid: internal & external eect on channel 1
and channel 2
right: internal eect on channel 2 & external
eect on channel 1
select push button for selection of four eects, indicated by
the LEDs between return and master.
return level control for the internal eects
power This LED indicates that your amplier is ready to use
master Adjusts the overall volume level
3. Controls and Connections
Front panel top (from left to right):
8. Use only the right fuses with the same current rating and trigger
characteristic as replacements. Never mend fuses! Pull the mains
plug before replacing a fuse. Should a fuse blow again after a
short while, the device needs to be checked.
9. Never install your amp close to devices with strong elec-
tromagnetic elds such as large mains transformers, revolving
machines, neon illumination etc. Do not lay signal cables parallel
to power current cables.
10. There are no user-servicable components inside the unit. To avo-
id the risk of an electric shock, the unit must not be opened. All
maintenance, adjustment and repair works should be carried out
by qualied sta only. Any unauthorized tampering will void the
2-year warranty.
11. In keeping with the EMV regulations screened cables with cor-
rectly tted connectors must be used for all signal connections.
12. Always use an earthed power supply with the correct mains volta-
ge. If you are in doubt about the power outlet‘s ground, have it
checked by a qualied technician.
13. Cable up your amp only when it is powered o.