12
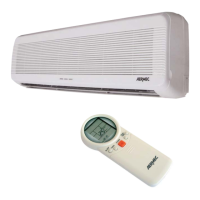
IMPOSTARE L’ORA ATTUALE
– Premere il pulsante CLOCK.
– Il lampeggio delle sigle AM o PM
indica che la funzione di modifica
dell’orario è attivata.
– Usare i pulsanti oppure per
regolare l’orologio all’ora attuale.
il tasto permette di innalzarla;
il tasto permette di abbassarla.
Ogni volta che un pulsante viene pre-
muto l’orario va avanti/indietro di un
minuto. Tenere premuti i pulsanti per
cambiare l’ora velocemente, con
incremento di 10 minuti ogni secon-
do.
– Premere il pulsante CLOCK per con-
fermare l’orario, le scritte AM o PM
smettono di lampeggiare.
PRELIMINARY PROCEDURES
FANCOIL SET-UP
- Ensure that the unit is connected to the electrical mains.
- Open the front panel.
- Turn on the fancoil by setting the main switch to ON.
- Close the front panel.
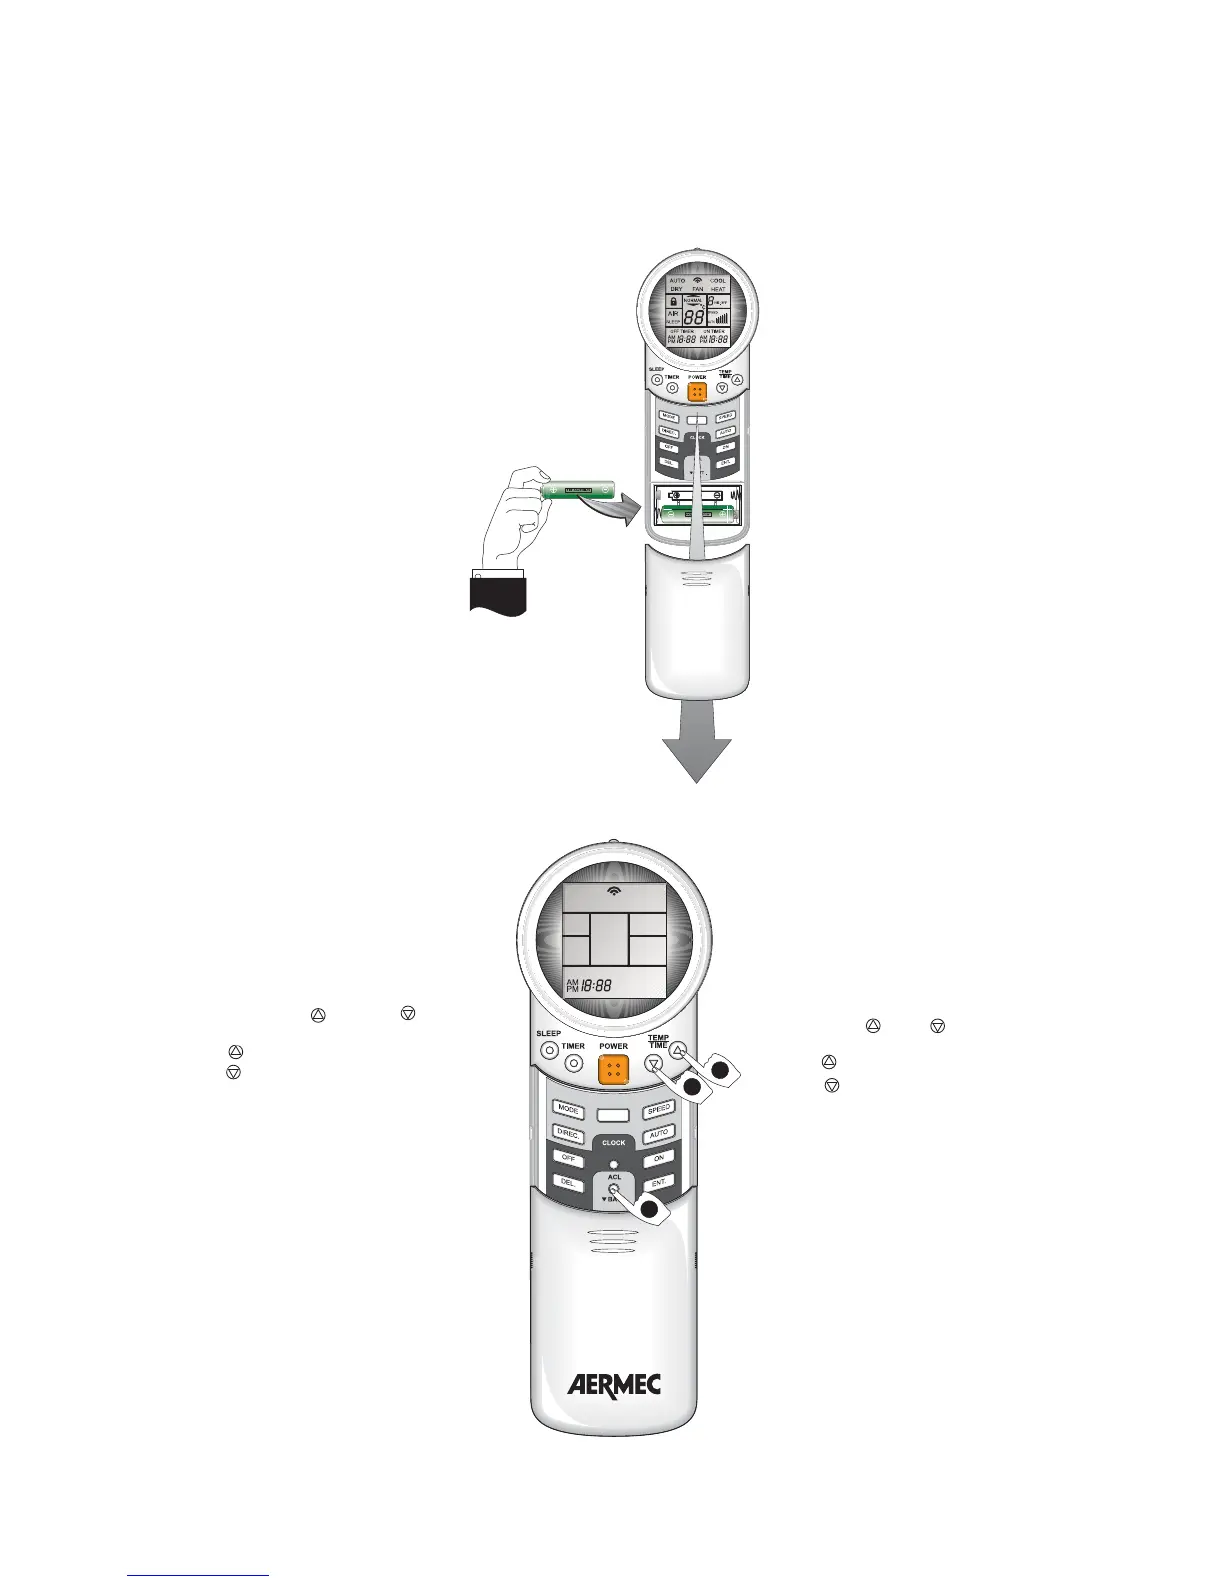
REMOTE CONTROL SET-UP
– Press the battery cover lightly and
slide off in the direction of the arrow.
- Insert the two 1.5 volt high performan-
ce magnesium or alkaline monopole
batteries R 03 (AAA), taking care not to
invert polarity.
- Close the battery cover.
IMPORTANT
- The average battery lifetime under nor-
mal conditions is 10 months.
- The two batteries must be identical.
- In the event of prolonged periods of
disuse, remove the batteries from the
remote control.
– If the remote control works only when
close to the conditioner, the batteries
should be replaced.
OPERAZIONI PRELIMINARI
PREPARAZIONE DEL VENTILCONVETTORE
– Assicurarsi che l’unità sia collegata elettricamente.
– Aprire il pannello frontale.
– Accendere il ventilconvettore posizionando su ON l’inter-
ruttore di alimentazione.
– Chiudere il pannello frontale.
PREPARAZIONE DEL TELECOMANDO
– Far scorrere il coperchio batterie (in
direzione della freccia premendo leg-
germente.
– Inserire due batterie al manganese o
alcaline da 1,5 volt (stilo) ad alte pre-
stazioni : R 03 (AAA), facendo atten-
zione a non invertire la polarità.
– Chiudere il coperchio batterie.
IMPORTANTE
– Le batterie hanno una durata media di
10 mesi con un utilizzo normale.
– Le due batterie devono essere identi-
che.
– Rimuovere le batterie dal telecoman-
do se si prevede di non utilizzarlo per
lunghi periodi.
– Quando il telecomando funziona solo
in prossimità del condizionatore è il
momento di sostituire le batterie.
SET THE CURRENT TIME
- Press the pushbutton CLOCK.
- The symbol AM or PM flashes to indi-
cate that the time modification mode
is enabled.
- Use keys
and to set the cur-
rent time.
Key
is used to increase the value;
Key is used to decrease the value
Each time a pushbutton is pressed the
time moves forward/back by one
minute. Press and hold the key for
rapid modifications in increments of
10 minutes per second.
- Press the pushbutton CLOCK to con-
firm the time; the symbol AM or PM
stops flashing on display.
A
IR
2
2
3
AIR