Important Note: Be sure that the machine is stopped while
checking or oiling the movement transmission gear system. Don't
touch to gears while the machine is working. Do not insert your hand
toward transmission system.
If you observe the damaged or worn-out parts during the controls,
don't work with seed drill before making the necessary maintenance
and repairs.
7.12. Marker System
Marker system guides the driver for not to
leave free space on eld and not to sow again the
area that has been sowed. Tractor's right front
wheel should be tracked the line that furrowed
by the marker. Adjustments of marker must be
adjusted before working. Adjustment of marker
is adjusted according to tractor's front wheel
track width (W) and machine working width
(W1). Therefore, farmers must make the
adjustment of marker according to their own
tractor's specications. Furrow dimensions for
some tractors are given in Table 8.
Marker adjustment of the machine can be
adjusted in various ways.
Simple calculation method as follows:
W: Distance between front wheels of tractor
(in to in)
W1: Working width of machine (Table 8).
L: The length from center line of machine to
marker (Fig. 16).
EXAMPLE:
If the seed drill is 20 rows and the tractor is
STEYR 8073;
From the formula of L=W1 – (W/2), L=284-
(135/2) is found as L=216, 5 cm.
The result is showed the distance from the
middle line of seed drill to the marker disc.
Important Note: Be sure that the seed drill is stopped for getting
the marker system to sowing and transporting position. For getting to
transporting position, x the marker as vertically and make the
necessary controls for keeping stabile the marker. Be careful that there
is no alive on the marker's movement area when the seed drill is on
sowing position.
8. DETACH OF MACHINE FROM THE TRACTOR
1. Park the tractor on a at surface, pull the handbrake and put the
wheel chock to tires.
2. Hydraulic arms of tractor should be alignment.
3. Lower the machine by means of the tractor hydraulic arms.
4. Wind up the machine support leg and insert the safety pin
5. If your machine has shaft dismount the shaft from tractor.
6. If your machine has hydraulic hoses depressurize the pressure
through tractor's hydraulic valve and disconnect the hydraulic
hoses from the tractor.
7. If your machine has electric system disconnect the electric
connections from the tractor when tractor is in stop position.
8. Pull out the connection pins.1-2
Öneml Not: Hareket letmn sağlayan dşl sstemn kontrol
ederken veya yağ uygularken maknenn durduğuna emn olunuz.
Makne çalışırken dşllere kesnlkle müdahale etmeynz. İletm
sstemnn olduğu bölgeye elnz sokmayınız. Yaptığınız kontroller
sırasında zarar gören veya aşınan parçalar tespt etmenz durumunda
gerekl bakım ve onarımı yapmadan mbzer le kesnlkle çalışmayınız.
7.12. Markör (kılavuz) Sstem
Kılavuz tertbatı, ekm alanında eklmemş alan
kalmaması ve eklen yern br daha eklmems
çn, sürücüye yol gösteren br sstemdr.
Kılavuzun açtığı çzden dönüşte traktörün sağ
ön teker geçrlr.
Kılavuz kullanılmadan önce ayarının yapılması
gerekr. Kılavuz ayarı traktörün ön teker z
genşlğ (W) ve makne ş genşlğ (W1) değerne
bağlıdır. Bu nedenle her çftç kılavuz ayarını
kend traktörüne göre yapmalıdır.
Bazı traktörlern z genşlğ Tablo 8'de
verlmştr.
Maknenn kılavuz ayarı muhtelf şeklde
yapılır.
Bast hesaplama şekl şöyledr:
W: Traktör ön tekerler arası mesafe (ç yanaktan
ç yanağa)
W1: Maknede ş genşlğ (bakınız mbzer
teknk detay tablosu)
L: Maknenn orta eksennden markör ucuna
kadar olan uzunluk (Şekl 18).
ÖRNEK:
Mbzer tp 20 sıralı ve traktör STEYR 8073
olursa;
L=W1 – (W/2) formülünden L=284 – (135/2)
L=216,5 cm olarak bulunur.
Sonuç mbzern ortasından kılavuz sacına
kadar olması gereken mesafey göstermektedr.
Öneml Not: Kılavuz sstemn ekm ve yol durumuna getrmek çn
mbzern durduğuna emn olunuz. Mbzernz yol durumuna
getrmek çn kılavuzu dk konumda sabtleynz ve yernden
çıkmaması çn gerekl kontroller yapınız. Ekm durumundak
mbzern kılavuzu hareket alanı çnde kesnlkle canlının
bulunmamasına özen göstern.
8. MAKİNENİN TRAKTÖRDEN AYRILMASI
1. Traktörü düz br zemne park ednz, el frenn çeknz ve tekerlere
takoz koyunuz.
2. Traktörün hdrolk kollarının aynı hzada olmasını sağlayınız.
3. Traktör hdrolk kolları yardımıyla makney yere ndrnz.
4. Maknenn park destek ayağını açınız ve emnyet pmn takınız.
5. Maknenz şaftlı se şaftı traktörden ayırınız.
6. Maknenzde hdrolk hortumlar varsa traktör hdrolk valfından
basıncını alınız ve hortumları çıkartınız.
7. Maknenzde elektrk bağlantısı varsa traktör stop durumdayken
çıkartınız.
8. Üç nokta bağlantı pmlern sökünüz.
21
EN
Operator's Manual
BM
Kullanım Kılavuzu
20
TR
L:?
L:?
W1
140
mm
W
Fg. 20
Şek. 20
FORD 3600
FORD 6600
FIAT 480
FIAT 640
Dstance between the front wheels for the varous tractors;
123 cm
135 cm
132 cm
132 cm
MASSEY FERGUSON 165
MASSEY FERGUSON 165
STEYR
ISBORA
127 cm
137 cm
135 cm
130 cm
Table 8
Tablo 8
EN
Operator's Manual
BM
Kullanım Kılavuzu
TR
FORD 3600
FORD 6600
FIAT 480
FIAT 640
Muhtelf traktörler çn ön tekerlekler ara mesafeler;
123 cm
135 cm
132 cm
132 cm
MASSEY FERGUSON 165
MASSEY FERGUSON 165
STEYR
ISBORA
127 cm
137 cm
135 cm
130 cm
Tablo 8
9. BAKIM
Peryodk olarak yapılacak çeştl bakım şlemlernn lstes
burada verlmştr. Düşük malyetl çalıştırma ve uzun ömürlü
br makne, kuralların ssteml ve sürekl uygulanmasına
bağlıdır.
Bu kılavuzda lstelenen bakım peryotları sadece ön
görülendr ve normal koşullardak kullanım çndr. Bu nedenle,
daha az ya da daha çok tozlu çevre gb etkenler bu süreler
değştrr.
Daha ağır hzmet koşulları çn daha sık bakım yapılacaktır.
Gres yağı enjekte edlmeden önce meme uçları, çamurun,
tozun ve yabancı maddelern gres yağına karışmasını önlemek
çn temzlenmeldr. Aks halde yağlamayı azaltacaktır.
- Kullanımdan sonra ekpmanı tamamen yıkayınız.
- İlk sekz saatlk çalışmadan sonra tüm cıvataların hâlâ sıkılı
olup olmadığını kontrol ednz.
- Tüm yağlama noktaları çn önerlen gres kullanınız ve
maknenz şanzımanlı se şanzıman yağı le yağlayınız.
Şanzımanlı maknelerde 400 saatlk çalışmadan sonra yağını
tamamen değştrnz (2 ltre).
Mevsm sonlarında veya uzun dnlenme dönemlernde
şunlar tavsye edlr:
- T ohum haznelern ve tohum dağıtıcıları boşaltın.
- Yıpranmış veya hasarlı parçaları kontrol edp gerekl se
yenleynz.
- Tüm cıvata ve vdaları sıkınız.
- Tüm boyanmamış parçaları yağlayınız. Ekpmanı naylon vb.
le koruyunuz.
- Tüm zncrler yağlayın.
- Kuru br yerde muhafaza ednz, yetkl olmayan kşlern
ulaşmasını engelleyn.
- Yukarıdak şlemler dkkatlce yapıldığında kullanıcı br
sonrak dönem y şartlarda muhafaza edlmş br makne
bulacaktır.
- Son olarak malâtçı firmaya her zaman gerekl yardım ve
yedek parça çn ulaşableceğnz hatırlatırız.
Cıvata ve Somunların Sızdırmazlık Kontrolü:
Lütfen makne çalıştıktan lk 3 saat sonra cıvata ve somunları
kontrol ednz. Lütfen her 50 saatte br peryodk olarak cıvata
ve somunları kontrol ednz. Eğer gevşeklk varsa, bütün somun
ve cıvataları sıkınız.
9. MAINTENANCE
Here follows a list of various maintenance operations to be
carrying out periodically. Lowered operating costs and a
longer lasting machine depend, among others, on the
methodical constant observation of these rules.
The maintenance periods listed in this booklet are only
indicative and are for on normal conditions on use therefore be
varied depending the kind of service, the more or less dusty
surroundings, seasonal factors, etc.
For more serious conditions of service, maintenance will
logically be done more often.
Before injecting grease, the nipples must be cleaned to avoid
mud, dust and foreign bodies from mixing with the grease;
otherwise they will reduce or even annul the effect of the
lubrication.
- After use wash the equipment thoroughly
- After the every eight hours of work check that all the bolts are
still tight.
- For all greasing points use the suggested grease and if your
machine has gearbox, use the gearbox oil. After 400 working
hours replace the gearbox oil new one completely (2 L).
At the end of the season or if a long period of rest is for seen it
is advisable:
- Empty the seed hoppers and seed distributors.
- Carefully check worn or damaged parts and replace if
necessary.
- Tighten all screws and bolts.
- Grease the all unpainted parts. Protect the equipment with a
cover (such as nylon and etc.).
- Gease the all chains.
- Keep your machine in a dry place. Don't move it and keep
away from unauthorized people.
- If these operations are done carefully, it will be total
advantage for you because next season your machine will be
perfectly ready to work.
- Finally, we remind you that the manufacturer is always
available for any and all necessary assistance and spares.
Tightness controlling of Bolt and Nuts:
Please check the bolts and nuts after 3 hours rst operating
of machine. Please check the bolts and nuts periodically once
every 50 hours. Tighten all nuts and bolts If they loose.
M 5
5,9
8,7
10
M 6
10
15
18
M 8
25
36
43
M 10
49
72
84
M 12
85
125
145
M 14
135
200
235
M 16
210
310
365
M 20
425
610
710
M 24
730
1050
1220
M 27
1100
1550
1800
M 30
1420
2100
2450
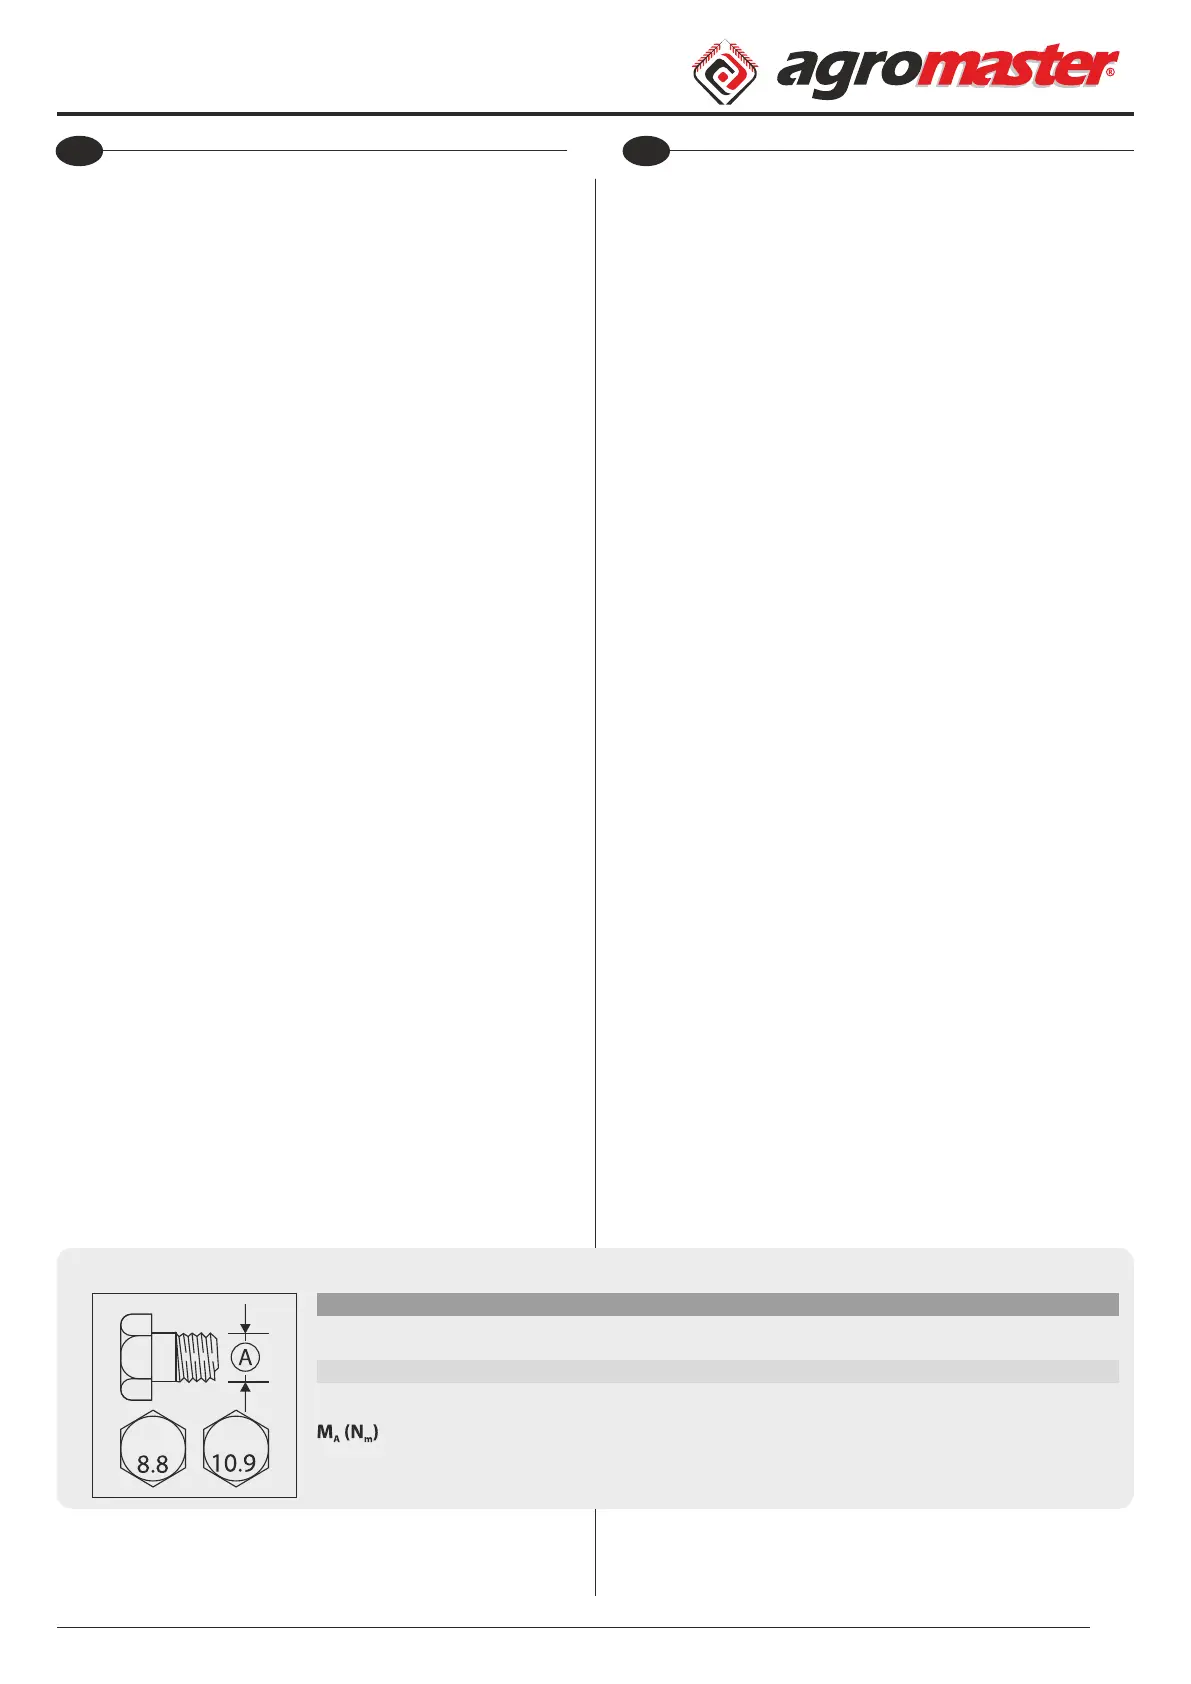
AØ
8.8
10.9
12.9
A= Nomnal Dameter
Table 9
A= Nomnal Ölçü
Tablo 9
The compaction pressure MA of blots and nuts
Cıvata ve somunların MA Sıkıştırma Basıncı
 Loading...