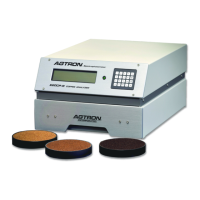
4) Place the Calibration Disk into the shallow side of the dish with the Red-Side facing up. Place the dish / disk
into the sample tray in the drawer.
Make certain that the dish sits flat and fully into the recess in the sample tray
5) Fully close the sample drawer
The display will first show: -- HIGH REFERENCE --
SETTING TO → XXX.X
The analyzer will set the Life Disk measured value as the factory High Reference disk calibration value
The display will then show: -OPEN SAMPLE DRAWER-
6) Fully open the sample drawer
Momentarily, the display will show: * SETTING REFERENCE *
KEEP DRAWER OPEN
The analyzer will measure the LIFE DISK under the sample drawer and will store a reference value. The
reference value stored is used automatically to recalibrate the analyzer every time the drawer is opened.
The display will change to: -- LOW REFERENCE --
BLACK-DISK OR SAMPLE
7) Turn the Calibration Disk over and place it into the shallow side of the dish with the Black-Side facing up
8) Place the Calibration Disk-set back into the sample tray
9) Fully close the sample drawer
The display will show: -- LOW REFERENCE --
SETTING TO → XX.X
The analyzer will set the Life Disk measured value as the factory Low Reference disk calibration value
The display will quickly flash: CALCULATING SCALE
Followed momentarily by: ** REFRENCES SAVED **
The display finally shows: <<< COFFEE MODE >>>
10) Return the two-sided disk & dish set to its storage box and close the lid
THE E20CP-III IS NOW READY FOR OPERATION
 Loading...