10 11
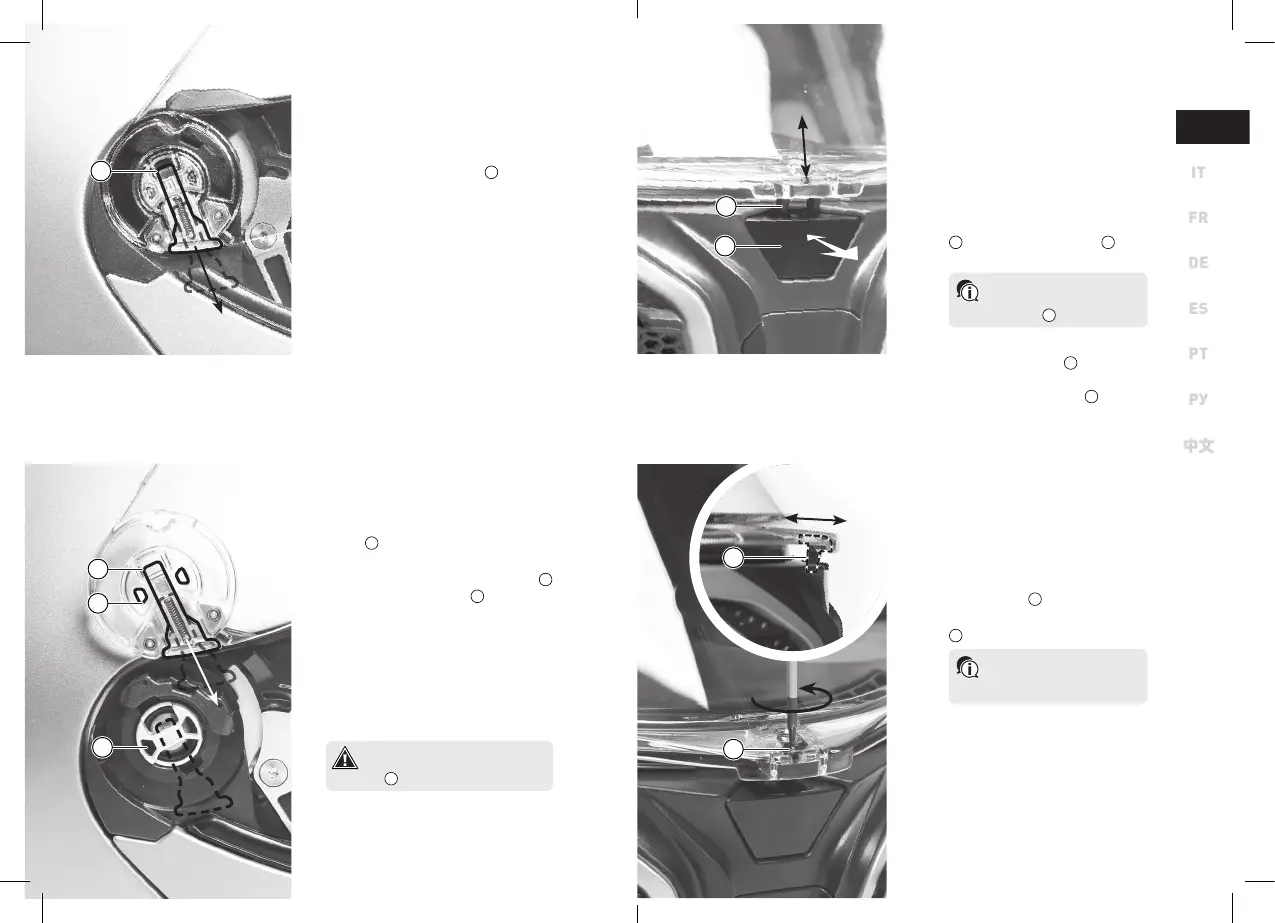
5.6 CLOSURE ADJUSTMENT
It is possible to adjust the position of the hook-
ing cog, thus changing the pressure thereby
required to the button to open the visor.
Prerequisite: the visor is installed and open, and the
helmet is resting on a flat surface. Use a Torx
®
T7
screwdriver.
• Loosen the screw
1
.
• Adjust the position of the engagement catch
2
as desired.
The farther back the catch is posi-
tioned, the more pressure is required
on the button to open the visor.
• Tighten the screw.
› Make sure that the visor closes securely.
5.5 MICRO-OPENING
In this position the visor is firmly closed pro-
viding maximum safety, but it creates a gap
of about 5mm to allow a moderate flow of air
inside the helmet.
Prerequisite: the visor is open.
› Lower the visor until the engagement catch
1
engages the opening button
2
to the
first click.
If necessary, facilitate this en-
gagement by pressing the visor
open button
2
lightly.
Prerequisite: the visor is closed.
› Press the opening button
2
and, in a single
movement, move the visor slightly upwards
until the engagement catch
1
locks the
visor to the first click.
5.3 REMOVAL
Prerequisite: the visor is fully open. Start the operation
on the right-side visor mechanism.
• Pull down the spring slider
1
with a fin-
gernail, then detach the visor from the
mechanism.
› Repeat the operation on the visor mechanism
on the left-side visor mechanism.
5.4 INSTALLATION
Prerequisite: begin the operation on the right-side visor
mechanism.
• Grasp the visor and pull down the spring slid-
er
1
with a fingernail.
• Place the visor on the associated mecha-
nism, so that the two engagement tabs
2
are seated into their slots
3
.
• Release the spring slider.
• Repeat the above operations on the left-side
visor mechanism.
› Visor installed. Rotate it, making sure it
is securely attached and the movement is
smooth.
2
1
3
1
1
2
1
2
Opening / closing the chinguard without the vi-
sor fitted can cause the come out of the mecha-
nism
3
from its sliding seat.