Do you have a question about the Aim Solo and is the answer not in the manual?
Explains Solo as an automatic lap timer based on GPS technology, detailing its functions and capabilities.
Lists the various track types supported by Solo, including circuits, hill climbs, and point-to-point races.
Highlights the extended features of SoloDL when connected to SmartyCam for video recording with data overlay.
Lists all the components provided in the SOLO and SOLODL packages, including cables, adapters, and mounting hardware.
Details various optional mounting kits available for Solo, such as suction cup and handlebar brackets for flexible installation.
Explains how Solo works, focusing on GPS technology for lap time calculation and track identification.
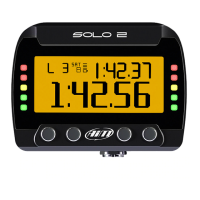
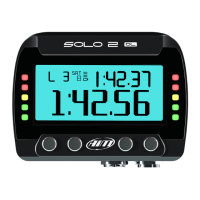
Describes the graphical display, physical buttons, USB port functionality, and connectors for powering and data transfer.
Covers different ways to mount the Solo device and the various race modes it supports, like Speed, Regularity, and Performance.
Outlines how to power the Solo device, either via its internal battery or an external 12V source.
Explains how SoloDL connects to a vehicle's Engine Control Unit (ECU) for data acquisition using OBDII or CAN/RS232.
Guides the user through the initial setup wizard, including language, units of measure, and race/track type selection.
Details how Solo acquires a GPS signal, displaying signal strength and identifying nearby tracks for accurate lap timing.
Describes how to configure Solo for different race modes such as Speed, Regularity, and Performance, including track type settings.
Covers customizing display pages, setting units of measure, time/date formats, and accessing system information like firmware version.
Explains how to install Race Studio 2 software and its primary uses: upgrading track lists, downloading data, and analyzing tests.
Details how to configure SoloDL to receive specific data from the vehicle's ECU using Race Studio 2's System Manager.
Provides instructions on how to add new starting line coordinates directly through the Solo device or via Race Studio 2 software.
Explains how to manage the track database using Race Studio 2, including adding, removing, and sending tracks to the Solo device.
Details the different lap time information displayed during speed races: Rolling, Static, and Predictive Lap Time.
Explains how Solo functions during Regularity races (maintaining constant lap times) and Performance tests (acceleration measurements).
Instructs users on how to access and review stored lap times and performance data directly on the Solo device using the MEM button.
Provides methods for clearing stored test data from the Solo memory, either through the device menu or after data download.
Explains the simple process of connecting Solo to a PC and downloading recorded test data using Race Studio 2 software.
Describes how Race Studio 2's analysis tools allow users to view and interpret data through graphs and GPS mapping for performance evaluation.
Introduces the synergy between SoloDL and SmartyCam, enabling video recording with overlayed data from ECU and GPS.
Details the physical connection using a CAN cable and configuring the data stream from ECU to SmartyCam via Race Studio 2.
Explains how to view SmartyCam status information, like recording status and SD card space, on the SoloDL display.
| GPS | Yes |
|---|---|
| Data Logging | Yes |
| Data Download | USB |
| Connectivity | USB |
| Power | Rechargeable lithium-ion battery |
| Operating Temperature | -10°C to 50°C |