Do you have a question about the Aiwa CSD-A120 and is the answer not in the manual?
Safety advice on placement near water, heat, and ventilation requirements for the unit.
Guidance on connecting to AC power and using batteries, including plug safety features.
Instructions for connecting the unit to AC power using the supplied cord.
Guidance on inserting and replacing batteries for portable operation.
Advice on cleaning the unit and handling the AC power cord.
Conditions under which the unit should be serviced by a qualified technician.
Steps for selecting radio, band, tuning stations, and adjusting volume.
Instructions for playing CDs, including track selection and playback controls.
How to program and play up to 16 tracks in a specific order.
Connecting headphones for private listening via the PHONES jack.
Instructions for inserting, playing, and stopping cassette tapes.
Steps for recording from CD or radio onto a cassette tape.
Technical details of the tuner, deck, CD player, and general unit features.
Procedures for cleaning the cabinet, tape heads, and CD lens.
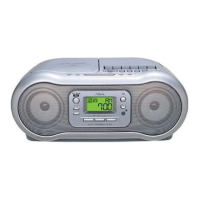
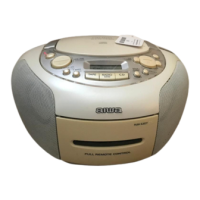
The AIWA CSD-A120 is a compact disc stereo radio cassette recorder designed for portable audio playback and recording. It offers multiple functions including a tuner for radio reception, a CD player for compact discs, and a cassette deck for tape playback and recording.
The device operates with a FUNCTION selector that allows users to switch between TAPE, RADIO, and CD modes. When in RADIO mode, the power is turned on, and the display shows "00" for CD mode. The unit features a VOLUME control for adjusting audio output and a PHONES jack for private listening with headphones.
To use the tuner, select RADIO with the FUNCTION control. Users can then select either AM or FM bands using the BAND selector and tune to a specific station with the TUNING control. For optimal FM reception, the rod antenna should be extended and oriented. For AM reception, the internal antenna requires positioning the unit itself for the best signal. After listening, selecting TAPE/STANDBY with FUNCTION turns the power off. The unit is designed to minimize noise from other electrical appliances, but if interference occurs, moving the unit away is recommended.
To play a CD, select CD with FUNCTION. The display will show "00" when the power is on. The disc compartment lid, marked CD OPEN, can be pulled up to place a disc with the printed side facing up. After placing the disc, the compartment should be closed. The total number of tracks on the disc will be displayed. Playback is initiated by pressing the PLAY/PAUSE button, which also pauses playback when pressed again. The track number currently playing is displayed. The VOLUME control adjusts the audio level.
Other CD playback controls include:
The CD player supports programming up to 16 tracks. In stop mode, pressing PROG initiates the programming sequence, with "Pr" and a program indicator flashing. Users select tracks using the or buttons and store them by pressing PROG. This process is repeated for all desired tracks, and pressing PROG again finalizes the program. Playback of the programmed sequence starts by pressing PLAY/PAUSE. The program indicator remains lit during programmed play. To check the program, press PROG twice in stop mode. To clear the program, press once in stop mode until the program indicator turns off. Programs can be modified by clearing and re-programming, or new tracks can be added to the end of an existing program.
The cassette deck supports Type I (normal) tapes only. To insert a tape, pull the cassette holder, place the tape with the exposed side up and the side to be played facing out, then close the holder. To play a tape, press PLAY while the power is off; this will turn on the power and start playback. The VOLUME control adjusts the sound.
Tape controls include:
Recording is limited to one side of the tape. To record, insert a tape with the side to be recorded facing out. Prepare the source by selecting CD and loading a disc, or by selecting RADIO and tuning to a station. Pressing REC starts recording, simultaneously engaging PLAY. When recording from a CD, pressing PLAY/PAUSE on the CD panel starts playback. To record only selected CD tracks, first program the tracks as described above, then press REC and start CD play. To stop recording, press STOP on the cassette deck. To stop CD playback during recording, press STOP on the CD operation panel. To erase a recording, press REC while the power is off. After recording, select TAPE/STANDBY with FUNCTION to turn off the power. If a high-pitched sound is heard during AM recording, the OSC control can be adjusted to another position.
To prevent accidental erasure of a tape, break off the plastic tabs on the cassette. To record on the tape again, cover the tab openings with adhesive tape.
The CSD-A120 can be powered by AC house current or batteries. For AC operation, connect the supplied AC cord to the AC inlet on the unit and then to an AC outlet (AC 120 V, 60 Hz). Only the supplied AC cord should be used. For battery operation, open the lid of the battery compartment on the rear and insert eight R20 (size D) batteries, ensuring correct polarity. To switch from AC to battery power, disconnect the AC cord from the unit. Batteries should be replaced when the tape speed slows, volume decreases, or sound becomes distorted.
The device includes important safety warnings. To reduce the risk of fire or electric shock, the unit should not be exposed to rain or moisture. The casing should not be removed, and servicing should only be performed by qualified personnel. The unit should be placed on a flat, even surface with adequate ventilation (10 cm clearance from rear/top, 5 cm from sides). It should not be placed near heat sources or in extreme temperatures. Care should be taken to prevent objects or liquids from entering the unit. Condensation may occur if the unit is moved from a cold to warm environment, or in humid conditions; if this happens, allow the unit to sit for a few hours before operating.
For AC power, use the specified voltage and frequency. Some units have polarized plugs; if difficult to insert, flip the plug. Do not force it. When disconnecting the AC cord, pull the plug, not the cord itself, and do not handle with wet hands. Ensure power cords are secured to prevent damage. Avoid overloading AC outlets. If using an extension cord, ensure it accommodates a polarized plug. Unplug the AC cord and remove batteries if the unit will not be unused for several months.
Battery precautions include not mixing different types or old/new batteries, removing batteries during long periods of disuse, and not recharging, heating, or disassembling batteries. Leaking battery fluid should be wiped thoroughly.
The device is designed to comply with FCC rules for Class B digital devices, providing reasonable protection against harmful interference in residential installations. If interference occurs, users are advised to reorient the receiving antenna, increase separation from other equipment, connect to a different circuit, or consult a technician. Any modifications not expressly approved by the manufacturer may void the user's authority to operate the product.
| Radio | Yes |
|---|---|
| Cassette Player | Yes |
| Channels | 2 |
| Output Power | 2.5 W per channel |
| Frequency Response | 20Hz - 20kHz |
| CD Player | Yes |
| Type | CD Player |
| Power Source | AC |