6
Features
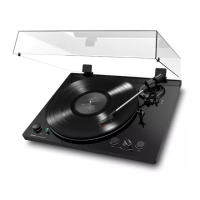
Top Panel
1. Platter: Place the slipmat here, and
then place your record on the slipmat.
2. Tonearm: The fixed tonearm can be
raised and lowered by hand, or by
using the raise / lower lever.
3. Arm Clip: This specially designed arm
clip secures the tonearm when not in
use.
4. Raise / Lower Lever: Use this to raise
and lower the tonearm on the record.
5. Counterweight: This is pre-balanced
to provide proper tracking for the
stylus.
6. 7”/12” Switch / Auto-Start/Stop:
Adjust the 7”/12” switch to select
whether you are using either a 7” or
12” record. Press Start to have the
tonearm automatically lift, swivel over
the record, and drop the needle at a
specific spot based on the 7"/12"
setting. When a record reaches the end or if Stop is pressed during playback, the tonearm will automatically
lift and return to the resting position.
7. 33/45 RPM Selector: Adjust this to select the RPM of the turntable platter based on the type of record you
are using.
8. Volume: Adjust this to control the headphone and Bluetooth output level.
9. Headphone Output: Connect headphones (sold separately) to listen to your vinyl playback.
10. Bluetooth Button: Press this button to start Bluetooth pairing. If after 5 minutes no Bluetooth speaker can be
found to pair with, the Bluetooth transmitter will become inactive and the LED will turn off. If currently
connected, press this to disconnect from a currently connected Bluetooth speaker.
Rear Panel
1. RCA Output: The audio from a playing record is sent
to the RCA audio output.
2. Preamp On/Off: If your receiver or amplifier has no
phono inputs, switch on the preamp (on). If the
system you are using has phono inputs, set this
switch off.
3. USB Audio Output: Use the included USB cable to
connect your turntable to your computer. The USB
connection will send audio from the turntable to your
computer. Please see the Operation > Computer
Setup section of this manual for information.
4. Power Input: Use the included power adapter to
connect to wall power.
5. Power Button: Press this button to turn BT100 on/off.

 Loading...