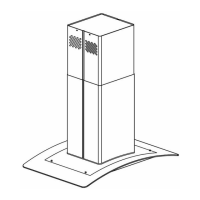
This document is an installation and use & care guide for a 30"/36" island-mount range hood. It provides comprehensive instructions for installation, operation, maintenance, and troubleshooting, along with important safety information and warranty details.
Function Description
The range hood is designed to remove smoke, vapors, and odors from the kitchen during cooking. For optimal performance, it is recommended to start the hood before cooking and allow it to run for several minutes after cooking is complete to fully clear the air. The hood can be configured for either vented (ducted to the outdoors) or non-vented (recirculating with carbon filters) installations.
Important Technical Specifications
- Model Numbers: HD-RH0257, HD-RH0258
- Ventilation Type: Can be configured for vented (ducted) or non-vented (recirculating) installations.
- Ducting Requirements (Vented):
- A 6" (15.2 cm) round vent system is needed.
- The hood exhaust opening is 6" (15.2 cm) round.
- Maximum equivalent vent length is 35 ft (10.7 m).
- Use no more than three 90° elbows.
- Maintain a minimum of 24" (61 cm) of straight duct between elbows if more than one elbow is used.
- Do not install two elbows together.
- Use clamps to seal all joints.
- The vent system must have a damper.
- Use caulking to seal exterior walls or roof openings.
- The size of the vents should be uniform.
- If exhaust ducting with a diameter less than 5.91" (150 mm) or flat ducting is used, noise level will increase, and extraction efficiency will decrease.
- Installation Clearances:
- Minimum height from electric cooking surfaces: 24" (61.0 cm).
- Minimum height from gas cooking surfaces: 27" (68.6 cm).
- Suggested maximum height above cooking surface: 36" (91.4 cm).
- Minimum height from cooking surface to bottom of filter surface: 29" (73.66 cm).
- Suggested maximum height from cooking surface to bottom of filter surface: 31” (78.74 cm).
- Electrical Requirements:
- 120 volt, 60 Hz, AC only, 15-amp, fused electrical circuit.
- Wiring must conform to National Electrical Codes (ANSI/NFPA 70) or CSA Standards (C22.1-94, C22.2 No. 0-M91) and local codes.
- If aluminum wiring is present, connect a solid copper wire section to pigtail leads using special UL-listed connectors.
- Mounting: Requires a ceiling support structure capable of holding 80 lbs (36.6 kg).
- Parts Supplied: Body (1 Pc), Support frame (1 Pc), Installation manual (1 Set), Chimney cover (1 Set), Mounting bracket (1 Pc), Metal grease filter (4 Pcs), Air outlet (1 Set), Exhaust pipe (1 Pc), Hardware (1 Set).
- Hardware: Wall Anchors (4 PCS), M4*9 screws (35PCS), Nuts (35PCS).
Usage Features
- Control Panel: Features include:
- Increase Speed (+): Increases blower speed.
- Decrease Speed (-): Decreases blower speed.
- Speed Indicator: Displays current blower speed.
- Light Button (①): Turns lights on/off.
- LED Display: Shows current settings, including time.
- Timer: Allows setting a timer.
- ON/OFF: Turns the range hood on/off.
- Operating Lights: The On/Off light button controls both lights. Press once for on and again for off.
- Operating Blower: Blower speed buttons turn the blower on and control its speed and sound level. Speed can be adjusted during operation. The blower off button turns the blower off.
- Adjusting Clock: Hold the clock button for two seconds, use "+" or "-" to adjust the hour, then press the clock button again to adjust minutes. Some models may use military time, which is not adjustable.
- Non-Vented (Recirculating) Installation: For non-vented setups, carbon filters are attached to both sides of the blower. Fumes and vapors are recycled through the top grille. It is crucial NOT to block the chimney holes in this configuration.
Maintenance Features
- Exterior Surfaces:
- Clean frequently with liquid detergent soap and water or an all-purpose cleanser.
- Wipe with a damp soft cloth or non-abrasive sponge, rinse with clean water, and wipe dry.
- Avoid steel wool or soap-filled scouring pads to prevent damage.
- Always wipe dry to prevent water marks.
- Metal Grease Filters:
- Remove by pulling the spring release handle and pulling down the filter.
- Wash as needed in a dishwasher or hot detergent solution.
- Reinstall by ensuring spring release handles face the front, inserting the filter into the upper track, pushing the handle, and pushing up on the filter to latch it into place.
- Non-Vented (Recirculating) Installation Filters (Carbon Filters):
- Carbon filters are not washable.
- They should last up to 6 months with normal use. Replacements can be purchased from www.akdyusa.com.
- LED/Halogen Light Replacement:
- Turn off the range hood and allow the light to cool before replacement.
- To avoid damage or decreasing bulb life, do not touch the bulb with bare fingers; use tissue or cotton gloves.
- If a new light does not operate, ensure lamps are inserted correctly. Replacements can be purchased from www.akdyusa.com.
The manual emphasizes several safety warnings:
- General Safety: Use the unit only as intended, disconnect power before servicing/cleaning, ensure installation and wiring are done by qualified professionals, do not operate with damaged cords/plugs, ensure sufficient air for proper combustion (especially with gas appliances), be aware of utilities when cutting/drilling, duct fans outdoors (do not vent into attics, crawl spaces, garages, walls/ceilings), and use for general ventilation only (not for hazardous/explosive materials).
- Range Top Grease Fire Prevention: Never leave surface units unattended at high settings, heat oils slowly, always turn hood ON when cooking at high heat or flambéing, clean ventilation fans frequently, and use proper pan sizes.
- In Case of Grease Fire: SMOTHER FLAMES with a lid, cookie sheet, or metal tray, then turn off the burner. Be careful to prevent burns. If flames persist, EVACUATE AND CALL THE FIRE DEPARTMENT. NEVER PICK UP A FLAMING PAN. DO NOT USE WATER (violent steam explosion will result). Use an extinguisher ONLY if you know how to operate a class ABC extinguisher, the fire is small and contained, the fire department is being called, and you can fight the fire with your back to an exit.
- Electrical Shock/Fire Hazard: Do not use with any solid-state speed control device.
- Excessive Weight Hazard: Use two or more people to move and install the range hood to prevent injury.
AKDY provides a three-year limited warranty from the date of purchase for factory-specified parts, applicable only in the United States or Canada when the appliance is used in the country of purchase. Proof of original purchase is required. The warranty excludes service calls for installation correction, instruction, house fuse/wiring/plumbing issues, light bulbs, air/water filters, repairs for non-normal household use, damage from accidents/misuse/improper installation, cosmetic damage (unless reported within 30 days), food loss due to refrigerator/freezer failures, costs associated with removal for repairs, unauthorized modifications, removal/reinstallation from inaccessible locations, and appliances with altered/removed model/serial numbers. The customer's sole remedy is product repair. Implied warranties are limited to one year or the shortest period allowed by law. AKDY is not liable for incidental or consequential damages.