EasyManua.ls Logo

AL-KO AKS 3004 - User Manual

AL-KO AKS 3004
23 pages
Print Icon
To Next Page IconTo Next Page
Loading...
AKS 3004
STABILISER
HANDBOOK FOR THE AKS 3004
STABILISER

Other manuals for AL-KO AKS 3004

Questions and Answers

Summary

Regulations for AKS 3004 Stabiliser

Towball Compatibility and Standards

Specifies use with 50mm dia. towballs conforming to EC Directive 94/20.

Vehicle and Trailer Weight Limits

Suitable for caravans/trailers with min weight 200kg and max 3000kg.

EC Design Approval

States EC design approval for AKS 3004 coupling under permit No. e1*94/20*0930*00.

Restrictions of Use for AKS 3004

Clearance Requirements for Stabiliser

Details necessary clearances around the towball and stabiliser lever for safe operation.

Overrun Device Compatibility

Lists limitations for specific overrun devices like those with 25° rotation or gas strut handbrakes.

Swan Neck Towbar Compatibility

Confirms compatibility of Swan Neck towbars if they meet EC Directive 94/20 and clearance specs.

Safety Warnings for AKS 3004

Prohibited Towball Couplings (A50-1)

Warns against using A50-1 type towball couplings, which invalidates warranty.

UK Towball Recommendation

Recommends the extended neck towball (A50-X) for optimal use in the UK.

Bolted-in Coupling Requirements

States bolted-in couplings are permitted only if the thread is securely locked or welded.

Reversing Lever Restriction

Prohibits use with a laterally attached reversing lever on the left side when facing traffic.

Towball Surface Preparation

Emphasizes cleaning towballs to maintain stabilising effect and prevent premature wear.

Contaminated Friction Pad Replacement

Advises replacing friction pads immediately if they become contaminated with grease.

Safe Operation by One Person

Recommends operating the AKS 3004 by one person to reduce injury risks during handle use.

Fitment Instructions for AKS 3004

Pre-Fitment Checks

Instructs to ensure the handbrake is engaged before starting the installation process.

Removing Existing Bolts

Details steps for removing existing nuts and the front bolt from the coupling head.

Using Dowel to Remove Rear Bolt

Explains how to use the provided dowel to push out the rear bolt from the coupling head.

Removing the Rear Bolt

Describes removing the rear bolt after the dowel has been inserted into the coupling head.

Detaching Coupling Head

Instructions to slide the coupling head off the overrun mechanism.

Incorrect Placement Warning

Explicitly warns against placing the AKS 3004 Stabiliser incorrectly over the overrun.

Mounting the Stabiliser

Guides on sliding the AKS 3004 Stabiliser onto the overrun mechanism.

Aligning Mounting Holes

Instructs to align the stabiliser's mounting holes with those of the overrun.

Inserting New Front Bolt

Details inserting the new front bolt with a washer into the designated hole.

Inserting New Rear Bolt

Explains inserting the rear bolt and removing the dowel from the other side.

Attaching Nuts

Step to screw the supplied nuts onto both newly inserted bolts.

Torquing Bolts

Specifies tightening both bolts to 86Nm using a torque wrench for secure fitment.

Fitment Notes - Additional Details

Bolt Insertion Direction

Advises inserting bolts from the right side for correct clearances with AL-KO Security Device.

Fitment for Non-AL-KO Overruns

Provides specific instructions for fitting to non-AL-KO overruns with different bolt configurations.

Coachbolt Fitment

Details fitting a Mushroom Headed Coachbolt and torque specifications for non-AL-KO overruns.

Damper Securing Mechanism

Explains how the damper is secured by the rear retaining bolt and telescopes independently.

Draw Shaft Diameter and Spacers

Notes the AKS 3004 is designed for 50mm shafts and requires spacers for smaller diameters.

Shaft Diameter Spacer Requirements

Lists specific spacer requirements for 35mm and 46mm draw shaft diameters.

Fitment Notes - Further Information

Gaiter Replacement for Shaft Diameter

Explains gaiter replacement may be necessary based on different draw shaft diameters.

Shaft Diameter Gaiter Amendments

Details gaiter amendments required for 35mm and 50mm draw shaft diameters.

Post-Fitment Safety Checks

Lists crucial safety checks for damper connection and proper usage of self-locking nuts.

Spare Parts Importance

Highlights the safety-critical nature of spare parts and recommends using original AL-KO parts.

Authorized Repair Services

Recommends repairs by trained personnel and provides information on AL-KO Approved Service Centres.

Quoting ETI Number for Spares

Advises quoting the ETI number printed on the product when enquiring about spare parts.

Operating Instructions - Coupling and Stabiliser

AKS 3004 Component Identification

Identifies key components of the AKS 3004, including the coupling handle and stabiliser lever.

Preparation for Coupling

Instructs to ensure the stabiliser lever is in the uppermost (open) position before coupling.

Coupling Procedure

Details the steps for coupling the AKS 3004 onto the towball, including handle operation.

Coupling Engagement Confirmation

Explains how to confirm correct coupling engagement using the visible green edge of the safety indicator.

Stabiliser Operation

Describes how to operate the stabiliser by pressing the stabiliser lever down.

Coupling Alignment Check

Instructs to check arrowhead alignment with a marked line for correct coupling.

Uncoupling Procedure

Details the steps for uncoupling the AKS 3004 from the towball, including lever and handle operation.

Friction Pad Function

Explains the function of friction pads in generating stabilising/damping force and their service life.

Operating Instructions - Manoeuvring and Safety

Manoeuvring with Stabiliser

Advises pulling the stabiliser lever up for easier manoeuvring on campsites.

Prohibited Manoeuvring Use

Warns against using the stabiliser lever as a manoeuvring handle to avoid damage.

Single-Person Operation

Reinforces that opening or closing the AKS must be performed by one person only.

Correct Lever Operation

Stresses operating the stabiliser lever only by hand force, not foot or extension bar.

Finger Safety During Operation

Warns to keep hands clear of the coupling handle to prevent finger trapping during operation.

Operating Instructions - Noise Troubleshooting

Causes of Driving Noises

Lists potential causes for clicking, creaking, or squeaking noises during driving.

Noise Cause: Foreign Bodies

Identifies foreign bodies or dirt between friction pads and towball as a noise source.

Noise Cause: Dry Drawshaft

Points to dry operation of the drawshaft inside the overrun device as a cause of noise.

Noise Cause: Towball Play

Mentions excessive play in detachable towball locking mechanisms as a potential noise source.

Remedial Action: Cleaning

Recommends cleaning towball and friction pads before each journey with emery paper or fluid.

Remedial Action: Lubrication

Suggests lubricating the drawshaft sleeve via the grease nipples to address noise issues.

Remedial Action: Towball Check

Advises checking the towball for damage and the locking mechanism's function for noise issues.

Servicing and Cleaning - Side Friction Pads

Checking Side Friction Pad Efficiency

Guides on checking the efficiency of side friction pads by observing their contact with the towball.

Testing Friction Pad Contact

Instructs to push the stabiliser lever to feel resistance indicating friction pad contact.

Friction Pad Wear Indicator (New)

Explains the arrowhead indicates new friction pads when aligned with green lines.

Friction Pad Wear Indicator (Worn)

Details worn friction pads indicated by the arrowhead aligning with red lines, requiring replacement.

Friction Pad Wear Indicator (Correct)

Describes correct alignment of the arrowhead with the black line for an applied stabiliser.

Friction Pad Maintenance

States friction pads need no lubrication but require cleaning with emery paper before each journey.

Servicing and Cleaning - Side Friction Pad Replacement

Side Friction Pad Replacement: Preparation

Instructions to uncouple the AKS 3004 stabiliser before replacing side friction pads.

Removing Protective Caps

Details removing protective caps using a small screwdriver during pad replacement.

Removing Worn Side Pads

Explains how to press and remove worn-out side friction pads using a punch and hammer.

Inserting New Side Pads

Guides on inserting new friction pads, including re-inserting shim washers if present.

Servicing and Cleaning - Front;Rear Friction Pads

Checking Front;Rear Friction Pad Efficiency

Steps to check the efficiency of front and rear friction pads using wear indicators.

Wear Indicator: Green (Good)

The green indicator signifies good condition of pads and towball within permissible limits.

Wear Indicator: Red (Potential Issue)

The red indicator suggests issues like low towball limit or worn pads requiring attention.

Wear Cause: Low Towball Limit

Identifies the towball reaching its lowest limit (49.61mm) as a cause for the red indicator.

Wear Cause: Stabiliser Wear

Mentions wear on the AKS 3004 stabiliser itself as a cause for the red indicator.

Wear Cause: Worn Friction Pads

Indicates worn front/rear friction pads with a new towball cause the red indicator.

Front;Rear Friction Pad Replacement: Preparation

Steps to uncouple the AKS 3004 before replacing front/rear friction pads.

Removing Soft Dock

Instructions to remove the soft dock from the stabiliser during pad replacement.

Releasing Safety Indicator

Details pressing the safety indicator and securing it with a hex spanner for pad access.

Removing Cheese-Head Screw

Explains removing the cheese-head screw using a special torx tool during pad replacement.

Removing Friction Lining

Guides on pressing and removing the friction lining recess to access pads.

Opening Coupling Handle

Step to open the coupling handle during front/rear pad replacement.

Removing Head Cap Screw

Details removing the countersunk head cap screw with a special torx tool.

Removing Front;Rear Pads

Explains pressing and removing the front/rear friction pads from their housing.

Installing New Front;Rear Pads

Guides on fitting new pads and tightening screws to 5Nm during replacement.

Replacing Soft Dock

Instructions for replacing the rubber soft dock after friction pad replacement.

Servicing and Cleaning - Maintenance and Lubrication

Towball Cleaning Advice

Emphasizes regular cleaning of the towball with thinners or brake cleaner for optimal pad performance.

Contaminated Friction Pad Replacement

Advises replacing contaminated friction pads instead of attempting to clean them.

Towball Surface Condition

Stresses the importance of a towball surface free from grooves, rust, or seizing marks.

Coated Towball Preparation

Mandates complete removal of paint or coating from towballs using 100/120 grit emery paper.

Winter Care: Visual Indicator

Recommends spraying only the visual indicator with de-icer during winter conditions.

Lubrication Procedure

Outlines the procedure and precautions for lubricating stabiliser parts when necessary.

Lubrication: Cleaning Parts

Advises thorough cleaning of all parts before applying any lubrication.

Lubrication: Grease Application

Specifies applying only a thin film of grease to designated areas, avoiding friction pads.

Lubrication: Grease Type

Recommends using multipurpose grease DIN 51825 KTA 3K for lubrication purposes.

FAQs - Stabiliser and Friction Pads

Indicator Button Replacement

Addresses replacement of red/green indicator buttons, noting the red part is not replaceable.

Red Indicator Button Non-Replaceable

Clarifies that the red indicator button cannot be replaced due to its design.

Stabiliser Arms Lifting During Travel

Explains the handbrake handle catching the stabiliser lever is a common cause for lifting.

Adjusting Handbrake Handle

Advises gently teasing the handle away from the contact point to fix the issue of lifting arms.

Friction Pad Lifespan and Replacement

Discusses friction pad lifespan (approx. 30,000 miles) and when they should be changed.

Glassy;Flaking Friction Pads

Explains glassy/flaking pads are due to contamination and suggests cleaning with emery paper.

FAQs - Noises and Towball Issues

Loud Creaking;Groaning Noises

Lists incorrect towball fitment and contamination as primary causes for creaking or groaning noises.

Towball Compatibility Check

Advises checking towball compatibility and replacing if necessary to prevent caravan detachment.

Contamination Causing Noises

Explains contamination on friction pads from grease or road spray can cause noises; cleaning is recommended.

Snapped Friction Pad

Describes snapping friction pads due to not disengaging them properly before lowering onto the towball.

Friction Pad Use Recommendation

States AL-KO does not recommend using friction pads without activating them for damping benefits.

Greased Towball Use

Strictly prohibits using a greased towball with an AKS stabiliser due to performance degradation.

FAQs - Clearances and Towballs

Minimum Clearance to Towing Vehicle

Specifies a minimum clearance of 68mm between the towball and the towing vehicle.

Importance of Clearance

Warns that insufficient clearance can hinder articulation and potentially damage the car or detach the stabiliser.

Compatible Towballs

Refers to page 4 for clearances and recommends AL-KO extended neck towballs for compatibility.

New Towball Paint Removal

Confirms that paint must be removed from new towballs to prevent contamination of the stabiliser friction pads.

Complementary Products - Accessories

AL-KO Security Device

Describes the AL-KO Security Device as a theft deterrent that locks the coupling handle.

Friction Pads Description

Details friction pads made from low-wear material for ensuring optimum friction damping.

Extended Neck Towball

Explains the Extended Neck Towball's design for correct stabiliser articulation and clearances.

Hitch Cover

Describes the hitch cover's purpose to protect the stabiliser from environmental elements.

Complementary Products - Safety Systems

AL-KO ATC Trailer Control

Introduces the ATC Trailer Control as an electronic braking device for caravan stability.

AL-KO Formula for Optimum Safety

Explains the AL-KO Formula for Optimum Safety combining technologies for the safest towing experience.

AKS Stabiliser Benefits

Highlights the AKS Stabiliser's suppression of trailer movements and increased critical driving speed.

ATC Emergency Safeguards

Details how ATC automatically safeguards against critical driving conditions for enhanced safety.

Overview

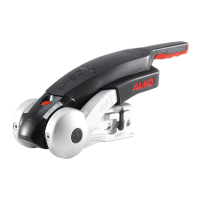
The AL-KO AKS 3004 Stabiliser is a device designed to enhance the safety and stability of towing caravans and trailers. It works by suppressing small swinging and pitching movements of the trailer, thereby increasing the critical driving speed by approximately 20%. This makes for a safer and more comfortable towing experience.

Function Description

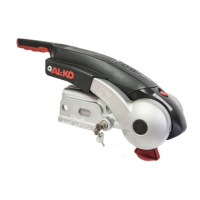
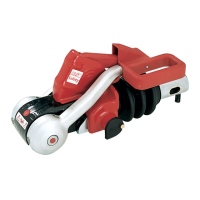
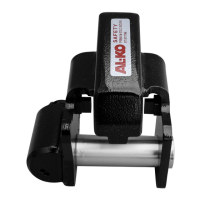
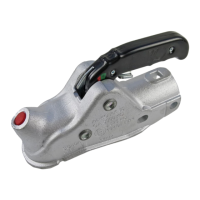
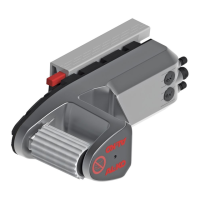
The AKS 3004 Stabiliser operates by applying friction to the towball, creating a damping force that counteracts trailer sway. It features a coupling handle for attaching to the towball and a stabiliser lever to activate the friction pads. When the stabiliser lever is pressed down, friction pads (side and front/rear) engage with the towball, generating the necessary stabilising and damping force. The device is designed to be used in conjunction with specific towballs and overrun devices that meet certain clearance requirements, ensuring proper articulation and preventing damage.

Usage Features

  • Coupling and Uncoupling: To couple, the stabiliser lever must be in the uppermost (open) position. The coupling handle is then pulled up, and the opened coupling is placed onto a clean towball. A visible green edge on the safety indicator button confirms correct engagement, accompanied by an audible click as the handle returns to its flat position. For uncoupling, the stabiliser lever is pulled up, the coupling handle opened, and the AKS 3004 lifted from the towball. Using the jockey wheel can assist with lifting, especially with larger nose loads.
  • Activating the Stabiliser: Once coupled, the stabiliser is activated by pressing the stabiliser lever down as far as it will go. An arrowhead on the lever aligning with a black line indicates correct coupling of the stabiliser unit.
  • Manoeuvring: For easier manoeuvring in situations like campsites, the stabiliser lever should be pulled to the 'up' position to disengage the friction pads. It's crucial not to use the stabiliser lever as a manoeuvring handle; instead, use the caravan's handles or an AL-KO manoeuvring handle fitted to the jockey wheel.
  • Safety Precautions: The AKS 3004 should only be operated by one person when opening or closing the handle to minimise injury risks. The stabiliser lever should be pressed down by hand force only; using a foot or an extension bar can damage components. When operating the stabiliser lever, care must be taken to avoid trapping fingers with the coupling handle.
  • Towball Compatibility: The stabiliser requires a clean, grease-free towball. Towballs with paint or other coatings must have these completely removed using emery paper (100 or 120 grain) to prevent contamination of friction pads and ensure effective stabilisation. Certain types of towballs, such as A50-1 couplings, are not compatible, and their use will invalidate the warranty. Bolted-in ball couplings are only permissible if the thread is locked or welded. The device is not suitable for use with overrun devices that revolve above 25° or specific BPW overruns. Swan Neck towbars are suitable if they comply with EC Directive 94/20 and have the required minimum 60mm clearance.
  • Noise During Driving: Clicking, creaking, or squeaking noises during driving usually indicate issues such as foreign bodies/dirt between the friction pad and towball, dry operation of the drawshaft, or excessive play in the locking mechanism of a detachable towball. Remedial actions include cleaning the towball and friction pads, lubricating the drawshaft sleeve, and checking the towball for damage or play.

Maintenance Features

  • Friction Pad Maintenance: The friction pads are subject to wear over time but have a long service life (approximately 30,000 miles) if well-maintained. They should be kept free of grease and dirt. Before each journey, the towball and friction pads should be cleaned by lightly rubbing their surfaces with fine emery paper (100-120 grit) or using brake cleaning fluid to remove build-up.
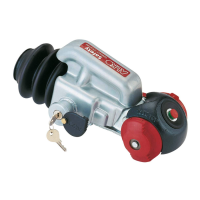
  • Checking Friction Pad Efficiency (Side Pads): The efficiency of the side friction pads can be checked by ensuring the stabiliser is correctly coupled and the red indicator button is raised. Pushing the stabiliser lever down until resistance is felt allows for checking the arrowhead's position on the stabiliser arm. If it aligns with two green lines, the pads are like new. If it aligns with two red lines, the pads are worn and require immediate replacement.
  • Checking Friction Pad Efficiency (Front/Rear Pads): For front/rear pads, couple the stabiliser without activating it. A green indicator on the handle signifies new condition or pads/towball within permissible limits. A red indicator suggests the towball has reached its lowest limit (49.61mm), the stabiliser pads show wear, or new towball (50mm) with high wear on front/rear pads. The towball diameter should be checked to assess pad wear, ensuring it's not less than 49.61mm.
  • Friction Pad Replacement (Side): Side friction pads should be replaced one at a time. This involves uncoupling the stabiliser, removing protective caps with a small screwdriver, pressing the worn pad inwards (using a punch and hammer), and inserting a new pad from below, ensuring any shim washers are re-inserted.
  • Friction Pad Replacement (Front/Rear): Front/rear friction pad replacement requires uncoupling the stabiliser, removing the soft dock, pressing the safety indicator outwards and securing it with a SW14 hex spanner, removing a cheese-head screw with a special torx tool, pressing the friction lining recess inwards, opening the coupling handle, removing a countersunk head cap screw with a special torx tool, pressing the worn pad inwards with a screwdriver, and finally fitting new pads in reverse order, tightening screws to 5Nm, and replacing the rubber soft dock.
  • Lubrication: If lubrication of stabiliser parts becomes necessary, all parts must be thoroughly cleaned first. Areas should only be covered with a thin film of multipurpose grease (DIN 51825 KTA 3K). It is critical to ensure no grease gets into the friction pad or towball holding area during lubrication.
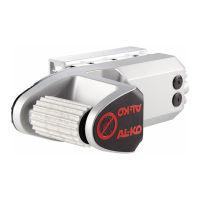
  • Winter Maintenance: In winter, only the visual indicator should be carefully sprayed with de-icer.
  • Self-locking Nuts: Self-locking nuts are single-use and must be replaced with new ones if removed.
  • Repairs: Repairs should only be carried out by trained and qualified workshop personnel. AL-KO provides a list of approved service centres online. When enquiring about spare parts, the ETI number printed on the product should always be quoted. AL-KO recommends using original AL-KO spare parts for safety and reliability.

The AKS 3004 Stabiliser is part of the AL-KO Formula for Optimum Safety, which, when combined with AL-KO ATC Trailer Control and responsible driving, aims to provide the safest possible driving conditions and unparalleled towing stability for caravan owners.

AL-KO AKS 3004 Specifications

General IconGeneral
Maximum Towing Capacity3000 kg
StabilizerYes
Maximum Gross Weight3000 kg
Maximum Nose Load150 kg
Wear IndicatorYes
SecurityLockable
MaterialSteel
ColorSilver
Coupling Head50 mm ball
Friction Pads4
TypeStabiliser coupling
Compatibilitytrailers
Weight4.2 kg

Related product manuals