Usage
Usage
The soldering
iron, the soldering tip and the soldering
iron holder
remain
hot for
some
time after disconnection
from the mains!
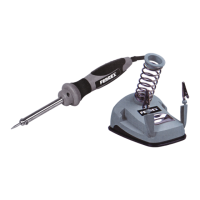
Place
the soldering
iron with appropriate tip
in
the
holder
!l
of
the soldering iron stand
El
.
Connect the
mains
plug
to a suitable
power
socket
and
place
the soldering
iron set on a suitable base
that does
not heat
up and
a
pad
that can handle
the dripping
tin. Allow the soldering iron to heat up
for
approx. 3
-
5 minutes.
a
a
Before soldering, the
soldering tip has to be tinned.
To
do this,
heat up a new or a
soldering tip that
has been cleaned using the cleaning sponge
Z
and coat it by
making contact
with the solder wire.
Before
starting
work on a
particular
workpiece
and/or
type of material, check
for
suitability by testing the
soldering iron on a similar
piece
of
(scrap)
material.
Clean the
parts
to be
joined
before soldering.
lf
possible,
mechanically connect the
parts
to be soldered
together, for e.g. by twisting
wires
together.
Use the two retaining clips
for
positioning
the
parts
correctly.
Heat the contact surface of the
parts
to be
soldered using the soldering
iron
and
guide
the
filled flux solder wire to the extreme end of
the soldering tip
E,El
and melt the
solder wire. The workpiece
is
coated
with the flux, which flows out of the solder
wire,
allowing the solderto
join
the metal.
lf the soldering
iron is used for longer
periods
we recommend that
you
clean the tip
occasionally
with the cleaning sponge and
re-tin
the
tip if necessary.
Use a de-soldering
braid
(not
supplied) to clean the
joint,
to de-solder and to remove
excess solder
from the
joint.
Cover the
excess solder with the de-soldering braid and
heat
up
the soldering tip.
The melting solder is soaked up by the de-soldering braid.
Disconnect the
power
cable from the
mains socket after soldering.
Allow the soldering iron to cool down
in the holder before cleaning and storing
it.
o
a
12