Alemite Corporation 11 Revision (10-04)
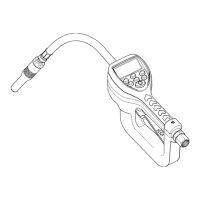
Electronic Preset Metered Control Valve SER 3640
Control Valve Assembly
Battery Door
1. Remove Screws (
43
) that secure Battery Door (
42
) to
Bottom Case (
41
).
• Separate the Battery Door (with batteries) from the
Bottom Case.
Valve Case
2. Remove Screws (
43
) that secure Case Cover (
44
) and
Partition (
45
) to the Bottom Case.
• Remove the Case Cover and the Partition from the
Bottom Case.
3. Remove four Screws (
46
) that secure Bottom Case (
41
)
to Housing (
37
).
4. Push the Battery terminals from the Bottom Case.
• Separate the Bottom Case from the Housing.
5. Remove four Screws (
18
) that secure the Housing to Top
Case (
16
).
6. Remove one additional Screw (
17
) that secures the Top
Case to the Housing.
• Separate the Top Case from the Housing.
7. Remove Keypad (
19
) from the Top Case.
Solenoid
8. Carefully pull the terminal connector from
Solenoid (
48
).
9. Unscrew the Solenoid from the Housing.
10. Remove Detent Ball (
47
).
Circuit Board and Metering Gears
11. Remove three Screws (
22
) that secure Circuit Board
(
21
) to Housing Cover (
33
).
• Remove the Circuit Board from the Housing.
NOTE
: The lower right-hand screw contains
external tooth washer (
23
).
12. Remove Screws (
32
) that secure the Housing Cover to
the Housing.
• Remove the Housing Cover from the Housing.
13. Remove Gears (
35
and
36
) and O-Ring (
34
) from the
Housing.
Valve Mechanism
14. Remove Stop Pin (
20
) from Nut (
24
).
15. Unscrew the Nut from the Housing.
• Remove O-Ring (
26
) and Seal (
25
) from the Nut.
16. Remove Spring (
27
), Valve (
30
) [with
O-Ring (
28
), Back-Up Ring (
29
), and Seal (
31
)] from
the Housing.
Lever Mechanism
IMPORTANT: Use care not to lose Spring
(
40
) during the removal of Lever (
39
).
17. Remove Roll Pin (
38
) that secures Lever (
39
) to the
Housing as required.
• Remove the Lever and Spring (
40
) from the Housing.
Swivel
18. Unscrew Swivel (
13
) from the Valve’s Housing.
19. Remove O-Ring (
12
), O-Ring (
15
), and Screen (
14
)
from the Swivel.
Clean and Inspect
1. Clean all metal parts in cleaning solvent. The solvent
should be environmentally safe.
2. Inspect all parts for wear and/or damage.
• Replace as necessary.
3. Closely inspect the mating surfaces of all components
for any imperfections. Ensure a smooth and clean
contact is obtained when assembled.
4. Closely inspect the mating surfaces of Cover (
33
) and
Housing (
37
) for any imperfections. Ensure a smooth
and clean contact is obtained when assembled.
 Loading...