4
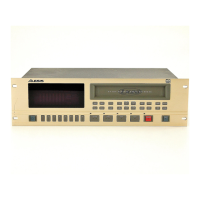
Features
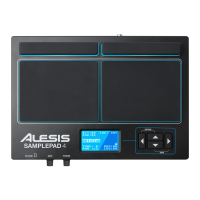
Top Panel
1. Pad: Strike these single-zone pads with a drumstick.
A LED around the pad will illuminate when that pad is
struck.
2. LCD: Displays the current parameters and other
operations.
3. Cursor Left: Press this button to decrease the value
of a parameter.
4. Cursor Up/Down: Press these buttons to move up
and down through the available parameters or menu
options.
5. Cursor Right: Press this button to increase the value
of a parameter or enter a submenu.
6. SD Card Slot: Insert a standard SD card (not
included) containing .WAV samples into this slot.
7. Main Volume: Adjusts the overall volume level for the
Main Out.
8. Phones Volume: Adjusts the overall volume
level for the Phones Out.
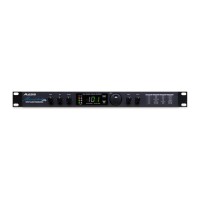
Rear Panel
1. Phones Out: Connect a pair of 1/4" headphones to this output.
2. Power Switch: Press this button to turn SamplePad 4 on. Hold this button for two seconds and release to
turn SamplePad 4 off.
3. DC Input: Connect the included power adapter here, then connect the adapter to wall power.
4. Trig In: Connect a dual-zone or single-zone drum pad, cymbal pad, or trigger to this input using a 1/4" TRS
cable for dual-zone or a 1/4" TS cable for single-zone. You can use this input to trigger samples assigned to
the EXT 1A and EXT 1B trigger location of each kit on SamplePad 4.
5. Main Out: Use standard 1/4" cables to connect this output to a speaker or amplifier system. (For mono
sound, connect a cable only to the Left output.)
6. USB/MIDI Port: Connect SamplePad 4 to a computer to send and receive MIDI data or load samples to the
SD card.
LCD Screen
1. Kit: Displays the name of the kit that is currently being
edited.
2. Sample Location: Displays the location of the sample
assigned to the velocity layer being edited.
3. Sample Name: Displays the sample that is currently
assigned to the velocity layer of the trigger location being
edited.
4. Trigger Location: Displays the trigger location that is
currently being edited.
5. Velocity Layer: Displays the velocity layer of the trigger
location that is currently being edited.
6. Other Parameters: Displays the tuning, sensitivity,
panning, reverb, level, MIDI Note, mode, and mute group
parameters of the velocity layer that is currently being
edited.
WARNING: Put on your headphones or turn on your
speakers only AFTER turning on SamplePad 4.
1