EasyManua.ls Logo

Allen-Bradley 1769-L18ERM-BB1B - User Manual

Allen-Bradley 1769-L18ERM-BB1B
327 pages
To Next Page IconTo Next Page
Loading...
CompactLogix 5370 Controllers
Catalog Numbers 1769-L16ER-BB1B, 1769-L18ER-BB1B, 1769-L18ERM-BB1B, 1769-L19ER-BB1B, 1769-L24ER-QB1B, 1769-L24ER-
QBFC1B, 1769-L27ERM-QBFC1B, 1769-L30ER, 1769-L30ER-NSE, 1769-L30ERM, 1769-L33ER, 1769-L33ERM, 1769-L36ERM
User Manual
Для уменьшения размера файла удалены фотографии обложки и пустые страницы между разделами

Table of Contents

Other manuals for Allen-Bradley 1769-L18ERM-BB1B

Question and Answer IconNeed help?

Do you have a question about the Allen-Bradley 1769-L18ERM-BB1B and is the answer not in the manual?

Allen-Bradley 1769-L18ERM-BB1B Specifications

General IconGeneral
SeriesCompactLogix 5370
Controller TypeCompactLogix 5370 L1
Power Supply24V DC
Programming SoftwareStudio 5000 Logix Designer
Ethernet Ports1
Ethernet Port Speed10/100 Mbps
Product TypeCompactLogix
Communication PortsEthernet
Operating Temperature0 to 60 °C (32 to 140 °F)
CertificationsCE

Summary

Install the CompactLogix 5370 L1 Controller

Install the CompactLogix 5370 L2 Controller

Installation Summary

Step-by-step guide for controller installation.

Install the CompactLogix 5370 L3 Controller

Install the System

Mounting the controller and system components on a DIN rail.

Connect the Controller to an EtherNet;IP Network

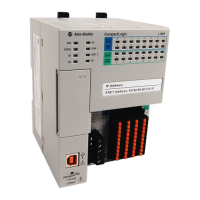
Connecting the controller to the EtherNet/IP network.

Complete Software Tasks Required at CompactLogix 5370 Controller Installation

Set the IP Address of a Controller

Procedures for assigning an IP address to the controller.

Change the IP Address of a Controller

Methods for modifying an existing controller IP address.

Load the Controller Firmware

Steps to download and install controller firmware.

Communicate over Networks

EtherNet;IP Network Communication

Details on communication protocols and capabilities over EtherNet/IP.

DeviceNet Network Communication

Details on communication protocols and capabilities over DeviceNet.

Use I;O Modules with CompactLogix 5370 L1 Controllers

Use I;O Modules with CompactLogix 5370 L2 Controllers

Use I;O Modules with CompactLogix 5370 L3 Controllers

Select I;O Modules

Options for selecting local and distributed I/O modules.

Configure I;O

Adding and configuring I/O modules in the project.

Develop Applications

Develop Integrated Motion over an EtherNet;IP Network Application

Motion Axes Support

Overview of supported virtual and drive-based motion axes.

Time Synchronization

Enabling and configuring CIP Sync for accurate time synchronization.

Configure Integrated Motion on the EtherNet;IP Network

Steps to enable and configure integrated motion.

Use a Secure Digital Card

Store or Load a Project with the Secure Digital Card

Procedures for saving and retrieving projects from an SD card.

Troubleshoot the Module

Use Logix Designer Application for Troubleshooting

Using the Logix Designer to identify and resolve module issues.

Connect Power to the Series A L1 CompactLogix 5370 Controllers

CompactLogix 5370 L1, Series A, Controller Power Connection

Connecting external power to the controller's VDC terminals.

CompactLogix 5370 L1, Series A, Controller Field Power to I;O Devices Connection

Connecting external power to FP terminals for I/O devices.

Related product manuals