15
Series AE1L, AE.E, AE.N, AE.H, AE.V, AED1E, AED2N
Design ID, ZD
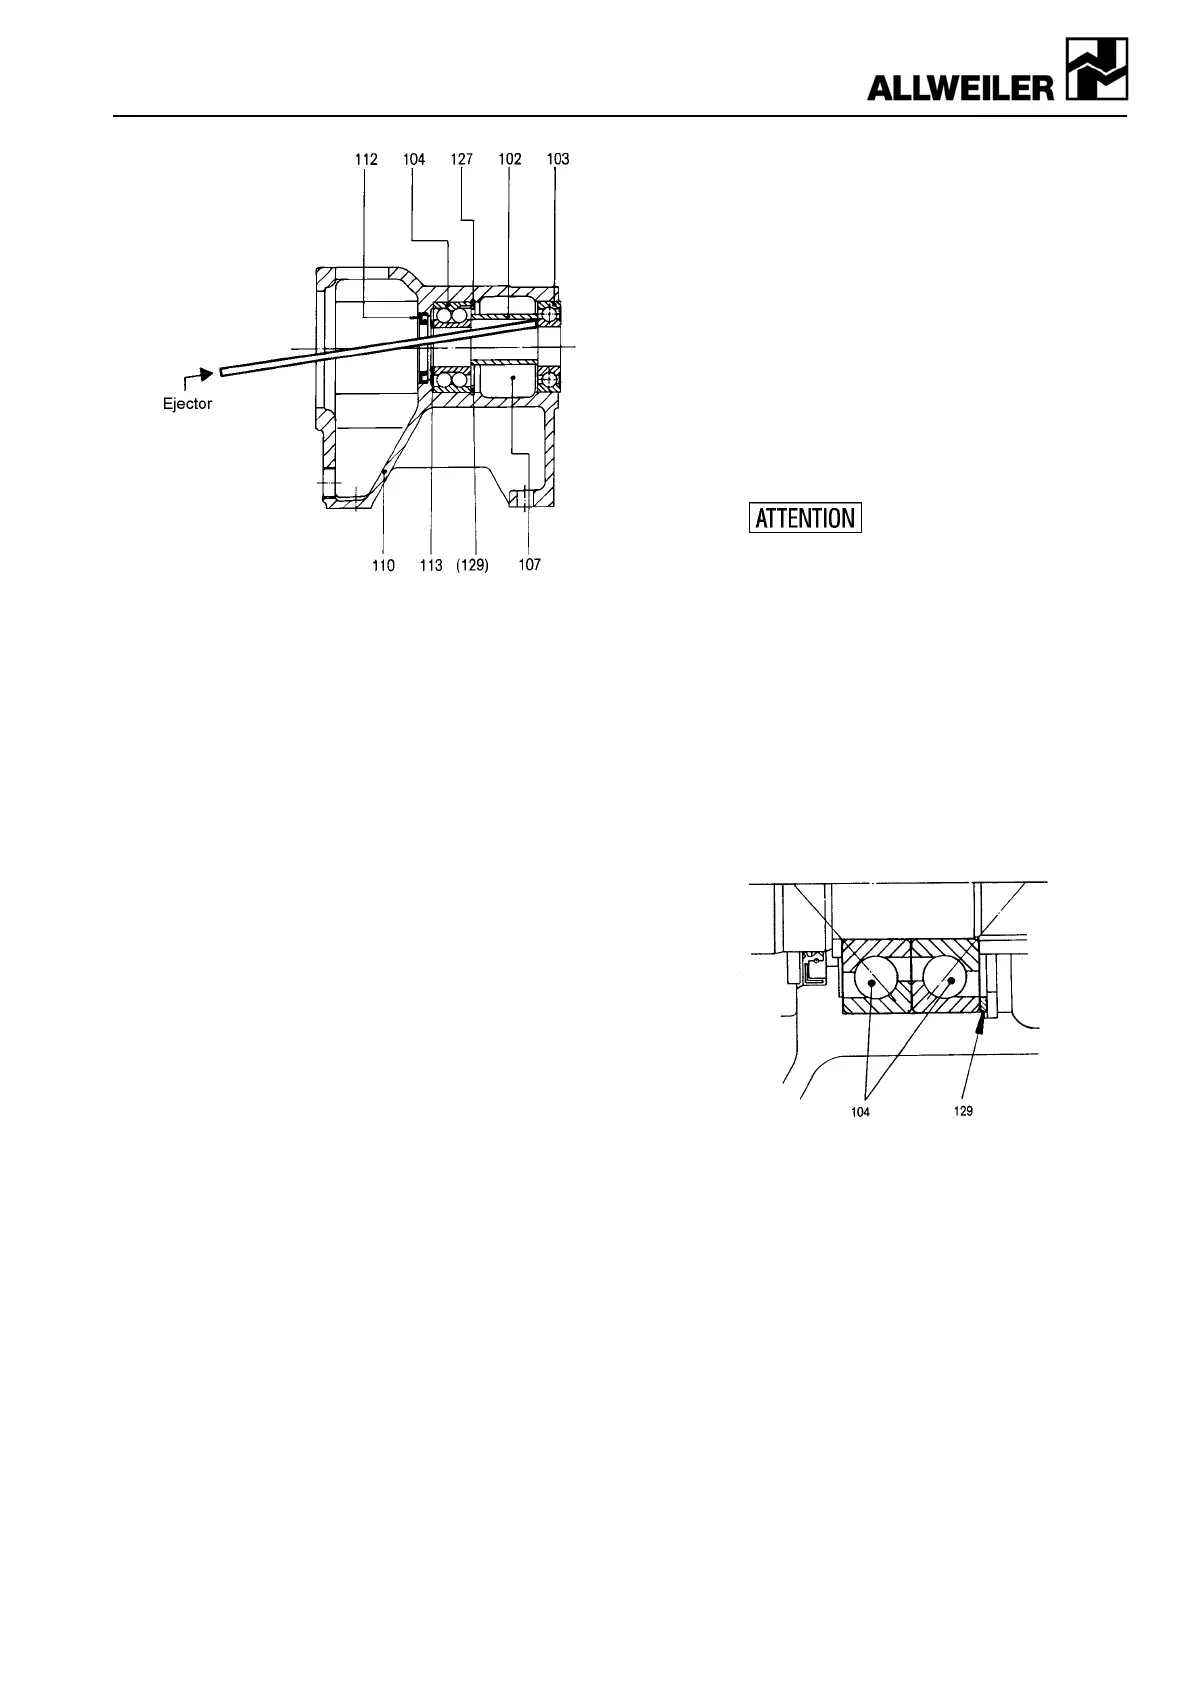
Figure 6: Dismounting the bearings
! Remove spacer sleeve (102) and bearing grease
(107).
! Remove the circlip (127) from the bearing bracket
(110).
! Remove the shim rings (129).
Note: Only valid for sizes
AE1L 2701 / 5001
AE1E 1450 / 2700 / 5000 / 9500
AED1E 2300 / 4250 / 7800 / 15500
AE2E 1450
AE1N 750 / 1450 / 2700 / 5000
AE2N / AE4N 750 / 1450
AED2N 1200 / 2300 / 4250 / 7800
AE.H 380 / 750 / 1450 / 2700
AE.V 200 / 380 / 750 / 1450
! Drive the angular contact ball bearing (104) out of
the bearing bracket (110) with a suitable tool
(driver).
! Remove the spacer ring (113) from the bearing
bracket (110).
! Press the shaft seal ring (112) out of the bearing
bracket (110).
7.2.2 Mounting the eccentric screw pump
General
Assembly of the individual pump components after
careful cleaning takes place in reverse direction.
7.2.2.1 Installing the angular contact and groove ball
bearings
Note: The pumps are equipped with re-greasable ball
bearings. For re-assembly, the ball bearings must be
greased sufficiently.
The groove ball bearing with vertical pump design is
greased for life.
! If required, clean ball bearings carefully with diesel
fuel. If the bearing surfaces are shiny and undam-
aged, you can reuse the ball bearings (103) and
(104). If this is not the case, replace the ball bear-
ings.
! Fill the ball bearings (103) and (104) with roller
bearing grease. Apply the grease filling as de-
scribed in the following.
1. Fill the cavities between the roller bearings
approx. 30 to 50% with grease.
2. Strip off excess grease (best with your fingers,
do not use any metal objects). For recom-
mended roller bearing greases, see Chapter
7.1.2.2.
! Press the double-row angular contact ball bearing
(104) from the drive side with a matching piece of
pipe over the outer ball bearing position ring into
the bearing bracket (110). Oil bearing position
slightly beforehand.
Note: The ball filling notch of the angular contact
ball bearing must point towards the drive side.
The following pump sizes are
equipped with two single-row
angular contact ball bearings (104):
AE1L 2701 / 5001
AE1E 1450 / 2700 / 5000 / 9500
AED1E 2300 / 4250 / 7800 / 15500
AE2E 1450
AE1N 750 / 1450 / 2700 / 5000
AE2N / AE4N 750 / 1450
AED2N 1200 / 2300 / 4250 / 7800
AE.H 380 / 750 / 1450 / 2700
AE.V 200 / 380 / 750 / 1450
Both bearings have to be pressed into the bearing
bracket (110) in O-type arrangement and ad-
justed without play via the shim rings (129) (see
figure 7).
Figure 7: Two single-row angular contact ball bear-
ings with shim rings
! Insert the circlip (127) in front of the ball bearing
(104) respectively the shim rings (129) into the
bearing bracket (110).
! Insert the spacer sleeve (102) into the bearing
bracket (110).
! Fill the space between the bearing bracket (110)
and the spacer sleeve (102) approx. 90% with
roller bearing grease.
For recommended roller bearing greases, see
Chapter 7.1.2.2.
For filling quantities, see table in Chapter 7.1.2.6.



 To Next Page