EasyManua.ls Logo

Andonstar AD409-Pro - User Manual

Andonstar AD409-Pro
20 pages
Print Icon
To Next Page IconTo Next Page
Loading...
Digital Microscope AD409-Pro
Users Manual
Thank you for purchasing our products! To facilitate your use and maintenance, please
read the users manual carefully before use. If you have any questions, please feel free to
contact us, we will reply within 24H (there may be a delay on holidays). We appreciate
the opportunity to serve you, your satisfaction is our utmost priority!
Customer servicesupport@andonstar.com
Question and Answer IconNeed help?

Do you have a question about the Andonstar AD409-Pro and is the answer not in the manual?

Summary

Basic Parameters

Whats in the box

Installation

Button Instructions

Quick Start

Review and Manage Images

Remote Control Instructions

Settings

Gridline Setting

Configure crosshair lines, direction, position, color, and width for grid overlays.

Save Setting

Instructions on how to properly save device settings before powering off.

Three Output Modes

HDMI Output

Guide on connecting the microscope to external displays via HDMI for output.

USB Output

Steps for connecting the microscope to a PC via USB for data transfer and software use.

WIFI Output (Test function)

Instructions for enabling and using the Wi-Fi connection for wireless image transmission.

Icons Definitions

Software Interface Definitions and Functions

Functions

Calibration

Procedure for calibrating the microscope using a ruler for accurate measurements.

Measuring

How to use the toolbar tools to perform measurements on captured images.

Special Effect

Applying visual enhancements like edge detection, inverse color, and sharpening to images.

Capture and Recording

Instructions for taking still images and recording video footage with the microscope.

Safety and Maintenance

FAQ

Warranty Card

Overview

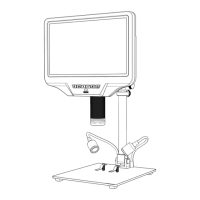
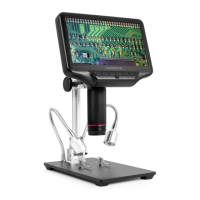
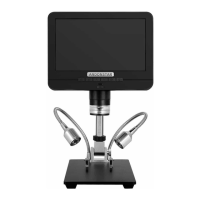
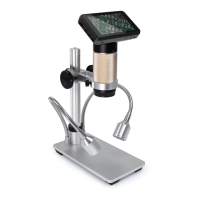
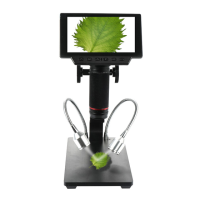
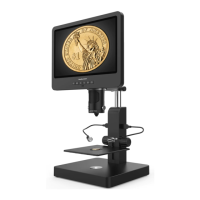
This document is the user manual for the Digital Microscope AD409-Pro, a versatile microscope designed for various applications, including measurement and image analysis.

Function Description

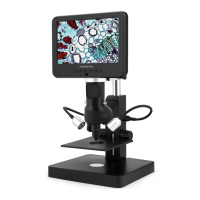
The AD409-Pro digital microscope serves as a tool for magnifying objects, capturing still images, and recording videos. It offers multiple output modes, allowing users to view magnified images on its integrated screen, an external HDMI monitor, a computer via USB, or a mobile device via Wi-Fi (test function). A key feature is its measurement capability when connected to a PC, enabling precise analysis of dimensions, angles, and areas. The device also includes special effects for image enhancement, such as edge detection, inverse color, horizontal flip, relief, sharpen, and smooth. Gridline settings are available for precise alignment and measurement.

Important Technical Specifications

  • Image Sensor: 4 Mega Pixels HD Sensor
  • Video Output: UHD 2880x2160 24FPS; FHD 1920x1080 60FPS/30FPS; HD 1280x720 120FPS
  • Video Format: MP4
  • Magnification Ratio: Up to 300X (with a 27-inch HDMI monitor output)
  • Photo Resolution: Max 24M (5600x4200)
  • Photo Format: JPG
  • Minimum Focus Distance: 5cm
  • Frame Rate: Max 120f/s (under 600 Lux Brightness & HDP120)
  • Storage: Micro-SD card up to 64G (Class10 high-speed card recommended, not included)
  • PC Support: Windows XP/7/8/10, with PC software for measurement
  • Mobile Phone & Tablet Terminal: Supports Wi-Fi connection
  • HDMI Output: Supported
  • Power Source: USB 5V 2A DC
  • Stand Size: 18x20x32cm
  • Screen Size & Resolution: 10.1 inch, 1280x800
  • Language Support: 10 types (English, French, German, Italian, Portuguese, Spanish, Russian, Simplified Chinese, Traditional Chinese, Japanese)
  • Package Contents: Microscope monitor, Base (with light), Column, Beam, UV filter (assembled), Power cable, HDMI cable, USB cable, Power adapter, Metal clip×2, Wrench, Remote, Users Manual.

Usage Features

Installation and Quick Start

The manual provides clear instructions for installing the bracket and optional metal clips. To begin, users connect the power cable, HDMI cable (for external display), and insert a Micro-SD card for storage.

Button Instructions

The device features a set of buttons on the monitor for power, menu/mode selection, zoom (up/down), OK/start video record, picture capture, and focus control. An infrared sensor is present for remote control operation. Additional ports include an endoscope interface (optional), USB port, HDMI port, and a reset hole.

Adjust Magnification & Focus

Magnification is adjusted by lifting the monitor to change the object distance, while focus is controlled via a dedicated focus controller.

Save Picture and Video

Images and videos are saved to a Micro-SD card. The manual emphasizes that the memory card does not support hot-swapping. To record videos, users press the "OK" button, and to take photos, they press the "capture" button.

Review and Manage Images

In playback mode (accessed via the "MODE" button), users can cycle through saved pictures and videos. Long-pressing the "MENU" button allows for file management.

Remote Control Instructions

A remote control provides convenient access to various functions, including capture, mode selection, zoom, brightness, cross line settings, file lock/unlock, contrast, lens image switching (for endoscope), default settings, and black & white mode.

Settings

The microscope offers extensive settings, accessible by long-pressing the "M" button in video standby mode or photo mode. These settings include resolution, EV exposure, date stamp, sharpness, freeze, contrast, color, burst mode, quality, white balance, and ISO.

Gridline Setting

Users can enable and customize gridlines for precise alignment and measurement. Settings include cross line, line, direction (horizontal/vertical), position, color, and width. These settings can be adjusted using the remote control.

Save Setting

To ensure settings are saved, the device must be turned off by long-pressing the power button, followed by disconnecting the power. Settings will not be saved if power is cut off directly.

Three Output Modes

  1. HDMI Output: Connects the microscope to an external HDMI monitor for a larger display.
  2. USB Output: Connects the microscope to a computer for viewing and measurement using the "Microscope Measure" software. The software allows for various measurements (e.g., distance, angle, area) and image analysis functions (e.g., edge detection, inverse color). Calibration is a crucial step for accurate measurements, involving placing a ruler under the microscope and defining a unit length within the software.
  3. Wi-Fi Output (Test function): Allows connection to mobile phones or tablets via the "Ucam Dashcam" app. This feature enables synchronous display of the microscope screen, recording, and photo capture on the mobile device. A memory card must be inserted for Wi-Fi functionality.

Maintenance Features

  • Clean Environment: Keep the device in a clean, dry environment, away from corrosive substances.
  • Lens Cleaning: If image quality is poor, clean the lens gently with a dry, soft cloth.
  • Display Care: Avoid pressing hard or hitting the display with sharp objects. Clean the screen with a dry, soft cloth; do not spray water or cleaners directly.
  • Troubleshooting: The manual includes a FAQ section addressing common issues such as power-on problems, unclear images, unsaved settings, memory card errors, software installation issues, measurement inaccuracies, and display problems with HDMI monitors.
  • Warranty: A warranty card outlines conditions for coverage, excluding damage from improper use, accidents, unauthorized repairs, or expired warranty periods.

Andonstar AD409-Pro Specifications

General IconGeneral
BrandAndonstar
ModelAD409-Pro
CategoryMicroscope
LanguageEnglish

Related product manuals