Do you have a question about the Andonstar AD409-Max and is the answer not in the manual?
Overview of all buttons on the microscope device and their primary functions.
How to adjust the object distance and focus using the controller.
Instructions for inserting the memory card for saving media.
Instructions for recording videos and taking still photographs with the device.
Guide on how to view, manage, and delete recorded images and videos.
Details on the functions of each button on the remote control.
How to configure gridlines for measurement and alignment.
Procedure to save the current device settings.
Details on connecting the microscope via HDMI.
Instructions for connecting and using the microscope via USB.
Guide for using the WiFi output feature and the associated app.
Explanation of the main menu, toolbar, and other interface windows.
Step-by-step guide for calibrating the microscope for accurate measurements.
Instructions on how to use measurement tools in the software.
Explains how to apply special visual effects like edge detection and flip horizontal.
Guide on how to capture images and record videos using the microscope.
Answers to common questions regarding operation, settings, and troubleshooting.
The Digital Microscope AD409-Max is a versatile imaging device designed for detailed observation, measurement, and recording of objects. It offers multiple output modes, allowing for flexible integration into various workflows, and includes a comprehensive software suite for advanced analysis and management of captured data.
The primary function of the AD409-Max is to provide magnified views of objects, enabling users to observe fine details that are not visible to the naked eye. It captures high-resolution images and videos, making it suitable for documentation, inspection, and educational purposes. The device supports various output methods, including HDMI for direct display on a monitor, USB for connection to a computer with dedicated software, and an experimental WiFi output for mobile devices.
A key feature of the microscope is its ability to perform precise measurements directly on the magnified image. This is facilitated by a dedicated software application that includes a range of measurement tools, such as distance, angle, radius, and area calculations. The software also supports calibration, ensuring the accuracy of these measurements.
The microscope is equipped with an adjustable focus controller and magnification settings, allowing users to achieve optimal clarity and desired zoom levels for different objects. It also includes a spot light interface for illuminating the specimen, with adjustable brightness to suit various lighting conditions.
For image and video management, the device allows users to save captured content to a Micro-SD card. The remote control provides convenient access to essential functions, including power on/off, zoom, video recording, picture capture, and menu navigation. The menu system offers extensive settings for customizing image parameters, gridlines, and output preferences.
The AD409-Max is designed for ease of use, from initial setup to advanced operations.
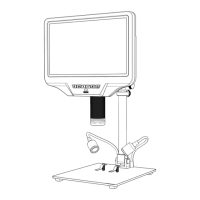
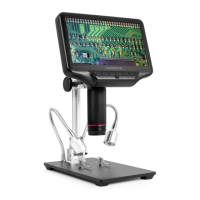
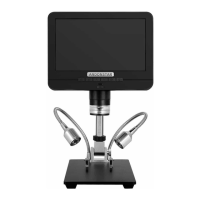
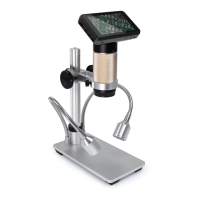
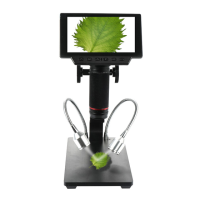
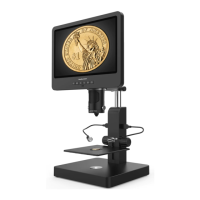
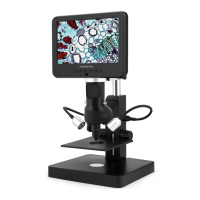
Installation and Setup: The device comes with a modular stand that is straightforward to assemble. The base includes a repair mat and tool holders, providing a stable and organized workspace. The microscope monitor attaches to a column, which can be adjusted for height to set the object distance. Power is supplied via a USB 5V 2A DC adapter, and connections for HDMI and USB are clearly marked.
Quick Start: After assembly, users can quickly begin observation by adjusting the monitor's height to set the object distance and then turning the focus controller to achieve a clear image. The spot light brightness can be adjusted to enhance visibility.
Image and Video Capture: To save images or videos, a Micro-SD card must be inserted into the designated slot. The device does not support hot-swapping of the memory card, so it should be inserted before powering on. Video recording is initiated and stopped by pressing the "OK" button, while still images are captured using the "capture" button on the remote or monitor.
Review and Management: Captured pictures and videos can be reviewed directly on the microscope monitor by entering playback mode via the "MODE" button. Users can navigate through files using the "Up" and "Down" keys. Long-pressing the "MENU" button in playback mode allows for file management.
Remote Control: The included remote control provides convenient access to a wide array of functions, including power, mode selection, zoom in/out, brightness adjustment, picture capture, video recording, cross line display, file lock/unlock, contrast adjustment, lens image switching (for optional endoscope), default settings, and black & white mode.
Settings Menu: The microscope features a comprehensive settings menu, accessible by long-pressing the "M" button in video standby mode. This menu allows users to configure various parameters such as resolution, EV exposure, date stamp, sharpness, freeze frame, contrast, and color. In photo mode, additional settings like burst mode, quality, white balance, and ISO are available.
Gridline Setting: A practical feature for inspection and alignment is the gridline setting. Users can enable or disable cross lines and individual lines, adjust their direction (horizontal/vertical), position, color, and width. This is particularly useful for precise positioning and measurement tasks.
Software Features (USB Output): The "Microscope Measure" software offers a rich set of tools for image analysis and measurement.
Proper maintenance ensures the longevity and optimal performance of the AD409-Max.
Environmental Care: The device should be kept in a clean, dry environment, away from oil, water, gas, and corrosive materials. This prevents damage to sensitive electronic components and optical elements.
Lens Cleaning: If the image quality degrades, the lens should be gently cleaned with a dry, soft cloth. Avoid using harsh chemicals or abrasive materials that could scratch the lens.
Display Cleaning: The display screen should be wiped with a dry, soft cloth to remove dust. Never spray water or cleaners directly onto the display.
Handling Precautions: Avoid pressing hard or hitting the display with sharp objects to prevent damage.
Troubleshooting: The manual provides guidance for common issues:
The AD409-Max is a comprehensive solution for microscopic observation, offering robust features for both casual and professional users, backed by clear usage instructions and maintenance guidelines.
| Display Resolution | 1920x1200 |
|---|---|
| Power Source | DC 5V |
| Stand Type | Metal stand |
| Display Size | 10.1 inch |
| Connectivity | HDMI |
| Video Resolution | 1080p |
| Focus Range | 2cm to 15cm |
| Frame Rate | 30fps |
| Storage | MicroSD card |
| Lighting | 8 LED ring light with adjustable brightness |