Do you have a question about the Aries S224046 and is the answer not in the manual?
Read all instructions thoroughly before installation. Use proper tools to improve quality and reduce time.
Wax after installing for a protective layer. Avoid abrasive polishes. Use mild soap for gloss black finishes.
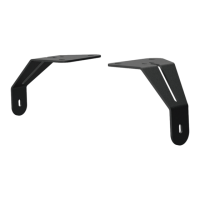
Identify five mounting tabs on the vehicle body, using the first, third, and fifth tabs.
Mount the bracket to the front driver side using an 8mm hex bolt, lock, and flat washer, snugging hardware.
Rotate bracket, slide 8mm clip-nut over tab, and secure bottom with another 8mm hex bolt, lock, and flat washer.
Repeat steps 2 and 3 to install the second bracket over the third mounting tab location.
Remove plug from access hole, insert clip nut, and secure bracket top with 8mm bolt and bottom per step 3.
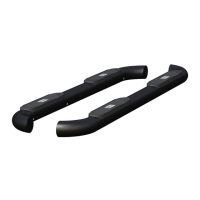
Position the side bar onto the mounting brackets, aligning all mounting points carefully.
Fasten the side bar to brackets using 10mm hex bolts, lock washers, and flat washers at each location.
Adjust and level the side bar, then tighten all brackets to the vehicle, followed by side bar connections.
Repeat steps 1 through 8 for the passenger side installation.
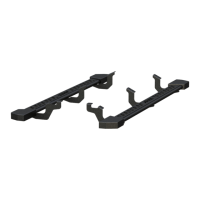
For diesel trucks, locate def-tank bracket components and the rocker panel mounting hole.
Insert the 10mm bolt plate into the rocker panel access hole and secure with a plastic retainer.
Attach the def-tank L-bracket to the bolt plate using a 10mm hex nut, lock washer, and flat washer.
Slide 8mm clip nut onto tab and fasten side bar bracket with 8mm hex bolt, flat washer, and lock washer.
Connect the def-tank support bracket to the L-bracket using a 10mm hex bolt, flat washer, and lock washer.
Complete the installation by repeating steps 6 through 8 on the passenger side of the vehicle.
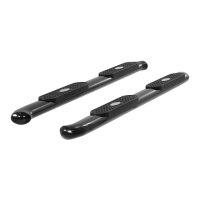
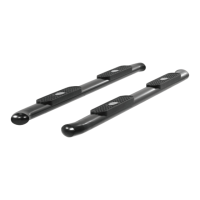
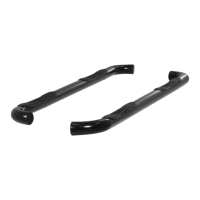
This document outlines the installation process for the ARIES S224046 4" oval side bars, designed to enhance vehicle accessibility and aesthetics. The side bars are provided as a pair, with one specifically for the driver/left side and another for the passenger/right side.
The ARIES 4" oval side bars serve as a convenient step for easier entry and exit from a vehicle. They provide a stable and wide stepping surface, improving accessibility, particularly for taller vehicles or individuals who may find it challenging to step into the vehicle directly. Beyond their functional purpose, these side bars also contribute to the vehicle's aesthetic appeal, offering a rugged yet refined look. The installation process is designed to be straightforward, utilizing existing mounting points on the vehicle's body, ensuring a secure and integrated fit. For diesel truck models, specific def-tank brackets are included to accommodate the unique vehicle configuration, ensuring compatibility and a proper installation without interference.
The installation kit includes a comprehensive list of hardware components necessary for a secure attachment. Key components and their specifications are:
The ARIES 4" oval side bars are designed for ease of use and durability. Once installed, they provide a sturdy and reliable step. The installation instructions emphasize snugging hardware initially and then fully tightening after leveling, which ensures proper alignment and a secure fit. The product is designed to be compatible with specific vehicle models, and for diesel trucks, additional components are provided to ensure a seamless fit around the DEF tank. The "Level of Difficulty" is rated as "Easy," suggesting that most individuals with basic mechanical skills and tools can complete the installation. The inclusion of helpful install tips via a scannable QR code further simplifies the process.
To ensure the longevity and appearance of the ARIES 4" oval side bars, specific maintenance recommendations are provided:
The comprehensive nature of the manual, from detailed parts lists and step-by-step instructions to maintenance guidelines, ensures that users can successfully install and maintain their ARIES 4" oval side bars for optimal performance and appearance.
| Brand | Aries |
|---|---|
| Model | S224046 |
| Category | Automobile Accessories |
| Language | English |