EasyManua.ls Logo

Aries B35-2000 User Manual

Aries B35-2000
2 pages
To Next Page IconTo Next Page
Page #1 background imageLoading...
Page #1 background image
PAGE 1 • B35-2000-INS-RB877.287.8634 • NEED ASSISTANCE? ARIESAUTOMOTIVE.COM
Product Image
Notes and Maintenance
Before you begin installation, read all instructions thoroughly.
Proper tools will improve the quality of installation and reduce the time required.
For stainless steel and aluminum, polish may be used to clear small scratches
and scuffs on the finish. Mild soap may be used also to clean the product.
Refer to the table to the left when securing hardware during the
installation process to help prevent damage to the product or vehicle.
Level of Difficulty
Easy
Parts List
1 Bull bar
1 Driver / left
mounting bracket
1 Passenger / right
mounting bracket
2 Hex bolt, M12 x 50mm
2 Flat washer, M12
2 Lock washer, M12
Tools Required
Torque wrench Ratchet
Socket, 17mm Socket, 18mm
Scan
for helpful
install tips
INSTALLATION MANUAL B35-2000
Torque Specifications
METRIC
M6 bolt 3 ft.-lbs.
M8 bolt 7 ft.-lbs.
M10 bolt 16 ft.-lbs.
M12 bolt 28 ft.-lbs.
SAE
1/4" bolt 3 ft.-lbs.
5/16" bolt 7 ft.-lbs.
3/8" bolt 16 ft.-lbs.
7/16" bolt 20 ft.-lbs.
1/2" bolt 28 ft.-lbs.
Question and Answer IconNeed help?

Do you have a question about the Aries B35-2000 and is the answer not in the manual?

Aries B35-2000 Specifications

General IconGeneral
BrandAries
ModelB35-2000
CategoryAutomobile Accessories
LanguageEnglish

Summary

Installation Preparation

Parts List

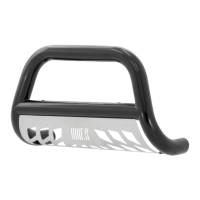
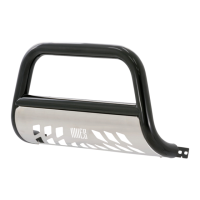
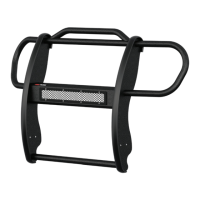
Lists all components required for the bull bar installation, including quantities.

Tools Required

Specifies the necessary tools for performing the installation, such as torque wrench and sockets.

Torque Specifications

Provides torque values for different bolt sizes to ensure proper hardware tightening.

Installation Steps

Step 1: Remove Factory Tie Down

Instruction to remove the factory tie down from the driver-side of the vehicle.

Step 2: Mount Brackets

Guidance on attaching mounting brackets to the vehicle frame and snugging hardware.

Step 3: Attach Bull Bar

Instructions for connecting the bull bar to the installed mounting brackets.

Step 4: Adjust and Tighten

Procedure for leveling the bull bar and tightening all mounting hardware.

General Notes

Notes and Maintenance

Read all instructions before installation. Polish or mild soap can be used for cleaning.

Related product manuals