3
Installation and Service Manual
INSTALLATION
Figure : Wiring diagram
Note:
· All heads are polarity insensitive
· Polarity must be observed when using remote indicators
· Continuity link is to be manually operated. The link snaps back
when a head is inserted and as such opens the shorting bar
between terminals 1 and 2
· Alarm contacts are shown in non-alarm mode
· An earth terminal can be inserted for ground continuity wiring.
Not required by the detector head.
Fire Sensor Placement and Spacing
In general, locate ceiling mounted smoke detectors near the center
of the room or hall whenever possible. Always place sensors a
minimum of 100 mm from any wall. When the sensor is wall
mounted, the top of the detector should be 100-300 mm from the
ceiling.
When more than one detector is used, use the spacing of 9 m as a
guide on smooth ceilings. Other spacing may be used depending on
ceiling height, high air movement, and other conditions or response
requirements. Local regulations should be observed at all times.
Where NOT To Place Sensors
One of the major causes of nuisance alarms is improper placement
of sensors. Avoid locating sensors:
· Too close to kitchens or wood stoves where smoke can be
generated.
· In garages and furnace rooms due to exhaust fumes.
· Too close to bathrooms which can cause problems from
steamy baths or showers.
· Where normal ambient air temperature can exceed 40°C, such
as attics.
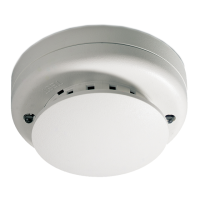
Installing the Detector Head
To install a detector head, insert the head and rotate it clockwise
until it is properly aligned and “sets” into the base (Figure
). Then
rotate it an additional 15° to lock it in place. This action will
automatically “open” the continuity switch in the base and allow
continuity in the system to be established by the detector heads.
Consider the Locking Mechanism BEFORE Installation
Each 700 Series detector head is equipped with a break away
locking tab slot to prevent unauthorized removal of the detector
head (Figure
). If you want detectors to be locked in the base,
remove the tab before inserting the base. To remove the detector
head, insert a small screwdriver into the slot on the side of the base
and pressing in while simultaneously turning the detector head
counterclockwise (Figure
).
Every 700 Series base includes a continuity switch that shorts
terminals 1 and 2 together for easy continuity testing and/or
temporary detector removal (Figure
). When a 700 Series head is
inserted, the continuity switch will be snapped back, out of the way,
and will no longer short terminals 1 and 2. The continuity switch can
be snapped back into its original position with a screwdriver, if
necessary.
TESTING THE SYSTEM
After all connections are completed and the wiring is checked, apply
power to the system. There should not be an alarm. If there is,
determine whether a detector is latched or if there is a problem with
the wiring. If no alarm has occurred, go to the last detector and
check the detector power with a volt meter for the specified voltage.
Testing Each Detector
All 700 Series smoke detectors are shipped with a plastic dust cover
for use in areas where construction is on-going. Smoke detectors
will not work with the dust cover in place. Remove the dust cover
when installation is completed, prior to testing.
Test all smoke detectors in place annually or according to local
regulations to ensure smoke entry into the sensing chamber and
alarm response. If canned smoke (test aerosol) is used, carefully
follow the manufacturer’s directions to avoid damage to the detector.
This is a gross, go/no-go test and is not a reliable indication of
detector sensitivity. If it is successful, the LED will remain lit. For in-
depth sensitivity testing, see Sensitivity Level Test Mode in the table
below. To reset the detector, operate the system reset switch for 2
to 3 seconds to remove power from the detectors.
The optical and ionization detectors sample for smoke every 9
seconds. If smoke is detected, the rate of sampling increases to
every 4.5 seconds. Excessive smoke must be detected in three
consecutive tests for the alarm to trip.
Heat detectors continuously sample for heat. Test heat sensors by
using a hot air gun (Figure
). Aim at heat sensor from 15 to 25 cm
away. Detector should go into alarm in less than 30 seconds. Be
careful not to melt plastics.
MAINTENANCE, CLEANING AND SENSITIVITY TESTING
If a smoke detector drifts beyond its approved sensitivity range for
more than 24 hours or fails internal diagnostic tests during power-up
the unit automatically indicates trouble by flashing its LED every
second.
The sensing chamber of the 700 Series photoelectric detector
unsnaps for easy field cleaning and service (Figure
). Whenever
the status LED indicates cleaning is necessary, remove the
photoelectric detector cap snap off and throw away the optical block
chamber (Figure
). Then blow off the optical block base and snap
a new optical block chamber back in place, replace the cap and
verify sensitivity with the Sensitivity Level Test.
Figure :
Detector cap
Field replaceable optical chamber
Additional Diagnostics Available with Sensitivity Level Test
Mode
Each smoke detector also includes a special Sensitivity Level Test
mode that is activated by holding a magnet near the integral reed
switch for more than one second (see Figure
). Once the routine
starts, the fault LED will flash one to nine times, indicating actual
sensitivity and whether or not service is required. The yellow fault
LED provides indicators as listed below.
After the sequence of blinks, if the sensitivity is found to be within
limits and if all other tests pass, the detector will go into alarm until
reset by the panel. If the sensitivity is not within limits, or an
unserviceable hardware fault has been detected, the fault LED will
continue to flash once per second until the panel resets the
detector. If sensitivity test indicates an unacceptable level, take
action recommended above.
GB

 Loading...