The Ashton RHYTHMVX is an electronic drum kit designed in Australia, offering a comprehensive drumming experience with a focus on value and quality materials. This user manual provides detailed instructions for setup, operation, and maintenance of the drum kit.
Function Description
The Ashton RHYTHMVX is a complete electronic drum kit designed for drumming practice, performance, and recording. It features a drum module with various controls for adjusting drum kit settings, voice settings, pattern settings, metronome (click) settings, and recording functions. The kit allows users to select from preset drum kits and patterns, create and save custom user kits, and record their drumming. It also supports MIDI/USB connectivity for integration with external devices and software.
Important Technical Specifications
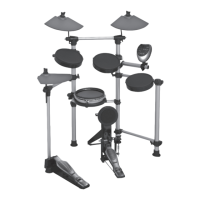
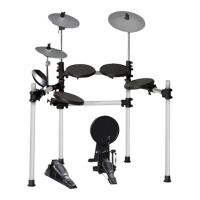
- Drum Pads:
- 3 x Tom pads
- 2 x Cymbal pads
- 1 x Snare pad (dual trigger)
- 1 x Hi-hat control pedal
- 1 x Hi-hat pad
- 1 x Kick pad
- Voices: 108 Voices (a detailed voice list is provided on page 22 of the manual).
- Drum Kits: 10 preset kits and 5 user kits.
- Patterns: 40 preset songs and 1 user pattern.
- Controls: Power on, master volume, mute drum (drum off), drum kit settings (volume, select, user kit), pad settings (volume, select), pattern settings (select, playback, volume, tempo), metronome (click), recording functions, and restore factory settings.
- Display: LED Display.
- Connections:
- Phones (1/8” jack)
- Pad connections (1/8” jack)
- USB (USBA jack)
- Mix in (1/8" jack)
- Output (1/8" jack)
- Power Supply: 9V AC.
- Recording Capacity: 5000 notes.
- MIDI Output Formats: Internal format (default) and GM format.
- Automatic Shutdown: The drum module will power off after 30 minutes of inactivity (default setting), which can be disabled.
Usage Features
Setup and Assembly:
The manual provides a detailed parts list and step-by-step assembly instructions for the stand, tom pads, snare pad, drum module, cymbal pads, hi-hat control pedal, and kick trigger. It emphasizes not connecting the electronic drum kit to a power unit until fully set up to avoid electrical damage.
Basic Functions:
- Switching On/Off: Rotate the master volume knob counter-clockwise to minimum before turning on the unit using the ON/OFF switch.
- Main Volume Adjustment: While hitting a pad, gradually rotate the master volume knob to achieve a comfortable sound level.
- Drum Off (Mute): Press the DRUM OFF button to mute the drum part of a pattern, useful for practicing without the drum accompaniment.
- Automatic Shutdown: The kit features an automatic shutdown function that powers off the module after 30 minutes of idle time to save energy. This feature can be disabled by holding the START/STOP button while turning on the module.
Drum Kit Settings:
- Selecting a Drum Kit: Press the KIT button, then use the (+) and (-) buttons to select from 10 preset kits (001-010) or 5 user kits (010-015).
- Adjusting Kit Volume: In kit selecting mode, press the VOLUME button, then use (+) and (-) buttons to adjust the kit volume (000-016).
- Saving a User Kit: Press and hold the SAVE button, use (+) and (-) buttons to choose a user kit location (010-015), then press SAVE again to store the current kit settings.
Voice Settings:
- Selecting a Pad Voice: Press the VOICE button, hit the desired pad, then use (+) and (-) buttons to select from 108 available voices.
- Selecting a Pad Volume: In voice selecting mode, press the VOLUME button, then use (+) and (-) buttons to adjust the pad volume (000-016).
- Saving a User Kit (with voices): After assigning pad voices, follow the same steps as saving a drum kit to store the new voice settings in a user kit.
Pattern Settings:
- Selecting a Pattern: Press the PATTERN button, then use (+) and (-) buttons to select from 40 preset patterns or 1 user pattern.
- Listening to a Pattern: Press the START/STOP button to play or stop a pattern. The indicator lights will flash in accompaniment.
- Adjusting Pattern Accompaniment Volume: In pattern selecting mode, press the PATTERN button, then use (+) and (-) buttons to adjust the pattern volume (000-016).
Click (Metronome) Settings:
- Turning Metronome On/Off: Press the CLICK button.
- Changing Time Signature: Use (+) and (-) buttons to change the time signature (e.g., 1/4, 4/4, 6/8).
- Adjusting Click Sample/Volume: Press and hold the CLICK button, then use (+) and (-) buttons to adjust the click sound (metronome, beep, cowbell, voice). Press VOLUME in time signature mode to adjust click volume.
Recording Settings:
- Waiting to Record Mode: Press and hold the SAVE button for more than 2 seconds. Adjust accompaniment pattern, tempo, kit, metronome, and muted settings. Pad voices cannot be adjusted in this mode; they must be saved to a user kit beforehand.
- Recording Mode: Press START/STOP or hit any pad to begin recording. There is a one-bar introductory beat. Original data will be replaced. Only the metronome can be adjusted during recording, and it will not be recorded.
- Stop Recording: Recording automatically stops when the bank is full (5000 notes) or by pressing START/STOP. Recordings are saved to user pattern 04.1.
- Playing Back User Pattern: Select 04.1 in the pattern menu and press START/STOP. The user pattern plays once and is not looped. Tempo and kit can be changed during playback. DRUM OFF mutes the pattern, not the recorded drumming.
- Connecting: Connect a PC/MAC or other USB host device via USB cable. The drum module sends MIDI data from pad triggers and pedal steps through the USB port. Click and song data are not included in MIDI info.
- MIDI Output Format: Choose between Internal format (default, for when the drum module acts as a sound source) and GM format (for external sound sources like computers). Select by pressing PATTERN in pattern selecting mode and toggling with (+)/(-).
Maintenance Features
- Restore Factory Settings: Turn on the drum module while holding down the (+) and (-) buttons to restore all user kits (voice and volume) and clear recording data to factory defaults.
- Safety Information: The manual includes detailed safety instructions regarding fire, electric shock, and injury prevention. It advises against operating at high volumes for extended periods, using the product near water, and attempting to service the product beyond the manual's instructions. All servicing should be referred to qualified personnel. It also highlights the importance of proper grounding and cautions against modifying the plug or power cord.