Do you have a question about the Assa Abloy Sargent SN Series and is the answer not in the manual?
Equipment compliance with Class B digital device limits for harmful interference.
Class B digital apparatus meets Canadian Interference Causing Equipment Regulations.
Compliance with FCC/Industry Canada RF exposure and transmitter gain limits.
Product can expose users to lead, known to cause cancer and birth defects in California.
Retrofitting fire rated openings may impact rating; consult code specialist.
Basic precautions for handling electronic components to avoid ESD damage.
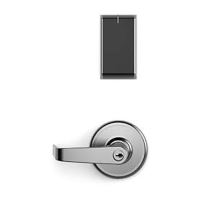
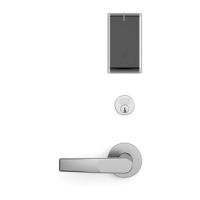
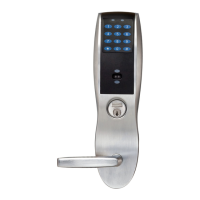
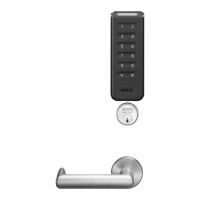
Overview of SARGENT SN200/210 Series integrated wired access control solutions.
Supports various credentials and mobile access via Bluetooth/NFC.
Grade 1 hardware, REX/DPS monitoring, Fail Safe/Secure, UL listings.
Details UL 294 ratings for Destructive Attack, Line Security, Endurance, Standby Power.
Lists average and peak current draw for reader and actuator at 12/24VDC.
Provides recommended wire gauge for OSDP and Wiegand based on length and load.
Illustration showing all components included in the lock assembly.
Lists necessary tools: Phillips/Slotted Screwdrivers, 1/8" Allen Wrench.
Itemized table listing part numbers, descriptions, and quantities for lock components.
Lists various lock body configurations based on deadbolt and fail-safe/secure settings.
Caution regarding Life Safety Egress and contact factory for specific options.
Pin assignments and color codes for SN200 (Wiegand) and SN210 (OSDP) connectors.
Describes LED behavior and credential presentation for Wiegand and OSDP.
References instruction sheet for EOL resistors and notes on OSDP cable length.
Detailed wiring diagram for Wiegand SN200, including panel and power connections.
Notes that tamper is not supported for Wiegand applications.
Emphasizes adherence to NEC/NFPA 70 and ESD precautions.
Detailed wiring diagram for OSDP SN210, including panel and power connections.
Notes reader electronics require 12VDC and tamper triggers on removal.
Reiteration of NEC/NFPA 70 compliance and ESD precautions.
Instructions for verifying door hand and bevel before installation.
Guidance on preparing the door using templates and ensuring clean holes.
Steps for reversing the lock hand and latch hand of the mortise lock body.
Explanation of DIP switch settings for handing, actuator, and RX output.
Steps for inserting the lock body and securing it with screws.
Instructions for attaching the reader backplate and optional fire shield.
Guidance on attaching the inside mounting plate and routing wires.
Steps for mounting the reader onto the mounting plate.
Instructions for connecting the 6-pin and 2-pin connectors.
Instructions for connecting ElectroLynx harnesses.
Guidance on neatly folding excess wires into the door hole.
Steps for installing the fire plate onto the mounting plate.
Instructions for installing and testing the outside cylinder.
Steps for assembling the inside lever and adapter plate.
Instructions for installing the inside escutcheon and ensuring proper function.
Steps for installing the inside rose and lever assembly.
Instructions for attaching the front plate using screws.
Details the Wiegand Test Unit's capabilities for verifying installation and features.
Procedures for checking key operation and lever function.
Steps to verify lock functionality with credentials and test LED/sounder activity.
Procedures for checking and correcting fail-safe or fail-secure operation.
| Brand | Assa Abloy |
|---|---|
| Model | Sargent SN Series |
| Category | Locks |
| Language | English |