Step 5
Step 4
8
1:1
TEAM/FT 6589, qty 1
5/32 x 5/16 ball bearing
unflanged
B A G E
REMOVE THESE
PARTS FOR:
Steps 4-5
T O O L S U S E D
5/64"
s t e p 4
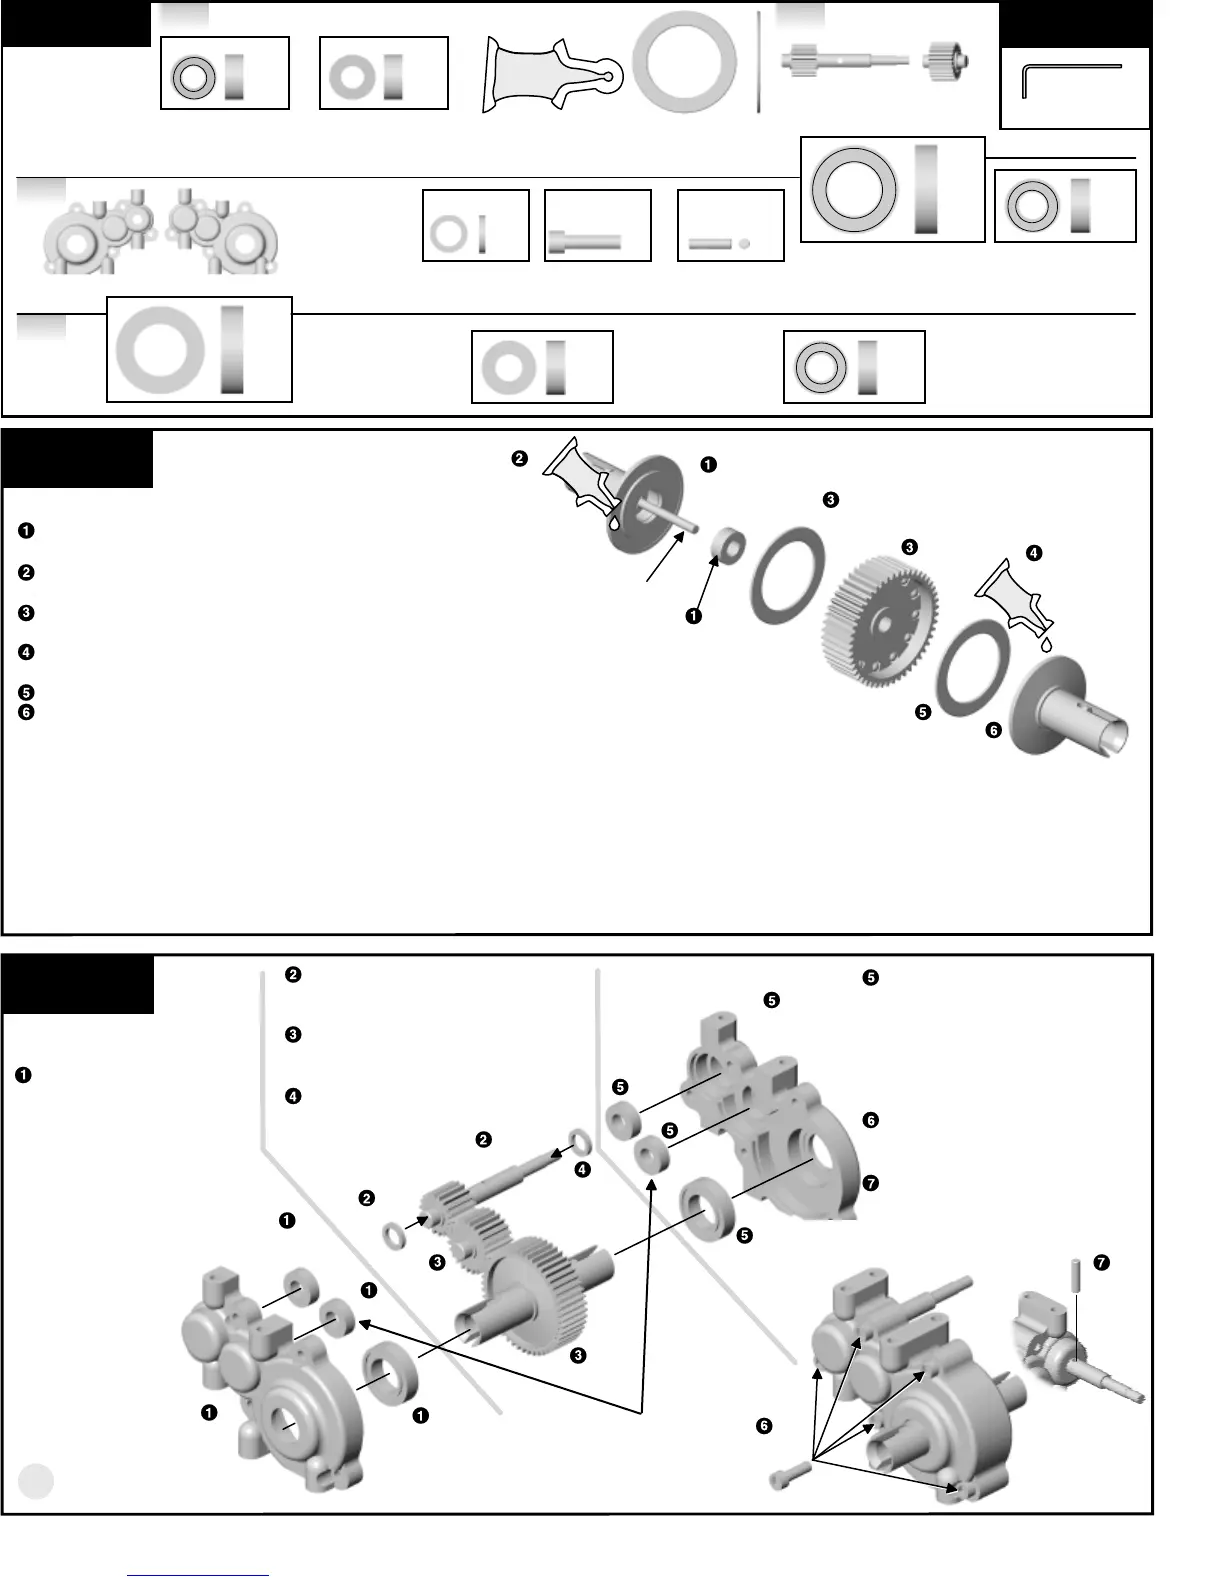
ASSEMBLE HUBS
Insert one #6589 bearing or #6597 bushing into
the #7667 right outdrive.
Add a light coat of #6591 Stealth lube to the
recessed area of the face.
Place a #7666 diff drive ring and then the gear
assembly on the outdrive.
Add a light coat of #6591 Stealth lube to the
#7668 left outdrive recessed area of the face.
Place a #7666 diff drive ring on the outdrive.
Push the #7668 left outdrive assembly against
the other side of the gear.
CHECK ALIGNMENT OF HUBS
Tighten the diff bolt with your 5/64 Allen wrench,
but not completely.
Rotate the diff hubs several times as you are
tightening the bolt to check proper alignment
of the parts.
READ STEPS 9-11 CAREFULLY.
6591, qty 1
Stealth lube
7666, qty 2
diff drive ring
1:1
TEAM/FT
3977, qty 4
3/16 x 3/8 ball bearing
unflanged
1:1
TEAM/FT 3976, qty 2
3/8 x 5/8 ball bearing
unflanged
7661, qty 1
transmission case,
left & right
7669, qty 2
spacer
1:1
6571, qty 1
driveshaft
6570, qty 1
idler gear
6924, 6860*, qty 5
4-40 x 3/8 screw
1:1
7665, qty 1
roll pin
1:1
TEAM/FT 6589
RTR/TEAM BUILT 6597
6591
7666
7668
7667
(right outdrive)
(left outdrive)
6591
7666
ADJUST THE DIFF
As you tighten the diff bolt, you will notice the T-nut
ears moving closer to the bottom of the diff hub slot.
This compreses the spring behind the T-nut. The spring
should be fully compressed at the same time the T-nut
reaches the end of the slot.
CAUTION:
Pay close attention to
feeling when the spring is fully compressed.
Do not overtighten
the bolt.
When you feel the spring fully compressed, loosen the diff bolt 1/8
of a turn. No more, no less. Your diff should feel smooth when
turning the hubs in opposite directions.
After you have driven the truck once, recheck the diff adjustment.
diff bolt
7
8
9
10
11
s t e p 5
ASSEMBLE THE
TRANSMISSION
Install the two #3977
bearings or one #6599
bushing
into the #7661
left transmission case.
Install one #3976
bearing or #6598
bushing into the #7661
left transmission case.
TEAM/FT 3976
RTR ONLY 6598
7669
6571
7661
left case
7661
right case
7669
Add the #7669 spacer to the
#6571 driveshaft and put both
into the left case.
Install the left side of the diff
assembly and #6570 idler
gear into the left case.
Install the second #7669
spacer to the driveshaft.
Install the remaining #3977
bearings or one #6599 bushing
into the right transmission case.
Install one #3976 bearing or
#6598 bushing into the right
transmission case and put the
case halves together.
Screw the transmission cases
together with five #6924 (6860*)
screws.
Insert the #7665 roll pin into the
shaft hole with your needlenose
pliers. Center the pin in the
shaft.
1:1
RTR/TEAM BUILT 6597, qty 1
5/32 x 5/16 bushing
unflanged
1:1
RTR ONLY 6599, qty 2
3/16 x 3/8
bushing
unflanged
1:1
RTR ONLY 6598, qty 2
3/8 x 5/8 bushing
unflanged
TEAM/FT 3976
RTR ONLY 6598
TEAM/FT
3977
RTR ONLY
6599
6570
diff assembly
6924,
6860*
3977
3977
ALL KITS HAVE #3977
BEARINGS FOR THE
IDLER GEAR SHAFT
TEAM/FT
3977
RTR ONLY
6599
1:1
RTR ONLY 3977, qty 2
3/16 x 3/8
ball bearing
unflanged
Step 5
Step 5
7665