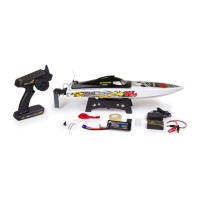
Turn Fins & Pre Run Checklist
The Atomik Barbwire features adjustable turn ns to aid in
turning. These can be adjusted using the included Allen Wrench.
The optimum angle of the adjustment is 45 degrees to the hull.
Driving Your Boat
1. Switch “ON” the transmitter. Check that the transmitter’s red LED light glows brightly.
2. Check that the model’s turn ns are adjusted correctly.
3. Switch “ON” the model. (Connect the LiPO battery pack.)
4. Check that the propeller and rudder respond to the transmitter inputs before placing the boat in the water.
After Use:
1. When you have nished using the boat, rst switch “OFF” the model by disconnecting the battery pack. Then
switch “OFF” the transmitter.
2. Remove all batteries from the transmitter and model.
3. Leave the boat’s upper deck o to allow moisture to evaporate. Place the model in a safe, dry place until it is
dry and then store it away.
NOTE: If the boat begins to bob when running, it may have taken on an excessive amount of water. In this case,
you should immediately return to shore, remove the upper deck and drain the water from the hull.
If the boat does not run in a straight line when not being steered, you
can x this by adjusting the steering trim located on the upper right
hand side of the transmitter.
1. Run your model on calm water when adjusting the steering. If your
model runs to the right when not being steered, press the “ST. TRIM-L”
button. Re-center the model and see if this has corrected the
problem. Keep making small adjustments in this way until the model
runs straight.
2. Press the “ST. TRIM-R” button to correct if the model steers to the left
without being steered in the same way as explained above.
Transmitter Introduction
REV
POWER
NOR
ST
Steering Switch Reverse
Throttle Trim Brake
Throttle Trim Forward
Power Indicator
Steering Switch Normal
Steering Trim Right
Steering Trim Left
Steering Travel Angle Left
Steering Travel Angle Right
1. Inspect all running hardware for loose screws and nuts.
2. Inspect the cooling lines for any cracks, clogging, or wear.
3. Install battery making sure they are charged and secure.
4. Perform a radio test by range checking your
transmitter. 100 feet recommended.
If you are going to race aggressively, use
the Atomik RC Hatch Tape. Part#: 0864
Racing Tip:
5. Be very certain the hatch is 100% secure.