3. Assemble the rear cover (5) to the front cover. Hold the instrument in
both hands face down and clear of the work surface. Use moderate
thumb pressure, or preferably heel of the hand pressure which spreads
the area of contact, to press the front cover into the rear cover a little at
a time. Work first on the sides, then top and bottom and back to the
sides as many times as necessary to bed down the assembly. Finally
go round the edges and corners to ensure that the covers are fully
mated and form a good seal
4. Insert and screw in the six No. 2 x 1/2 screws (6), using a hand screw-
driver only. Start with the screws in diagonally opposite corners and
finish off with the central top and bottom screws.
D2601-1
5
6
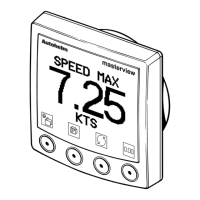
1. Front Cover (W065)
2. Keypad Mat (Q145)
3. PCB (Q144)
4. Buzzer Connector
5. Rear Cover (W067)
6. Screw No.2 x 1/2in. Pozi pan head (6 off)
13
2
4
masterview
Figure 1 Exploded View
Z211Z211
Z211Z211
Z211
ST80 Masterview
ST80 Masterview Service Manual 83028-1 7