Adding a Template
1.
In the New Task menu , click Site Setup.
2.
Select a server then, click Recording Schedule .
3. In the Templates: area, click Add Template .
4. Enter a name for the New Template.
5. Click the Set Area button, then click or drag the cursor across the Recording Mode: timeline to set
the types of events cameras will record. Individual rectangles on the Recording Mode: timeline are
colored when they have been selected.
The Recording Mode: options include:
l Continuous — Records video constantly.
l Motion — Records video when motion is detected.
6. To disable recording in parts of the template, click Clear Area, then click or drag the cursor across the
timeline to remove set recording periods.
7. If cameras are not recording in Continuous mode all day, you can set cameras to record reference
images between events in the recording schedule.
l Select the Record a reference image every: checkbox and set the time between each
reference image.
Editing and Deleting a Template
1.
In the Setup tab, select the server you want to edit and click .
2. Select a template from the Templates: pane and do one of the following:
l To edit a template, modify the schedule.
l To rename a template, click Rename Template and enter a new name.
l To delete a template, click Delete Template.
3. Click OK.
Setting Up a Weekly Recording Schedule
You can set up a weekly recording schedule by applying templates to cameras for each day of the week.
1.
In the New Task menu , click Site Setup.
2.
Select a server, then click Recording Schedule .
3. Select a template from the Templates: list. For more information, see Recording Schedule Templates
on the previous page.
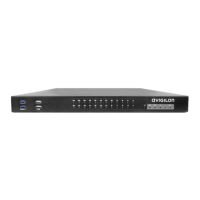
4. In Default Week, click the days your template will cover for each camera on your site.
Adding a Template 30