Do you have a question about the Avision AM7630i and is the answer not in the manual?
Users can place documents without precise alignment for auto crop and straighten.
Automatically detects and copies the text side of a document, ignoring the blank side.
The machine automatically selects the most suitable paper tray based on document size.
Streamlines workflow by integrating scan, copy, and print functions with an 8-inch touch screen.
Enables automatic duplex printing to save paper and reduce costs.
Allows saving scanned documents to the product's memory or a USB flash drive.
Enables electronic transmission of documents over the internet to various destinations.
Provides an embedded web page for remote monitoring and management of product functions.
Instructions for safely unpacking the MFP carton and its accessories from the packaging.
Detailed steps for removing protective tapes, films, and desiccants from the machine.
Procedure to move the lock switch to the 'Unlock' position for product operation.
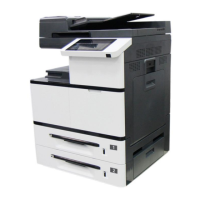
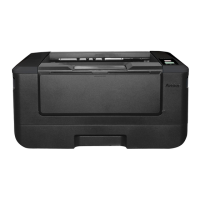
Illustrates and labels the front components of the AM7630i/AM7640i/AM7645i models.
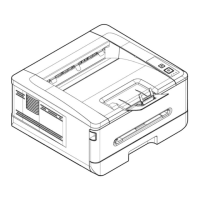
Diagram showing the rear view with labeled ports for USB, LAN, and power.
Lists the main units, consumables, and accessories included in the product package.
Important guidelines for installing the equipment, covering environment, ventilation, and power.
Steps to open the side door and remove the transport locking latch to enable machine function.
Instructions for unpacking, distributing toner, and installing the toner cartridge into the machine.
Procedure for removing protective elements and installing the developing unit to the machine.
Steps to remove protective film, pull release arms, and insert the drum unit into its slot.
Instructions on how to lift the paper stopper to collect printed paper.
Guidance on preparing paper and loading it into the main input tray for printing.
Steps for opening the manual tray, extending it, and loading paper for different sizes.
Instructions to move the scan unit lock switch to 'Unlock' position before using the machine.
Procedure for connecting the machine to a network using an Ethernet cable.
Steps for connecting the product's power cable to the power jack and a wall outlet.
How to power on the machine using the Power button on the control panel.
Procedure to turn off the machine via the power button and confirmation dialog.
Instructions for setting the correct date and time on the machine after initial power-on.
Steps to specify an IP address for the product, either via DHCP or static configuration.
Guide to entering mail server information required for sending scanned images via email.
Instructions for installing scanner and printer drivers when connecting via USB cable.
Steps to install scanner and printer drivers for network connection, including TCP/IP setup.
Guidance on loading documents into the ADF or onto the glass for scanning or copying.
Specifications and conditions for using the Automatic Document Feeder.
Information on the maximum scan area and placement of documents on the flatbed glass.
Steps for correctly placing documents in the ADF, including fanning and aligning.
Instructions for placing documents face down on the glass platen for scanning or copying.
Details on the intelligent copy function, including automatic features and workflow streamlining.
Procedure for performing copy operations using the flatbed glass, with option confirmation.
Explains the 'Bind' feature for flatbed copies, allowing continuous multi-page scanning.
Describes settings like Paper Supply, Density, Auto Fit, Duplex Output, Bind, Scale, and Count.
Options for merging multiple pages onto a single sheet, such as 2-in-1 or 4-in-1.
Explains 'Collated' and 'Uncollated' options for organizing copies in sort or stack order.
Covers advanced functions like Document Mode, Book Copy, and Watermark settings.
Step-by-step guide on how to perform a book copy using the Advanced settings.
Overview of the scanning process, including document placement and tapping the Scan button.
Details on choosing scan destinations like Device, USB, FTP, or CIFS, and managing folders.
Information on saving scanned images to a USB flash drive, including naming methods and format support.
Guide to setting up FTP and CIFS destinations for scanned documents and file naming conventions.
Instructions for copying both sides of an ID card onto a single sheet of paper.
Allows printing previously stored files from the machine's memory or a USB flash drive.
Function to scan and temporarily save copy jobs in the product's memory for later printing.
Steps for scanning documents and sending them as email attachments to recipients.
Accessing product configurations via the touch screen and viewing machine status.
Viewing general product details like Host Name, IP Address, and System Version.
Displaying current error items or warning messages and accessing troubleshooting methods.
Shows the current status of consumables like toner, developing unit, and fuser capacity.
Provides usage status of product functions, including serial number and page counts.
Accessing device settings such as language, date/time, paper size, and sleep mode.
Instructions for accessing the product's embedded web page for remote configuration.
Details on the Status tab, including General Information and System Usage Page.
How to access the Printer Driver Properties dialog box via the Control Panel.
Settings on the Basic tab include Orientation, Copies, Effect, Density, Toner Save, and Invert.
Settings for Original Size, Tray selection, and Media Type for printing.
Options for N-up printing, borders, and output paper size scaling.
Allows adding custom text or image watermarks to documents.
Settings for two-sided printing, including long-edge and short-edge binding options.
Enables combining multiple files into a single print job for PC printing.
Includes Wait Timeout settings and options to resume factory default settings.
Lists the minimum hardware and OS requirements for using the scanner.
Step-by-step instructions for starting the image editing application and selecting the scanner source.
Explains the main elements of the scanner user interface, including Mode, Resolution, and Brightness.
Guidance on choosing between Black & White, 8-bit Gray, and 24-bit Color modes.
Information on selecting optimal scan resolution for detail, file size, and OCR accuracy.
How to adjust image lightness, darkness, contrast, and grayscale levels.
Selecting between Flatbed, Auto, and ADF sources for scanning documents.
Options for Automatic, Deskew, and Custom scan area selection and size definitions.
Features for detecting overlapped documents using Additional Length or Ultrasonic Detection.
Allows filtering out specific color channels (Red, Green, Blue) from scans.
View scanner information like serial number, pad count, and firmware version for support.
Instructions to clean the glass area to resolve scanned images with abnormal lines.
Steps for cleaning the document glass with isopropyl alcohol for optimal image quality.
Procedure for cleaning the ADF feeding rollers and snap-in pad to ensure smooth document feeding.
Steps to clean the EP charger after about 10,000 pages, involving removing the drum unit.
Instructions for cleaning pickup, feeding, and reverse rollers in the paper tray to prevent jams.
Procedure for cleaning the roller in the manual tray to ensure proper paper feeding.
Guidance on correctly installing the manual tray roller, aligning the notch with the tab.
Steps to clean toner leakage from the machine using a lint-free cloth.
Instructions to clean the paper path to resolve print quality issues caused by dust or toner buildup.
Procedure to replace the ADF snap-in pad module when document feeding problems occur.
Steps to replace the ADF roller when worn out, causing document feeding issues.
Instructions for safely removing and replacing the waste toner can.
Procedure for removing and installing the toner cartridge, with advice on cleaning the EP charger.
Steps to replace feeding and reverse rollers in the paper tray to fix paper feeding issues.
Procedure to replace worn rollers and pad in the manual tray to ensure proper paper feeding.
Steps to remove and reinstall the drum unit, including safety precautions regarding light exposure.
Procedure to remove and install the developing unit, with instructions for returning the used unit.
Instructions for safely replacing the fuser, emphasizing waiting for it to cool down due to high temperature.
How to launch the Printer Status Monitor by double-clicking its icon on the system tray.
Explains how to view printer status, consumable information, and error messages in the dialog box.
Customizing monitoring settings like language, update interval, and pop-up alerts.
Guidance on resolving warnings or errors displayed on the LCD panel or indicated by the Error LED.
Table listing system error codes, their possible causes, and solutions for troubleshooting.
Lists error codes related to scanner malfunctions, their causes, and troubleshooting steps.
General advice on clearing paper jams by identifying the jammed position from messages.
Diagrams identifying specific areas (A-F) within the machine where paper jams can occur.
Steps to remove jammed paper from the drum unit, involving opening the side door and removing the drum.
Procedure to remove jammed paper from the fuser area, emphasizing caution due to high temperature.
Lists error codes related to fuser malfunctions, temperature issues, and connection problems.
Troubleshooting steps for various runtime errors, including NVRAM, EP NVRAM, and LPH errors.
Details on system errors like door openings, tray errors, and paper feed issues with their solutions.
Troubleshooting common network issues like IP conflicts, cable unplugged, and DHCP problems.
Solutions for errors related to external devices, such as CSA6 paper jams or timeouts.
Lists E-mail related network error codes, SMTP issues, and sender/recipient address problems.
Explains messages shown when a selected setting is unavailable for a specific feature.
Solutions for paper curling issues, involving paper weight, moisture, and tray loading.
Steps to resolve light printing issues, checking toner installation, Toner Save, and paper type.
Troubleshooting vertical black or white lines in prints by cleaning the EP charger or drum unit.
Addresses dirty backgrounds by checking toner leakage or paper specifications.
Troubleshooting blank pages by checking toner levels and calling for service if issues persist.
Solutions for loose toner, including trying different paper sides, checking specifications, and media type.
Overview of general product details: type, functions, CPU, memory, dimensions, weight, and power.
Details on copy speed, count, zoom, N-up, copy mode, and max scanning size.
Specifications for printing: method, speed, paper sizes, resolution, and paper capacity.
Details on scanner type, max scanning size, resolution, ADF capacity, bit depth, and file formats.
Expected page counts for consumables like toner, drum unit, developing unit, and fuser.