EN-2
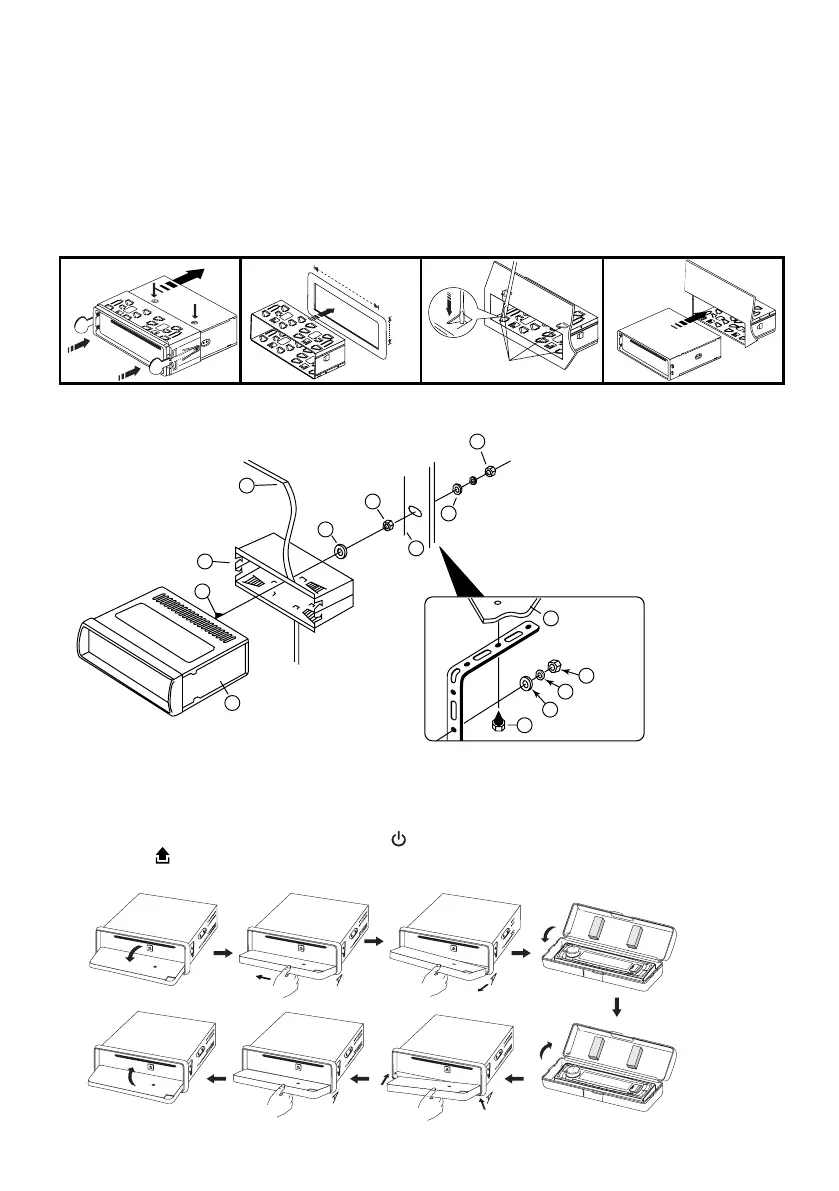
INSTALLATION
PRECAUTIONS
• Choosethemountinglocationcarefullysothattheunitwillnotinterferewiththenormaldrivingfunctionsof
the driver.
• Avoidinstallingtheunitwhereitwouldbesubjecttohightemperatures,suchasfromdirectsunlightorhotair
fromtheheater,orwhereitwouldbesubjecttodust,dirtorexcessivevibration.
• Useonlythesuppliedmountinghardwareforasafeandsecureinstallation.
• Besuretoremovethefrontpanelbeforeinstallingtheunit.
NOTE :Inclinationangleforcarradioinstallationmustnotexceed30˚otherwisethefrontpanelwillnotopen.
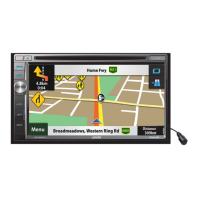
53mm
182mm
3
2
182mm
53mm
1
2
1
3
4
Bend these
claws,ifnecessary
release screw and
bracket
Note: Keep the release key in a safe place as you may need it in the future to remove the unit from the car.
TO SUPPORT THE UNIT
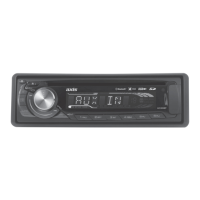
Detaching and attaching the front panel
The front panel of this unit can be detached in order to prevent the unit from being stolen.
FOLDING DOWN AND DETACHING/ATTACHING THE FRONT PANEL
Beforedetachingthefrontpanel,besuretopressthe button(1)OFFrst.
Then press the button(10),lettheFrontPanelarriveinhorizontalpositionanddetachthepanelbypullingit
towards you as illustrated.
1. UNIT
2. RELEASE CASE
3. DASH BOARD
4. HEX NUT
5. LOCK WASHER
6. PLAIN WASHER
7. CAR BODY
8. REAR SUPPORT STRAP
9. TAPPING SCREW
10. M5 X 15 HEX BOLT
Dashboard
1
2
15°
15°
15°
15°