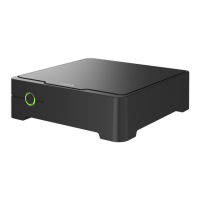
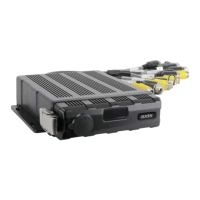
The AXIS S3008 Mk II Recorder is a compact network video recorder designed for surveillance solutions, featuring a built-in Power over Ethernet (PoE) switch for simplified installation. It comes equipped with a surveillance-grade hard drive and a USB port for convenient video footage export. This recorder is available in models with 2 TB, 4 TB, or 8 TB hard drives.
Function Description
The recorder serves as a central hub for up to eight network cameras, providing both power and data connectivity through its integrated PoE switch. It manages video recordings, stores them on its internal hard drive, and allows for remote access and management via the AXIS Companion video management software. The device ensures secure operation with digitally signed firmware and multi-factor authentication (MFA) for user accounts.
Usage Features
Camera Connectivity and Power:
The recorder supports up to eight devices connected to its PoE switch. It can supply a total of 124 W of power, with each network port supporting up to 15.4 W (PoE Class 3) at the PoE port (PSE) and 12.95 W on the camera side (PD). The switch intelligently allocates PoE power based on the class of the connected device.
Web Interface Access:
The device's web interface is accessible by typing its IP address into a web browser. This interface provides comprehensive control and monitoring capabilities.
Main Menu and Navigation:
The main menu can be shown or hidden, offering access to release notes, product help, language settings, and theme selection (light or dark).
User Management:
The user menu displays information about the logged-in user and allows for account changes (logging out and logging into a new account) or complete logout.
The context menu provides options for managing analytics data sharing, viewing legal information (cookies and licenses), providing feedback, viewing device information (firmware version, serial number), and switching to a legacy device interface.
Status Monitoring:
The web interface displays the time sync status, including NTP synchronization information and remaining time until the next sync. It also shows ongoing recordings, their designated storage space, and detailed device information.
App Management:
Users can install new apps, find more apps from Axis, and allow installation of unsigned or root-privileged apps. The interface provides security updates for AXIS OS and ACAP apps. Each app can be started or stopped, and its settings can be accessed. The context menu for apps offers options such as viewing open-source licenses, app logs, activating licenses with a key or automatically, deactivating licenses, configuring settings, and deleting apps.
Network Configuration:
The recorder supports both IPv4 and IPv6 settings. Users can choose to assign IP addresses and hostnames automatically via DHCP or configure them manually. Options for subnet mask, router (gateway) address, and fallback static IP address are available. DNS servers can also be configured automatically or manually.
Network Discovery Protocols:
The device supports Bonjour®, UPnP®, and WS-Discovery for automatic discovery on the network, allowing users to set friendly names for easier identification.
One-Click Cloud Connection (O3C):
The O3C feature provides easy and secure internet access to live and recorded video. Users can enable one-click connection by pressing and holding the control button for about 3 seconds until the status LED flashes green, or set it to "Always" to maintain a constant connection. Proxy settings, including host, port, login, password, and authentication method (Basic, Digest, Auto), can be configured. An Owner Authentication Key (OAK) can be fetched for secure device authentication.
Power over Ethernet (PoE) Management:
The interface shows allocated power, total PoE consumption, and allows users to keep PoE active during recorder restarts. A visual representation of the ports helps in identifying and managing individual port settings, including PoE on/off, network on/off, status, friendly name, and power consumption.
Storage Management:
The recorder provides detailed information about its hard drive, including free space, status (mounted/unmounted), file system, encryption status, temperature, and overall health test results.
Security Features:
The device uses certificates for authenticating devices on the network, supporting both client/server and CA certificates. It supports various certificate formats (PEM, .CER, .PFX) and private key formats (PKCS#1, PKCS#12). Users can filter, add, and manage certificates, including secure keystore options (Secure element, Trusted Platform Module 2.0) and key types. IEEE 802.1x support is included for secure network admission control, allowing the device to authenticate with an authentication server using digital certificates (EAP-TLS). Custom-signed firmware certificates can be installed for test or custom firmware.
SSH Server:
The Secure Shell (SSH) server can be enabled to allow secure remote login and execution of shell and network services.
Maintenance Features
Firmware Upgrade:
The recorder's firmware can be upgraded to new versions, which may include improved functionality, bug fixes, and new features. Users can choose between standard upgrade, factory default upgrade (which resets settings and prevents rollback), or autorollback (which reverts to the previous version if the upgrade is not confirmed within a set time). Firmware rollback to a previously installed version is also possible.
Restart and Restore Options:
The device can be restarted without affecting current settings. A "Restore" option returns most settings to factory default values, requiring reconfiguration of the device, apps, events, and presets. A "Factory default" option returns all settings to factory default values, requiring the IP address to be reset for accessibility.
Hard Reset:
A hard reset can be performed to return the recorder to factory default settings. This process resets all settings, including the IP address, but does not remove recordings. To perform a hard reset, the recorder must be switched off by long-pressing the power button, then the control button is pressed and held while the power button is pressed and released. The control button is released when the LED indicator flashes amber.
System Report:
Users can save a system report from AXIS Companion, which is useful for technical support when troubleshooting issues.
Troubleshooting:
The manual provides guidance on troubleshooting common issues, such as recordings not being available, inability to connect to cameras, "No contact" error notifications, and sites not appearing in the mobile app. It advises checking power, internet connection, network functionality, and firmware/software updates.
Buzzer and Overheating:
The buzzer indicates issues like exceeded PoE budget or severe overheating, and can be silenced with a short press of the power button.
The storage management section includes tools to check and repair the hard drive for errors. Users can format the storage device (erasing all recordings), encrypt or decrypt stored data, and change the password for disk encryption. The "Unmount" tool is available to safely disconnect the device from the system before physical removal. The "Write protect" feature can be enabled to prevent the storage device from being overwritten. The "Autoformat" tool automatically formats the disk using the ext4 file system.
Password Management:
If a password was set during configuration and the product was later added to a site, the AXIS Companion software changes the device passwords. To log in, users should use the username "root" and their site password.
Erasing Recordings:
All recordings can be erased from the hard drive by selecting the "Format" option in the System > Storage section of the web interface. This procedure does not alter the recorder's configuration or site settings.