When the desired volume is set, the locking ring should be
moved to the upper position (Fig. 5B). All volume setting
procedures should end in the the reduction of volume
setting from a position just above the desired level to that
level. As further examples:
•When moving from a high volume setting to a lower
value, the pushbutton or adjustment knob should be
rotated at normal speed, clockwise, to take the setting
just above the desired level. It should then be further
rotated very slowly till the desired volume is shown on
the digital volume display.
•In the event that you overshoot the desired setting,
repeat the procedure by increasing the volume to
a position just above the desired volume and then once
again, reduce slowly to the desired level.
•When moving from a low volume setting to a higher
value, the pushbutton or adjustment knob should be
rotated at normal speed, anticlockwise, to take the
setting to a position just above the desired level. Then
reduce the reverse the rotation and slowly adjust back
until the desired volume is shown on the digital display.
•Once again, in the event that you overshoot the desired
setting, repeat the procedure by increasing the volume
to a position just above the desired volume and then
reduce slowly to the desired level.
•Following volume adjustment, move the locking ring to
the upper position, to lock the knob and prevent
accidental volume change.
3 - ASPIRATING AND DISPENSING LIQUIDS
Place a tip on the shaft of the pipette. See Section 6 for
the appropriate tip. Press the tip on firmly using a slight
twisting motion. This will ensure an airtight seal.
Important: Never aspirate liquids into the AXYPET
without a tip attached.
Aspiration
Press the pushbutton to the first positive stop, (Fig. 2A).
Holding the pipette vertically, immerse the tip into the
sample liquid. The depth to which the tip is immersed in
the sample liquid depends on the model.
ENGLISH
5
Release the pushbutton slowly and smoothly to aspirate
the sample, (Fig. 2B). Wait one second and then withdraw
the tip from the liquid. If the pipette tip is not immersed to
the recommended depth or if the pipetting pushbutton is
rapidly released, air may enter the disposable tip.
Avoid touching the orifice of the tip.
Dispensing
•Place the end of the tip against the inside wall of the
vessel at an angle of 10° to 40°.
•
Press the pushbutton smoothly to the first stop, (Fig. 2C).
Wait one second.
•Press the pushbutton to the second stop to expel any
remaining liquid, (Fig. 2D).
•Keeping the pushbutton depressed to the very end,
remove the pipette by drawing the tip against the inside
surface of the receiving vessel.
•
Release the pushbutton to its starting position, (Fig. 2E).
•
Eject the tip by pressing the tip ejector button, (Fig. 2F).
Remember to change the tip whenever a different kind
of liquid is to be sampled.
Filters
A replaceable filter, fitted in a seat in the bottom part of the
shaft, is used in 5,000 μl and 10,000 μl pipettes (Fig. 3L).
This filter prevents the aspirated liquid from entering into
the shaft and thus from contaminating the inside of the
shaft and the piston. Using the filter is particularly important
when aspirating and dispensing large volumes of liquid.
If the filter becomes wet during liquid aspiration it should
be replaced with a new one.
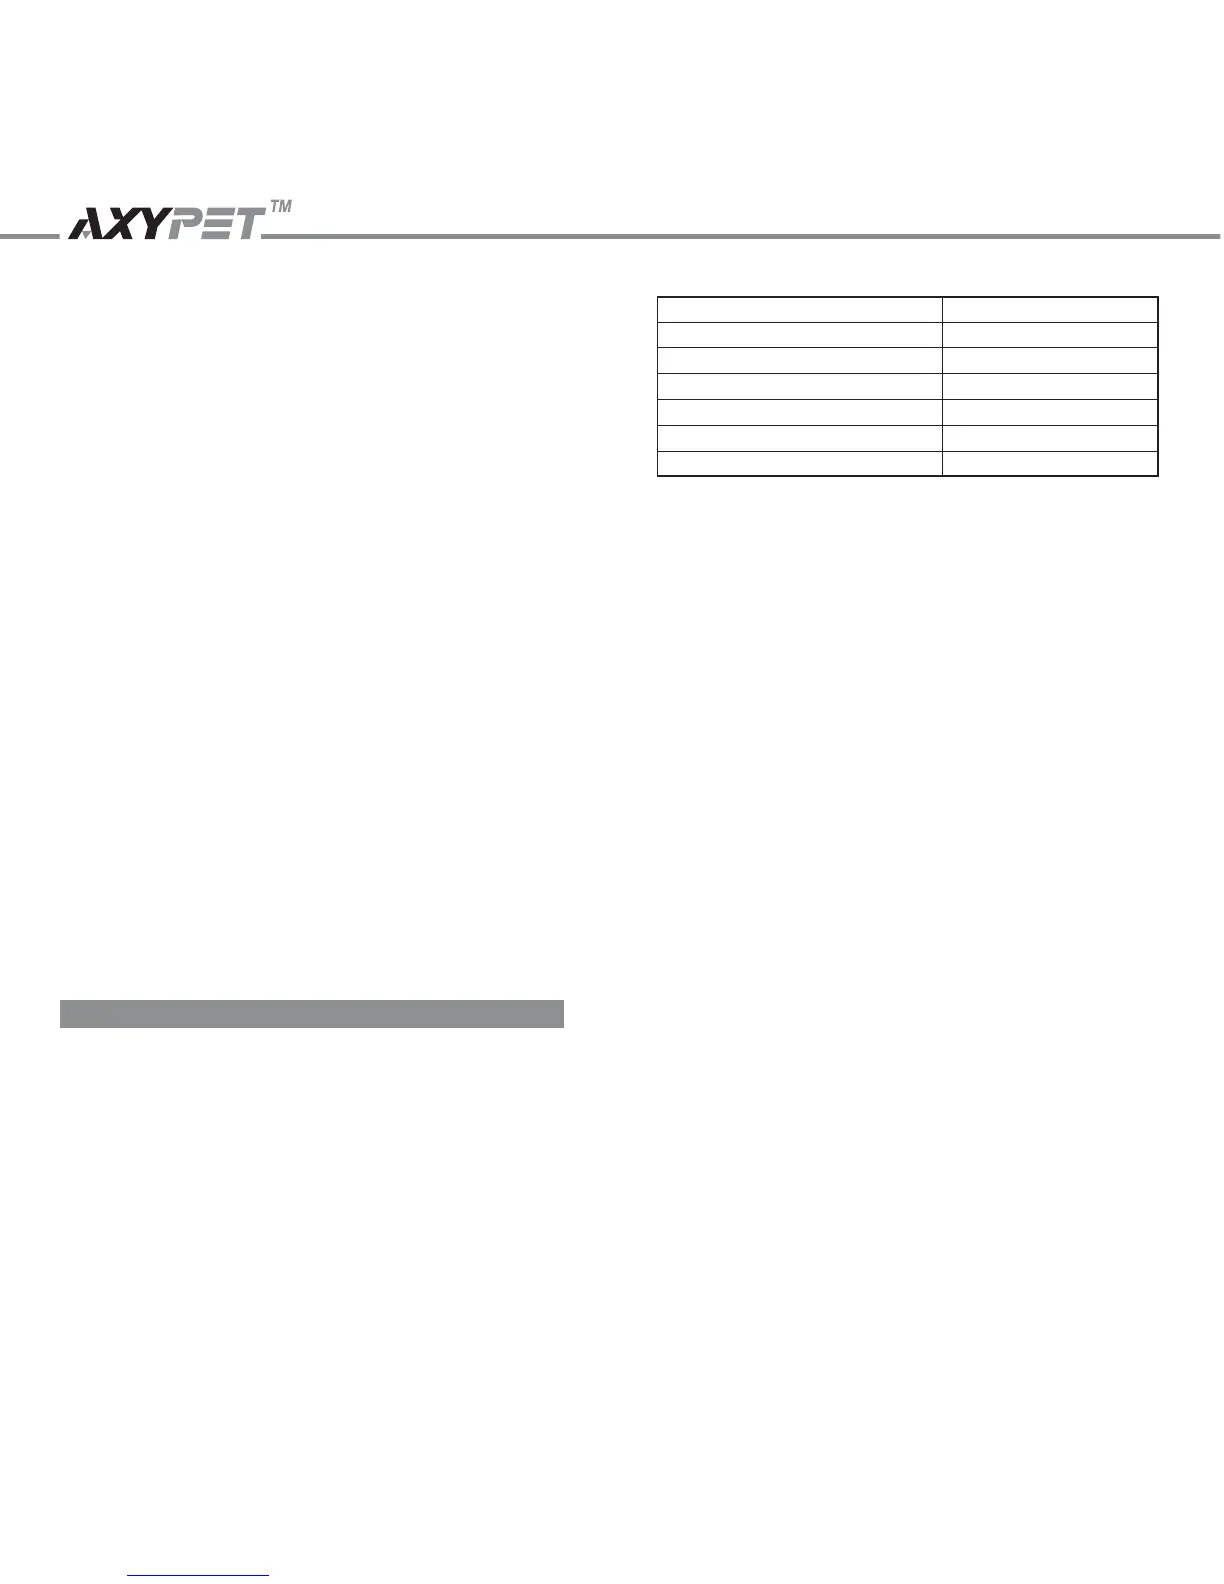
Model
AP-2
AP-10
AP-20, AP-50, AP-100
AP-200, AP-250, AP-1000
AP-5000
AP-10ML
Immersion depth (mm)
≤ 1
≤ 1
2 – 3
2 – 4
3 – 6
5 – 7
6
 Loading...