F`
MANUTENZIONE
MAINTENANCE
D
UM_RLG-CODE MEJ_I-GB_rev. 1.0
@R;$ "#")+)!*+#(%$@%CC'$A+(?a+'$@+$
)B'"&+""+#(%
@R;E=$ #II2..83-8
Serviranno una serie di attrezzi per procedere con
l’operazione.
• Martello di gomma
• N.2 cacciaviti
• N.4 chiavi a brugola: 3, 2,5 e 8 mm
• N.2 chiavi Torx® TX20 e TX25
• Cutter
• Chiave inglese da 17
• Grasso bianco Kluber 84 (per motorizzazioni con OR)
• LOXEAL 83-54 (loctite)
PERICOLO
PERICOLO DI FOLGORAZIONE
ATTENZIONE
AVVERTENZA
RISPETTA L'AMBIENTE
Prima di eseguire qualsiasi intervento di manutenzione,
togliere corrente ed inibire a chiunque l’uso dei comandi
dell’avvolgitore.
@R;E;$S.2I841583-2
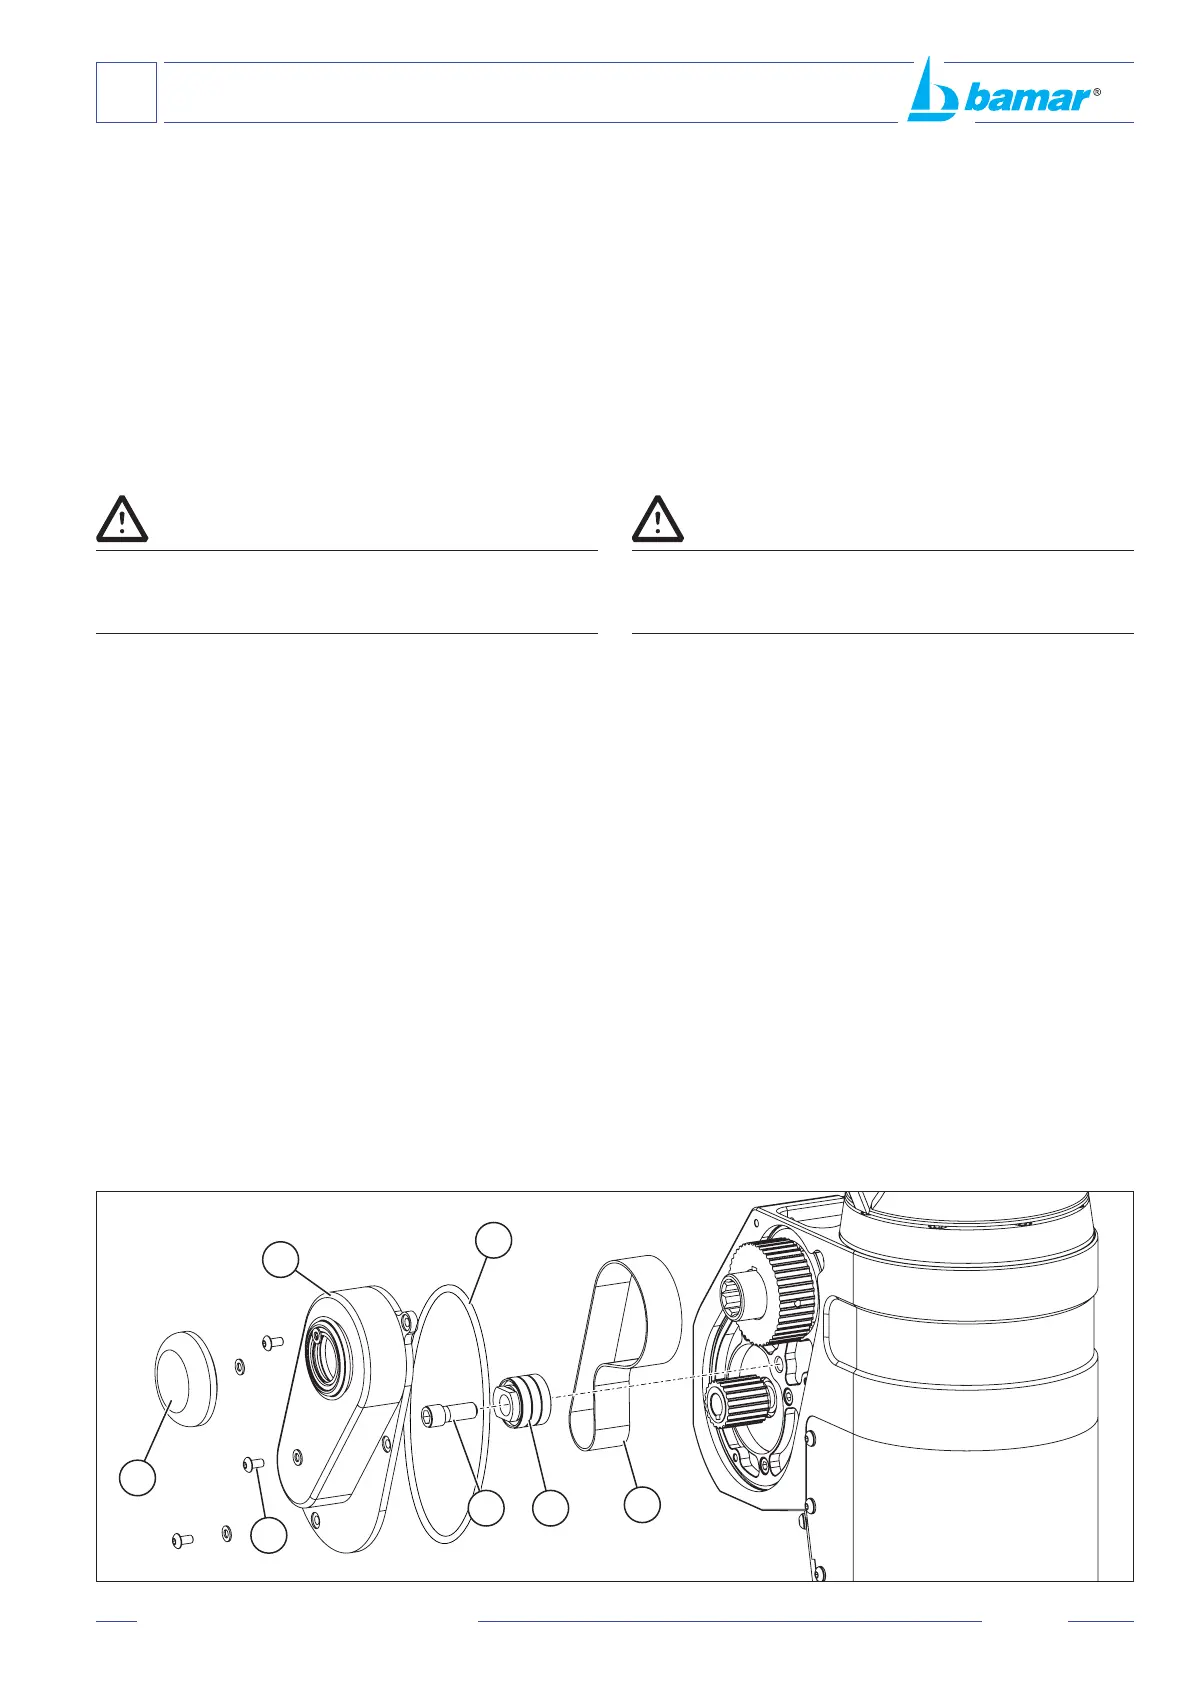
Dovendo sostituire la cinghia di trasmissione procedere
come segue:
• Smontare il tappo di protezione emergenza (F).
• Smontare le viti (A) di ssaggio e togliere il coperchio
(@).
• Smontare il galoppino (%) svitando la sua vite di
ssaggio (?).
• Smontare la cinghia di trasmissione (') e sostituirla
con una nuova.
• Procedere alla regolazione della tensione della cinghia
(') come descritto nel capitolo D-2.3.
• Pulire accuratamente le superci del coperchio (@) dove
riposizionare l’OR (D).
• Controllare che l’OR (D) sia in buono stato, altrimenti
sostituirlo con quello fornito come ricambio.
• Inserire l’OR (D) nella sua sede sul corpo riduttore
• Stendere un velo di grasso bianco sulla supercie della
guarnizione prima di rimontare il coperchio (@).
• Rimontare il tappo di protezione emergenza (F).
'T:$ VAH$*A$=#]>%+#$*V#$'=)W#$D#>*
'T:BF$ =LP02/L8$.336-$
You will need a series of instruments in order to carry out
the task.
• Rubber hammer
• N.2 screws drivers
• N.4 Allen keys: 3, 2, 5 and 8 mm
• N.2 Torx® keys: TX20 & TX25
• Cutter
• Spanner 17
• Kluber 84 white grease (for motorizations with OR)
• LOXEAL sealing liquid 83-54 (Loctite)
DANGER
DANGER OF ELECTROCUTION
CAUTION
WARNING
RESPECT THE ENVIRONMENT
Before carrying out any kind of maintenance, cut the
electric supply and prevent anyone from using the furler
commands.
'T:B:$]/31L80/L
If you have to replace the drive belt you have to proceed
as follows:
• Take off the emergency clutch protection cap (D).
• Unscrew the screws (+) from the protection cover (')
in order to take it off.
• Take off the eccentric pin (#) by unscrewing its locking
screw (<).
• Take off the belt (%) and replace it with a new one.
• Tension the drive belt as explained in section D-2.3
hereafter.
• Pay the outmost attention in cleaning the surface of the
cover (') where the OR (@) has to be positioned again.
• Check the OR (@) is in good conditions, otherwise
replace it with the one supplied as spare.
• Now insert the OR (@) in its housing on the motorization
• Before closing the cover ('), put some white grease on
the OR seal surface.
• Put the emergency clutch protection cap on again (D).
@
D
F
%?
A
'