Do you have a question about the Bambu Lab P1S and is the answer not in the manual?
Key design considerations including size, ventilation, printing method, and visual elements.
List of 3D printed components and recommended PETG filament type.
Fasteners (screws, nuts) and electronic components (LED strip, relay).
Print all parts as shown and clean them for smooth assembly.
Assemble the four corner segments of the ramp structure.
Connect the corner sections and add front/rear parts to form the main frame.
Assemble the LED frame and attach the LED strip with diffuser elements.
Connect the LED strip to the printer's USB and wire the relay for control.
Install the illuminated Bambu Lab logo button.
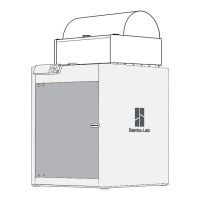
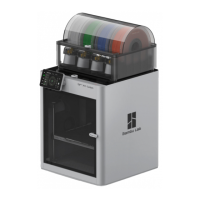
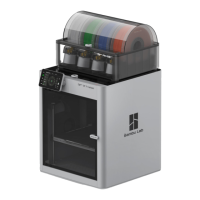
This document outlines the assembly and installation process for a "Light ramp Bambu Lab P1S," an accessory designed to enhance the lighting of the Bambu Lab P1S 3D printer. The primary function of this device is to provide additional illumination within the printer's enclosure, featuring both a top LED ramp and an illuminated Bambu Lab logo.
The Light ramp Bambu Lab P1S serves as an external lighting upgrade for the Bambu Lab P1S 3D printer. It integrates a top-mounted LED strip to brighten the printing area and incorporates an illuminated Bambu Lab logo for aesthetic appeal. The ramp's lighting is designed to be controlled by the printer's original side light control, ensuring seamless integration with the existing system. This allows users to switch the ramp on and off using the printer's built-in controls, maintaining a consistent user experience. The design prioritizes a low-profile frame, ensuring it does not obstruct the printer's operation or aesthetics. Ventilation holes are incorporated into the sides of the design, which is crucial for maintaining proper airflow and preventing heat buildup within the enclosure, especially given the presence of LED components. The entire assembly is designed for ease of printing, requiring no supports during the 3D printing process, which simplifies manufacturing and reduces material waste. Quick assembly is another key feature, with the design avoiding the need for gluing, relying instead on mechanical fasteners. The color scheme of the P1S printer is respected in the design, ensuring the accessory blends harmoniously with the printer's existing appearance.
The light ramp is intended to be a user-friendly addition to the Bambu Lab P1S. Once assembled and installed, its operation is straightforward, as it leverages the printer's existing side light control. This means users do not need to learn new controls or interact with additional switches; the light ramp will activate and deactivate in conjunction with the printer's built-in lighting. The illuminated Bambu Lab logo adds a distinctive visual element, enhancing the printer's overall look. The top LED ramp provides ample light, which can be particularly useful for monitoring print progress, inspecting details of printed objects, and improving visibility during maintenance tasks. The design's emphasis on a low frame height ensures that the accessory does not interfere with the printer's internal mechanisms or the movement of its components. The ventilation holes are a passive feature that contributes to the longevity of both the light ramp's electronics and the printer itself by facilitating heat dissipation. The use of PETG material for printed parts is recommended due to its durability and suitability for 3D printing applications, especially in environments that might experience moderate temperatures. The assembly process, as detailed in the manual, is designed to be accessible to users with basic DIY skills, involving the connection of pre-printed parts using screws and nuts. The inclusion of a relay in the wiring scheme suggests a robust electrical connection that can handle the power requirements of the LED strip while being safely controlled by the printer's existing light circuit.
Maintenance for the Light ramp Bambu Lab P1S primarily involves the initial cleaning of 3D printed parts and careful handling during assembly. After printing, parts should be cleaned to ensure smooth surfaces and proper fit. This step is crucial for the aesthetic and functional quality of the final product. The design's reliance on screws for assembly, rather than glue, means that components can be disassembled if necessary for repair, replacement, or further modification. This modularity is a significant maintenance advantage. Should any LED strip fail, or if the user wishes to upgrade the lighting, the strips can be accessed and replaced. The wiring, including the relay, is designed to be integrated into the printer's existing electronics, specifically connecting to the service USB for power and the original LED light connector for control. This integration requires careful handling of the printer's internal components, including peeling off the electronics cover and disconnecting existing wiring. Users should exercise caution to avoid damaging the printer's delicate parts. The manual explicitly states that unscrewing the original LED light will render it inoperable, indicating a trade-off where the light ramp replaces the printer's native lighting. The threading of wires through prepared holes and the use of diffusers for the LED strips are design choices that contribute to both the aesthetic finish and the protection of the electrical components, potentially reducing the need for frequent maintenance. The choice of PETG material is also a maintenance consideration, as PETG is known for its resistance to wear and tear, making the printed parts durable in the long run. Regular dusting or cleaning of the light ramp and its diffusers would be the extent of routine maintenance to ensure optimal light output and appearance. The detailed instructions and visual aids provided in the manual are essential for successful assembly and any future troubleshooting, making the device maintainable by the end-user.
| Layer Resolution | 0.1 - 0.3 mm |
|---|---|
| Filament Diameter | 1.75 mm |
| Chamber Temperature | Up to 60°C |
| Nozzle Temperature | Up to 300°C |
| Input Voltage | 100-240V AC, 50/60Hz |
| Extruder Type | Direct Drive |
| Heated Bed | Yes |
| Bed Temperature | Up to 100°C |
| Build Volume | 256 x 256 x 256 mm |
| Print Speed | 500 mm/s |
| Nozzle Diameter | 0.4 mm |
| Connectivity | Wi-Fi, USB |
| Supported Materials | PLA, PETG, TPU |
| Max. Acceleration | 20 m/s² |
| Control | Touchscreen |
| Enclosure | Fully Enclosed |
| Dimensions | 389 x 389 x 457 mm |