EasyManua.ls Logo

Barrette 3X6 User Manual

Default Icon
20 pages
To Next Page IconTo Next Page
Page #1 background imageLoading...
Page #1 background image
WEB REV 11.21
3X6
DECORATIVE SCREEN PANEL
FRAME KIT
Read all instructions prior to installing product.
Refer to manufacturers safety instructions when operating any tools.
To register your product, please visit: barretteoutdoorliving.com
Installation Instructions
English ...................................................................................1
Français .................................................................................7
Español ................................................................................ 13
Question and Answer IconNeed help?

Do you have a question about the Barrette 3X6 and is the answer not in the manual?

Barrette 3X6 Specifications

General IconGeneral
BrandBarrette
Model3X6
CategoryFencing & Gates
LanguageEnglish

Summary

Installation Instructions

Step 1: Determine Installation Location

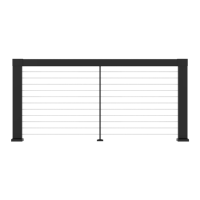
Determine where to install the frame kit, ensuring posts are held by a solid structure.

Step 2: Install Base Plates on Posts

Attach base plates to the bottom of posts using screws, ensuring a secure fit.

Step 3: Position and Mark First Post

Set the first post, mark holes for the surface mounting plate, and drill for fasteners.

Step 4: Install Post Channel and Bottom Rail

Insert post channel spacer and bottom rail into the first post and its channel.

Step 5: Install Second Post and Bottom Rail

Repeat step 4 for the second post, securing the bottom rail.

Step 6: Secure Posts and Rails

Use the provided drive bit to install screws, locking posts and rails together.

Step 7: Insert Post Channel

Insert the first plastic post channel into the post, pushing until it clicks.

Step 8: Repeat Post Channel Installation

Repeat step 7 for the second post.

Step 9: Insert Decorative Screen Panel

Insert the first decorative screen panel into the post channel assembly.

Step 10: Install Top Panel and Rails

Repeat steps 7-9 for the top panel, ensuring rails are equally spaced and level.

Step 11: Place Post Caps

Align post cap tabs with post holes and use a rubber mallet to seat them.

Step 12: Connect Additional Frame Kits

Utilize line and corner extension kits to connect additional frame kits.

Step 13: Assemble Trim Ring

Assemble the trim ring over the plate by pushing plugs through holes.

Related product manuals