EasyManua.ls Logo

Barska AX13104 - User Manual

Barska AX13104
2 pages
Print Icon
To Next Page IconTo Next Page
Loading...
User’s Manual for
1.01 Cubic Ft White Keypad Jewelry Safe
WARNING
Read all instructions before using this safe.
- For security purposes, change the factory default
code as soon as possible. Factory default code
is 168 and 12345678
-Test registered pin code a few times before closing
the safe door.
- Avoid leaving door open and unattended; it will allow
unauthorized individuals to reprogram the safe,
gaining full access to the safe and its contents.
- Body of safe consists of two steel plates filled with a
fire-retardant material
- Do NOT store combustible materials in this unit.
- In the event of a fire, we recommend caution when
opening the safe. If you feel unsure about opening the
safe because of the contents stored, contact your
local fire department for assistance.
- Store emergency keys in a secure place; NOT inside
of the safe.
- Keep children away from safe; they should not play
with or around the safe at anytime. Children at play
could accidentally get locked inside the safe or
accidentally pull on the safe door causing safe to tip
over if not properly mounted.
- Failure to follow these warnings could result in serious
injury or death.
NOTE: BARSKA is not responsible for any damage or
lost contents in the safe due to moisture.
NOTE: BARSKA is not responsible if the safe is stolen
or contents in the safe.
See reverse side for more information
D
L
o
c
k
U
n
l
o
c
k
D
E
BATTERY & KEY ACCESS
Push down on button
located under the key pad
and turn keypad cover
counter clockwise.
DO NOT pull on the wires or touch
the electronic components.
Install Battery
Insert one new 9V alkaline battery into the battery compartment
and restore keypad cover.
Key Access
Insert access key into key slot and turn clockwise to open safe.
MOTION SENSOR LIGHT
1. Motion Sensor Light has magnet bar at rear, so it can attach
on the interior surface of safe. Before you start to use safe,
please remove the light from safe and install with 4
AAA batteries.
PARTS OF THE SAFE
A
B
F
5/19
BC607
© 2019 BARSKA®
855 Towne Center Drive | Pomona, CA 91767
(t) 888.666.6769 | (f) 909.445.8169 | www.barska.com
A. Initialization Button
B. Bolts
C. Handle
D. Indicator Lights
F. Motion Sensor Light
F. Keypad and Keypad Cover
- turn keypad counter clock
wise to expose Battery
Compartment and
Emergency Key Access
2. Motion Sensor Light should be automatically activated when
the safe door is opened each time. Light should turn off within
a delay time after the safe door is closed.
PIN CODE REGISTRATION
Safe retains 2 pin codes
1st Safe Default Pin Code : 168
2nd Safe Default Pin Code : 12345678
Changing First Pin Code
1. Press initialization button located on the inside of the safe,
lock will beep twice and yellow indicator light will be lit.
2. Enter desired Pin Code (1-8 Digits) then press “ * ” button.
2 short beeps will be heard and yellow indicator light
will disappear.
3. With door open turn handle counter clockwise to extend the
bolts. Enter registered pin code and press “#” safe should
unlock. Turn handle clockwise and retract bolts; registration
is complete.
Note: If safe does not unlock then pin code registration was
unsuccessful. Please start over with Pin Code Registration.
Changing Second Pin Code
1. Press “ 00 ” on the keypad, then press the initialization
button located on the inside of the safe, lock will beep
twice and yellow indicator light will be lit.
2. Enter second desired Pin Code (1-8 Digits) then press
“ * ” button. 2 short beeps will be heard and yellow
indicator light will disappear.
3. With door open turn handle counter clockwise to
extend the bolts. Enter registered pin code and press
“#” safe should unlock. Turn handle clockwise and
retract bolts; registration is complete.
Note: If safe does not unlock then pin code registration was
unsuccessful. Please start over with Pin Code Registration
Question and Answer IconNeed help?

Do you have a question about the Barska AX13104 and is the answer not in the manual?

Summary

Motion Sensor Light

Motion Sensor Light Installation and Operation

Details on installing batteries and how the motion sensor light activates and deactivates.

Pin Code Registration

Changing First Pin Code

Step-by-step guide to changing the primary user PIN code for the safe.

Changing Second Pin Code

Instructions for setting and registering the secondary user PIN code.

Battery and Key Access

Battery Installation

Procedure for inserting a new 9V battery into the safe's compartment.

Key Access Method

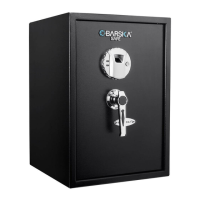
Method for opening the safe using the physical access key.

Opening and Closing Safe with Pin Code

Opening the Safe

Instructions on how to open the safe using the registered PIN code.

Closing the Safe

Procedure for closing and locking the safe door.

Mounting Instructions

Safe Anchoring and Stability

Guidance on securing the safe to a wall for stability and preventing tipping.

Care and Maintenance

Cleaning and Lubrication

Recommendations for cleaning the safe and lubricating moving parts.

1 Year Limited Warranty

Warranty Coverage and Return Process

Details on warranty terms, product return procedures, and required documentation.

Overview

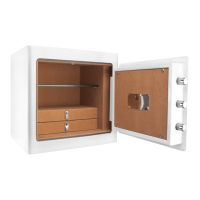
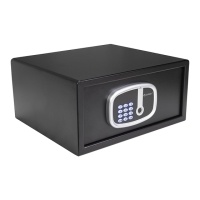
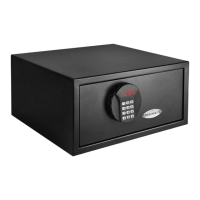
The Barska 1.01 Cubic Ft White Keypad Jewelry Safe is a robust security solution designed for safeguarding valuables. This user manual outlines its features, operation, and maintenance, emphasizing security and proper usage.

Function Description:

The safe is primarily designed for secure storage of jewelry and other valuables. It features a keypad entry system, allowing users to set and manage two distinct PIN codes for access. In case of electronic failure or forgotten codes, an emergency key access system is provided. A motion sensor light is integrated to illuminate the interior when the door is opened, enhancing visibility of contents. The safe's construction includes two steel plates filled with a fire-retardant material, offering a degree of fire protection for its contents. It is intended for indoor use and can be anchored to a wall for enhanced security.

Important Technical Specifications:

  • Capacity: 1.01 Cubic Feet
  • Construction: Two steel plates filled with fire-retardant material.
  • Locking Mechanism: Electronic keypad with two programmable PIN codes.
  • Emergency Access: Key access.
  • Power Source: One 9V alkaline battery for the keypad, four AAA batteries for the motion sensor light.
  • Default PIN Codes:
    • First PIN Code: 168
    • Second PIN Code: 12345678
  • PIN Code Length: 1-8 digits.
  • Mounting: Pre-drilled holes (3/8" diameter) at the back for wall anchoring.
  • Security Features:
    • Automatic lockout for 15 minutes after 3 consecutive incorrect password attempts.
    • Bolts extend and retract via handle.
  • Motion Sensor Light: Magnet bar for attachment to the interior surface, automatic activation upon door opening, and delayed turn-off.

Usage Features:

  • Opening and Closing:
    • To open: Enter a registered PIN code on the keypad, press "#", and turn the handle to the unlocked position. Pull the door open.
    • To close: Push the door shut and turn the handle to the locked position.
  • PIN Code Registration:
    • Changing First Pin Code: Press the initialization button inside the safe (beeps twice, yellow light illuminates). Enter a new 1-8 digit PIN code, then press "*". Two short beeps confirm successful registration, and the yellow light disappears. Verification is recommended with the door open by extending bolts, entering the new code, pressing "#", and retracting bolts.
    • Changing Second Pin Code: Press "00" on the keypad, then press the initialization button inside the safe (beeps twice, yellow light illuminates). Enter a new 1-8 digit PIN code, then press "*". Two short beeps confirm successful registration, and the yellow light disappears. Verification is recommended with the door open by extending bolts, entering the new code, pressing "#", and retracting bolts.
  • Low Battery Warning: A quick red light flash during access indicates low battery. Prompt replacement of the 9V battery is required.
  • Battery Installation: Push down on the button under the keypad, turn the keypad cover counter-clockwise to expose the battery compartment. Insert one new 9V alkaline battery and restore the cover.
  • Motion Sensor Light Setup: Remove the light from the safe, install four AAA batteries, and reattach it to the interior surface using its magnet.
  • Mounting Instructions:
    • Identify pre-set drill holes at the back of the safe.
    • Mark exact positions on the wall.
    • Drill appropriate size holes for anchors (using proper tools for wood, tile, or concrete).
    • Carefully press anchors into holes.
    • Mount the safe by running screws from inside the safe and securing to anchors.
    • Ensure the safe is level and securely mounted to prevent swinging or tipping.
  • Security Precautions:
    • Change default PIN codes immediately.
    • Test new PIN codes before closing the door.
    • Do not leave the door open and unattended.
    • Store emergency keys in a secure location, not inside the safe.
    • Keep children away from the safe.
    • Do not store combustible materials inside.
    • Exercise caution when opening the safe after a fire.

Maintenance Features:

  • Cleaning: Use a damp cloth to clean the safe. Avoid chemicals or cleaning agents. Keep liquids away from the keypad.
  • Lubrication: The internal mechanism and hinges are permanently lubricated. Door bolts may occasionally require lubrication; extend them fully with the door open and apply a small amount of oil around each bolt.
  • Battery Replacement: Replace the 9V battery when the low battery warning appears. Replace AAA batteries in the motion sensor light as needed.
  • General Care:
    • Avoid overstuffing the safe to prevent damage to the motor mechanism or contents.
    • Do not disassemble the product.
    • Contact BARSKA Customer Service for technical support or repairs.
    • Avoid setting the safe directly on a cement floor; use a spacer to prevent rust.
    • Avoid exposure to chemicals or adverse environments that could invalidate the warranty.

Warranty:

The product comes with a 1-year limited warranty against original defects in material and/or workmanship under normal use. The warranty excludes damage from improper installation, misuse, abuse, accidents, normal wear and tear, fire, flood, acts of nature, or unauthorized service/repairs. Shipping charges for removal and replacement of defective parts beyond the initial 12-month period are not covered. The warranty is limited to the original purchaser and applies only to products purchased in the United States. A Return Merchandise Number (RMA#) is required for all returns. A $90.00 fee covers inspection, shipping, and handling for warranty claims.

Barska AX13104 Specifications

General IconGeneral
BrandBarska
ModelAX13104
CategorySafes
LanguageEnglish

Related product manuals