Special cleanup instruction for use with
flammable solvents (must have a flashpoint
above 70°F (21°C)
• Always flush spray gun outside
• Area must be free of flammable
vapors
• Cleaning area must be well-ventilated
• Do not submerge power unit
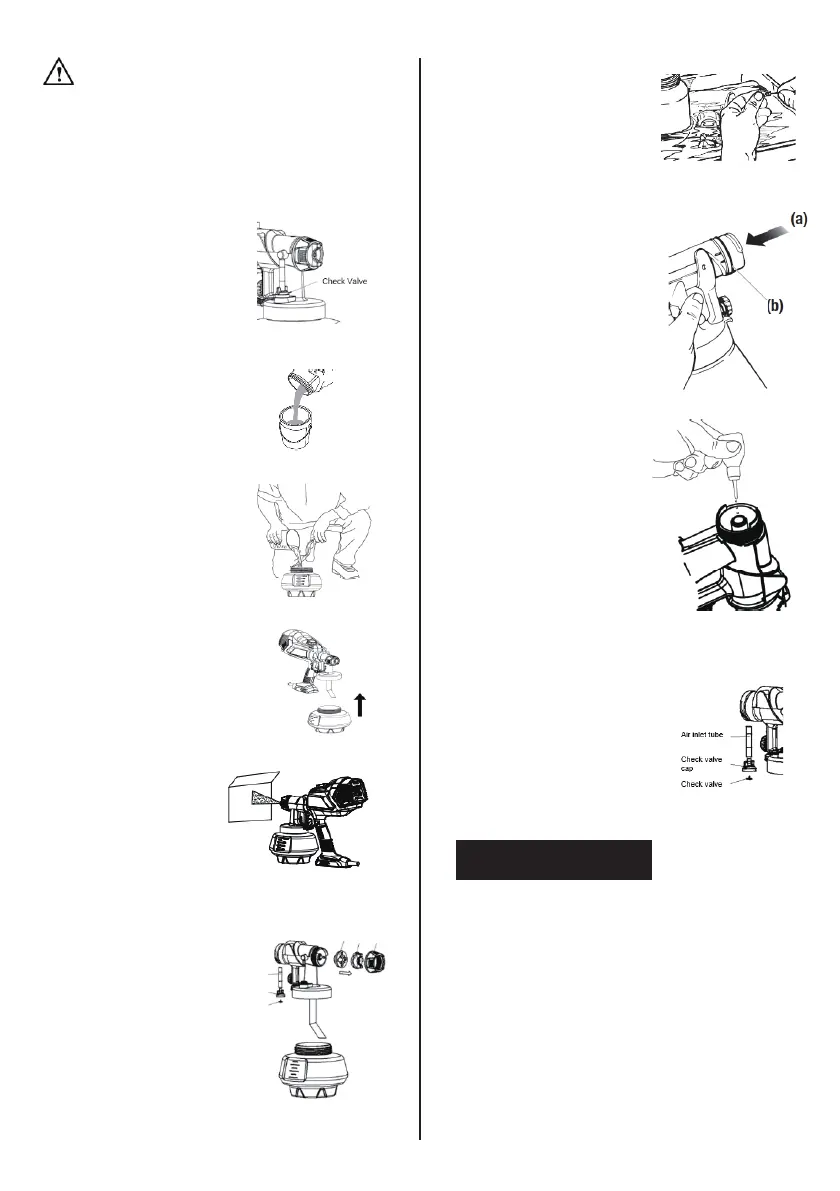
1.Un-Plug the spray gun.
Turn to loosen the check
valve cap to release the
pressure and then push
the trigger so that the
material inside the spray
gun flows back into the
container.
2. Unscrew the cont
ainer.
Empty any remaining
material back into the
material container
3. Pour a small amount of the appropriate cleaning
solution into the container.
Clean container and pickup
tube and properly dispose of
cleaning solution. Refill the
container with NEW
cleaning solution.
4. Attach the container back
to the gun, turn to tight the check valve, plug in the
cord.
5. Spray the solution through
the gun for 2 or 3 seconds in a safe area. Turn
off the power unit,
and tri
gger the spray
gun so that the
material inside the
spray gun flows back
to container. Wipe
the exterior of the
cup and gun until
clean.
6. Unscrew tip collar, air
cap, Nozzle, pickup tube,
check valve tube if there
is any paint inside or
outside.
7.Clean the container,
pickup tube, air cap, nut
and nozzle with a
cleaning brush and
appropriate cleaning
solution.
IMPORTANT: Never clean
nozzle or air holes in the
spray gun with sharp
metal objects. Do not use
solvents or
lubricants
containing silicone.
8.Twist and separate the spray gun from the power
unit. Clean the rear of the
spray gun (a) with the
appropriate cleaning
solution. Use a thin layer of
petroleum jelly to lubricate
the O-ring (b).
9.Dry all parts thoroughly
10. Place a drop of
household oil into the inside
of the sprayer from the
hole for assembling the
spray tip.
11. Reassemble spray gun
Note: Spray nozzle can
only be assembled in one
direction that the notch of
the
nozzle must align with
the skirt on spray unit
housing.
Note: The spray tip must be assembled in the
sprayer with the bumps on the spray tip in vertical
direction.
Wrap around the power unit
and put all accessories back
into place.
IMPORTANT: Pay special
attention on check valve
direction (nipple upward)
when you put it back into
place.
MAINTENANCE
Use only mild soap and damp cloth to clean
the power unit. Never let any liquid get inside
the power unit; never immerse any part of the
power unit into a liquid.
Important! To assure product SAFETY
and RELIABILITY, repairs, maintenance
and adjustment (other than those listed in
this manual) should be performed by
authorized service centers or other
qualified service personnel, always using
identical replacement parts.
Nozzle
Air Inlet tube
Check valve
cap
Check valve
Air cap Nut