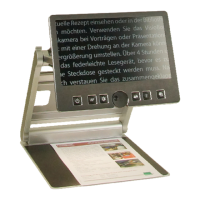
Place a document on the base plate.
Please use something coloured, like a
brochure or magazine with text and
images.
You can align a document
horizontally by moving it against the
silver rim in the back of the base
plate.
Let us try the buttons on the control panel now. We have already learned, the
power on button is the leftmost button.
In the middle of the control panel, there is a round knob. This is the zoom
knob which controls magnification. Turning this knob clockwise will increase
magnification while turning it counter clockwise will decrease magnification.
Turn the zoom knob counter clockwise to the end position to obtain
minimum magnification.
The minimum zoom level is not intended for reading, however it gives you a
better overview on the document structure. Thus you can easily find the
position you want to view at higher magnifications.
Now, press the picture button. The picture button is located to the right of
the zoom knob. Pressing this button will set VisioBook to real colour or
picture mode. This mode is ideal for viewing images and it also serves for
reading bad print and for writing or filling in forms. It provides all natural
colours in all shades.
So move the paper until you see one of the images of your document. If the
image is too small, increase the magnification by turning the zoom knob
clockwise. If you got lost and do not know where you are on the document,
decrease magnification, move the paper and increase magnification again.
VisioBook will remember the last setting - even after power off.
You already know a lot about VisioBook now, however let us read some text
now.
Move the paper to a position where you see some text on the display. Now
press the text button. The text button is located to the right of the picture
button it is the second button to the right of the zoom knob. The image will
be displayed in high contrast now and in two false colours only. If you press
11