EasyManua.ls Logo

Baxton Studio Sorrento BBT8013 User Manual

Baxton Studio Sorrento BBT8013
2 pages
To Next Page IconTo Next Page
Page #1 background imageLoading...
Page #1 background image
Read this instruction carefully. See hardware and furniture part list for guidance.
Be sure all parts are complete, before you assemble. Place all wooden furniture
parts on a clean and flat soft surface to prevent from being scratched.
Follow the figure to start assembling.
CAUTIONS : 1. Do not FULLY - TIGHTEN the nut or nut bolt until all nut or bolt is ready assembed.
2. Do not OVER - TIGHTEN the nut or bolt to avoid causing damages to the thread.
3. Keep all hardware parts out of reach of children.
NOTE : THE LIST AND QUANTITY SHOWN ARE FOR 1 UNIT ASSEMBLY.
ASSEMBLY INSTRUCTIONS
MODEL : BBT8013.14 A4 2 Seater Sofa
STEP 1STEP 1 STEP 2
STEP 3
STEP B
D
2
8
PAGE 1 OF 2
5
7
PART LIST
ITEM DESCRIPTION
QTY
A BACK
1pc
B SEAT
1pc
C ARM
2pcs
D FRONT RAIL
1pc
PART LIST
ITEM DESCRIPTION
QTY
1 JCBB Bolt M8 x 60mm
8pcs
2 JCBB Bolt M8 x 80mm
2pcs
3 M8 Flat Washer
4pcs
4
M8 Spring Washer 4pcs
5 Wood Dowel M10 x 40mm
2pcs
6 M8 Bran Nut
2pcs
7 Wood Button Dia 18.5mm
6pcs
8
M5 Allen Key (Ball Shape) 1pc
9 Wood Screw M4 x 50mm
2pcs
STEP A
7
1
C
6
C
8
D
B
C
Don't screw tied
8
1
3
4
A
B
MODEL : BBT8013 LOVESEAT
Question and Answer IconNeed help?

Do you have a question about the Baxton Studio Sorrento BBT8013 and is the answer not in the manual?

Baxton Studio Sorrento BBT8013 Specifications

General IconGeneral
BrandBaxton Studio
ModelSorrento BBT8013
CategoryIndoor Furnishing
LanguageEnglish

Summary

BBT8013 Loveseat Assembly Instructions

General Guidance and Safety Precautions

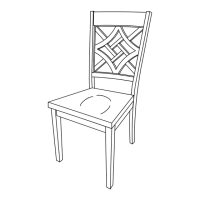
Covers initial setup, assembly best practices, and essential safety warnings for furniture assembly.

Step 1: Prepare Components

Instruction for Step 1, focusing on initial part preparation and orientation.

Step 2: Assemble Seat and Back

Instruction for Step 2, detailing the assembly of the seat and back components.

Step 3: Attach Arms

Instruction for Step 3, guiding the attachment of the armrests to the main structure.

Step 4: Frame Assembly and Tightening

Instruction for Step 4, covering frame assembly and final tightening of bolts.

Step 5: Secure Front Rail

Instruction for Step 5, focusing on attaching the front rail to the loveseat.

Step 6: Final Assembly

Instruction for Step 6, completing the final assembly of the loveseat.
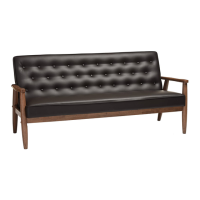
Related product manuals