10 11
Installation des lances à jet
variable
Insérez la buse à jet variable (I) ou
Turbo lance(K) ou la bouteille de
détergent (H) dans l’extrémité de
la lance d’arrosage, puis poussez
et tournez dans le sens horaire.
Pour la retirer, poussez et tournez
dans le sens antihoraire.
Remarque: Avant de changer
la lance, enfoncez le bouton de
sûreté pour vous assurer qu’elle
ne sera pas éjectée avec force
pendant l’opération.
Insérez la bouteille de détergent
(H) dans la lance (J), puis poussez
et tournez dans le sens horaire.
1
J
H
11
Installation de la bouteille de détergent
La bouteille de détergent dispose d’un
bouchon vissable muni d’une paille. Si
vous ne voyez pas la paille, regardez à
l’intérieur de la bouteille, puis fixez-la au
bouchon vissable. Au moment d’utiliser
la bouteille de détergent, remplissez-la
joignez un tuyau d’arrosage à
construit au tuyau d’arrosage
adaptateur situé à l’arrière de
la machine groupe (C).l’eau est
connecté à votre machine.
Remarque: Débusquer tuyau
d’arrosage avant la connexion de
tuyau d’arrosage adaptateur.
9
2
1
9
I
J
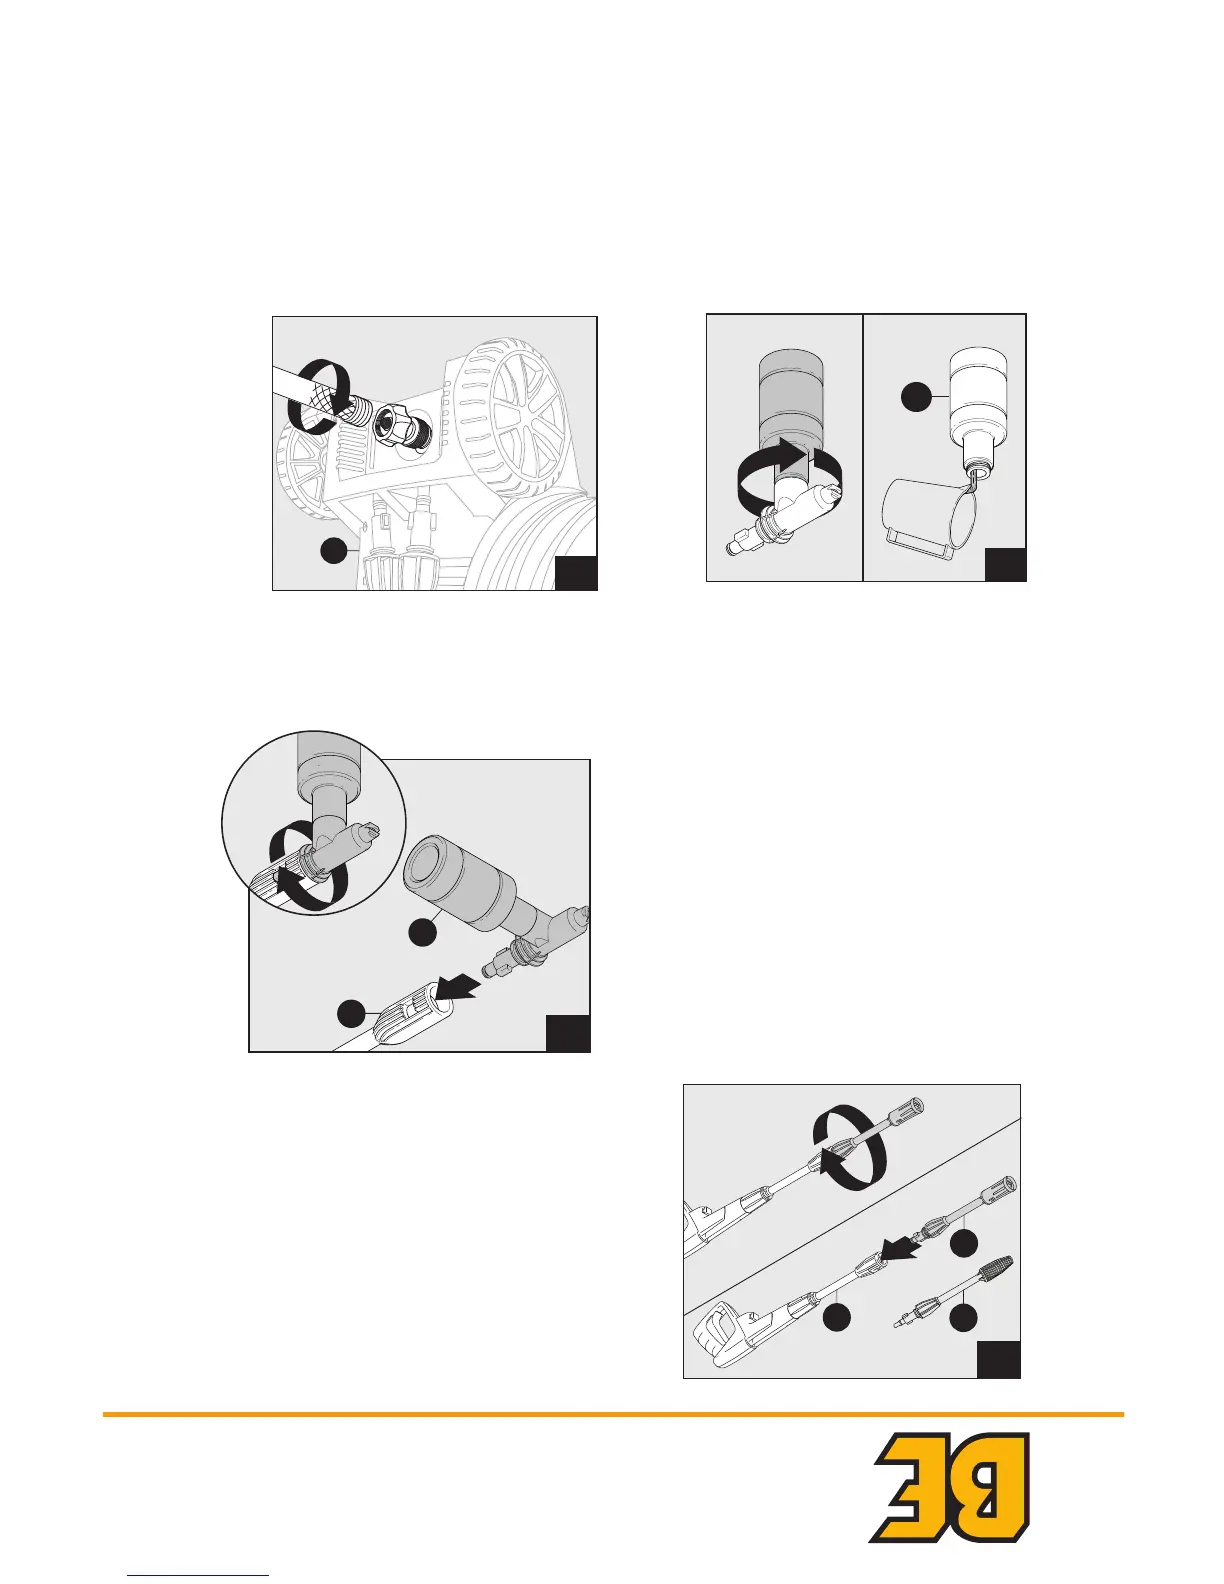
Variable Spray Nozzle Lance installation
Insert variable spray nozzle lance (I) or detergent bottle
(H) into the end of the extension lance by inserting and
pushing together turning clockwise simultaneously. To
remove push together and turn counterclockwise.
Note: Push the safety lock button to lock the trigger
when changing lances to ensure that they do not
accidentally eject with force during removal.
Insert detergent bottle (H) into extension lance (J),
push in and turn clockwise
10
2
1
H
Detergent Bottle Installation
The detergent bottle comes with a straw which is tted
into screw-on top. If you do not see the straw, look
inside the bottle and attach it to the screw-on top. When
using detergent bottle, ll it with a properly formulated
detergent or cleaner with a water ratio according to
instructions on the container.
• Pressure washer detergents are recommended. See
page 12 for more information.
• DO NOT use thick or gel-like detergents as they will
clog the power washer and can cause damage.
1
J
H
11
12
C
Attach a garden hose to built in garden hose
adapter located on the back of the power washer
unit (C). The water is now connected to your power
washer.
Note:
Flush out garden hose before connecting
to garden hose adapter.
ASSEMBLY INSTRUCTIONS
15ANR009 AR112S_1500PSI ENG-FR-SP.indd 9 16/12/17 下午12:38
avec la quantité d’eau et de détergent
indiquée sur la bouteille.
• L’utilisation d’un détergent pour
laveuse à pression est recommandée.
Reportez-vous à la page12 pour plus
d’information.
• N’UTILISEZ PAS un détergent
épais ou sous forme de gel. Ceux-ci
risquent de boucher la laveuse à
pression et de l’endommager.