EN 32
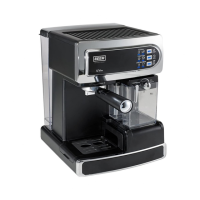
4. Insert the
portafi lter into the device (see the “Handling and Operation” chapter | “Inserting /
Removing the Portafi lter”).
5. Press the
button (16) to switch on the device and preheat the water. The control panel
fl ashes during the heating process.
If the milk tank is not inserted, only the
button (24) for an espresso or the button
(17) for two espressos
can be selected. Accordingly, the control panel is also only lit for these
buttons.
6. Place one or two suitable cup(s) beneath the coffee outlet (14).
For small cups, the device has a fold-down deposit surface (13) on the housing. Simply fl ip this
down (Picture F).
7. As soon as the device has heated up, the control panel stops fl ashing. Press the button for
one espresso or the button for two espressos or a double espresso. A beep sounds, the
brewing process starts and the chosen button fl ashes. Hot water is poured over the coffee
powder to brew it.
At the end of the brewing process, a beep sounds, the control panel is fully lit up again and the
device automatically switches to stand-by mode.
Cappuccino / Latte Macchiato
The perfect amount of espresso and milk to suit your own taste can be programmed in the
device (see the “Handling and Operation” chapter | “Programming Quantities”)
1. Fill the water tank (2) with water (see the “Handling and Operation” chapter | “Filling the
Water Tank”).
2. Fill the milk tank (9) (see the “Handling and Operation” chapter | “Filling the Milk Tank”).
3. Place the fi lter you want
into the portafi lter (12) (see the “Handling and Operation” chapter |
“Inserting / Removing the Filter in the Portafi lter”).
4. Fill the fi lter
with coffee powder (see the “Handling and Operation” chapter | “Filling the Filter
With Coffee Powder”).
5. Insert the
portafi lter into the device (see the “Handling and Operation” chapter | “Inserting /
Removing the Portafi lter”).
6. Fold out the milk nozzle (8) using the lever (7) (Picture E).
7. If necessary, select the setting you want using the dial for the milk froth (5) (see the “Handling
and Operation” chapter | “Setting the Milk Froth Quantity”).
8. Press the button (16) to switch on the device and preheat the water. The control panel
fl ashes during the heating process.
9. Place a suitable cup below the coffee outlet (14) and the milk nozzle.
03428_DE-EN-FR-ES-IT_A5_V4.indb 3203428_DE-EN-FR-ES-IT_A5_V4.indb 32 22.07.2019 10:13:2322.07.2019 10:13:23