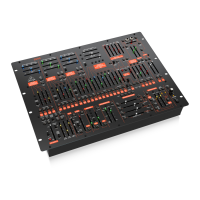
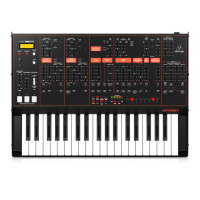
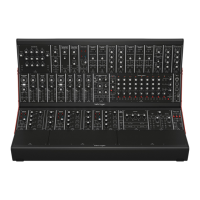
WASP DELUXE Getting started
(EN) Step 3: Getting started
OVERVIEW
This ’getting started‘ guide will help you set up the WASP DELUXE
analog synthesizer and briey introduce its capabilities.
CONNECTION
To connect the WASP DELUXE to your system, please consult the
connection guide earlier in this document.
SOFTWARE SETUP
The WASP DELUXE is a USB Class Compliant MIDI device, and so no
driver installation is required. The WASP DELUXE does not require
any additional drivers to work with Windows and MacOS.
HARDWARE SETUP
Make all the connections in your system. Use the rear panel MIDI
switches to set the WASP DELUXE to a unique MIDI channel in your
system. Connect an external MIDI keyboard directly to the WASP
DELUXE MIDI IN 5-pin DIN type input.
Apply power to the WASP DELUXE using the supplied power
adapter only. Ensure your sound system is turned down. Turn on
the WASP DELUXE rear panel power switch.
WARM UP TIME
We recommend leaving 15 minutes or more time for the WASP
DELUXE to warm up before recording or live performance.
(Longer if it has been brought in from the cold.) This will allow
the precision analog circuits time to reach their normal operating
temperature and tuned performance.
OSCILLATORS SECTION and MIX CONTROLS
The WASP DELUXE has two oscillators, an internal Noise generator,
and an external source input. Each of these, and any combination,
are used by the WASP DELUXE to generate sound.
The MIX controls allow you to adjust the volume of each of these
sources to create an overall mix. Start by adjusting the volume
control of Oscillator 1, while turning the other sources all the way
down. In the OUTPUT section, adjust the main volume. Now, if you
play a note on your MIDI keyboard, you should hear the sound of
Oscillator 1 only.
Turn up the other oscillator and /or noise and adjust their volume
controls to create a mix.
In the Oscillator section, adjust the FT (Foot) knob for either
oscillator, and you will hear the sound of the various octaves.
Adjust the WAVEFORM controls and listen to the dierences.
CONTROL OSC. SECTION
Play with the FREQ. and PITCH MOD. controls to hear how they
aect the speed and pitch of the oscillators. Use the Control
Oscillator 6-way WAVEFORM switch to apply dierent control
waveforms and listen to how they aect the sound.
FILTER and CONTROL ENV. SECTIONS
Switch between lo-pass, bandpass, notch and hi-pass lters, and
try playing with the cuto frequency by using the FREQ. knob. Use
the Q knob to experiment with the lter contour and slope.
The CONTROL ENV. controls are used to control the lter, so play
with the Attack, Decay and Delay controls to hear how these
controls aect the lter sound.
Spend some time moving the FILTER CONTROL knobs between
positive (+) and negative (-) settings to hear how the dierent
combinations of rising or falling control envelopes aect the
oscillators and lter.
ENVELOPE GENERATORS SECTION
In this section, adjust the Attack, Decay, and Sustain; they aect
the overall level over time, while a note is played. The loudness
decay switch aects the decay in level after a note is released.
EURORACK
The WASP DELUXE synthesizer can be taken out of its factory
chassis and tted into a standard Eurorack case (not supplied).
Please see the details shown later in this manual.
FIRMWARE UPDATE
Please check our website behringer.com regularly for any updates
to the rmware of your WASP DELUXE synthesizer. The rmware
le can be downloaded and stored on your computer, and then
used to update the WASP DELUXE. The rmware le comes with
detailed instructions on the update procedure.
36
 Loading...