Do you have a question about the Beko DVC665 and is the answer not in the manual?
Explanation of safety symbols used throughout the manual, indicating risks to people and property.
General safety advice for users, family, and friends to prevent accidents during operation.
Guidelines for safe cooking, including handling hot surfaces and food.
Safety advice for cooker operation, maintenance, and protecting the surrounding environment.
Details of the cooker's electrical specifications, dimensions, and weight.
Instructions and warnings for correctly connecting the cooker to the mains electricity supply.
Guidance on selecting a suitable location and maintaining necessary clearances for installation.
Steps to diagnose and resolve common problems if the cooker does not work.
Important safety and general instructions before cleaning the appliance.
Instructions for ensuring the appliance is level using adjustable feet.
Steps for preparing the cooker before first use, including burning off protective coatings.
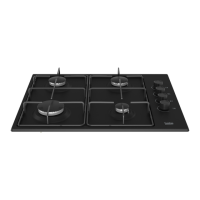
Explanation of hob control knobs, heating zones, and hot indicator lights.
Safety advice for deep fat frying and immediate actions for pan fires.
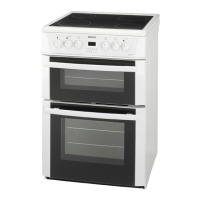
This document provides installation, operating instructions, and cooking guidance for the Beko DVC665 Double Oven Electric Cooker with Ceramic Hob. It is designed to give you lasting service and ensure safe and efficient use of the appliance.
The Beko DVC665 is a double oven electric cooker featuring a ceramic hob. It comprises a top oven/grill and a fan oven, offering versatile cooking options. The ceramic hob has four heating zones, each with fixed heat positions, allowing for various cooking tasks from warming to boiling. The top oven can function as a grill or a conventional oven, while the fan oven provides even heat distribution for baking and roasting. The cooker is equipped with a digital programmable timer that allows for setting the time of day, a minute minder, and automatic cooking programmes for the main oven.
Before initial use, it is crucial to read the instructions thoroughly and understand the controls. The cooker must be installed by a qualified electrician in a well-ventilated space. For the very first time, protective coatings need to be burnt off by operating the hotplates, grill, and fan oven at specified temperatures for a short duration. During this process, fumes will be emitted, so ensure the room is very well ventilated. After burning off, clean the appliance as recommended in the "Care & Cleaning" section.
The ceramic hob has four heating zones, each controlled by a dedicated knob. To switch on a heating zone, rotate the corresponding knob in either direction to select a heat level from 1 to 6. The red indicator light on the control panel will illuminate when any heating zone is active. To switch off a zone, turn the knob to 0. For best simmering, the rear left heating zone is recommended. For your safety, hob hot indicator lights illuminate to show which hob is hot and remain on until the temperature falls below 64°C. Avoid touching hot heating zones and keep children away.
For optimum efficiency on the ceramic hob, use pans that match the diameters of the elements. Using pans that are too small wastes energy. Do not use pots with concave or convex bottoms, or aluminum-bottomed pots, as these can deteriorate the ceramic glass surface. Steel or heat-resistant glass pots are recommended. Avoid "boron glass" or "Pyrex" oven-type containers. When deep fat frying, never fill the pan more than one-third full of fat or oil. Never leave frying unattended. Avoid frying too much food at once, especially frozen food, as this lowers the oil temperature and can result in greasy food. Always dry food thoroughly before frying and lower it slowly into the hot oil or fat. Frozen foods can cause frothing and spitting if added too quickly. Never heat fat or fry with a lid on the pan. Keep the outside of the pan clean and free from streaks of oil or fat. In the event of a chip pan or other pan fire, immediately switch off the electricity supply and smother flames with a fire blanket or damp cloth. Do not use water on the fire, and allow the pan to cool for at least 30 minutes.
The top oven can be used as a grill or a conventional oven. When grilling, open the grill door, which remains tilted slightly to direct any spillage away from you. Turn the control knob to 150°C and preheat for about 5 minutes. The red indicator light will glow. Then choose the desired setting. To turn off the grill, rotate the control anti-clockwise to the mark. Only use the middle and bottom rack positions for grilling; do not use the top position. Ensure food is correctly positioned under the grill element. Do not line the grill pan with aluminum foil. Plates and dishes on the floor of the grill compartment will be heated when the main oven is in use. Do not switch on the grill when using the compartment for storage. For toast, sealing, and fast cooking, use the 230° position. For thicker foods, turn the control to a lower setting after initial sealing on both sides, and turn the grill rack to its lowest position. When using the top oven as a conventional oven, turn the control knob clockwise to select the desired temperature. The amber temperature indicator light will glow until the pre-set temperature is reached, then cycle on and off to maintain it. To turn off the oven, rotate the control knob anti-clockwise to the mark. Always use an oven glove when handling hot utensils and the grill pan. The grill pan has a detachable handle; ensure it is securely located between the raised profiles across the front of the grill pan. Do not leave the handle in position when grilling, as it will get very hot.
To operate the fan oven, turn the oven control knob clockwise to select the desired temperature. The amber temperature indicator light will glow until the pre-set temperature is reached, then cycle on and off to maintain it. To turn off the oven, rotate the control knob anti-clockwise to the mark. As a fan oven heats up more quickly and generally cooks food at a lower temperature than a conventional oven, preheating is often unnecessary, except for foods like bread, scones, and Yorkshire pudding. Always ensure food is thoroughly cooked and piping hot. Stand back from the appliance when opening the oven door to allow steam or heat to escape.
The timer display is in 24-hour clock format. Ensure the correct time of day is set before using the cooker. The clock must be set before the oven can be operated. The 'A' symbol will flash when first turned on and go out once the time of day is set. It will also light up when an automatic cooking programme is set. The minute minder allows you to set a time period of up to 23 hours and 59 minutes, after which the timer will bleep. The 'bell' symbol will light up when a minute minder period is selected. The cook period function sets the actual length of time for which the timer will switch the oven on as part of an "Automatic Cooking" programme. The "cookpot" symbol will light up when the cooker is in "Manual Mode" or when you press the cook period button and set a length of time for an Automatic Cooking programme. The end time function allows you to set the time of day at which you want an automatic cooking programme to end. The 'A' symbol will remain lit to signify that an automatic cooking programme has been set. The "cookpot" symbol will light up again when the auto cook programme starts. To set the time of day: Ensure all oven controls are OFF and the electricity supply is ON. Press and hold both the cook period and end time buttons together. While holding, use the "+" or "-" buttons to set the correct time. Release all buttons simultaneously. To set the minute minder: Ensure the time of day is set correctly. Press and hold the minute minder button. While holding, use the "+" or "-" buttons to set the required minute minder time. Release all buttons. The 'bell' symbol will remain lit. To cancel the bleeping sound, press the minute minder button. To set the timer to switch ON and OFF automatically: Ensure the correct time of day is set. Place food onto the correct shelf position and close the oven door. Turn the oven control to the required temperature. Press and hold the cook period button; the display will show 0.00 and the "cookpot" symbol will light up. While holding, set the required cook period using the "+" and "-" buttons. The 'A' symbol will light up. Release all buttons. Press and hold the end time button; the display will show the earliest possible time for the cook period you have set. While holding, use the "+" and "-" buttons to set the end time. Release all buttons. The timer display will revert to the time of day with the 'A' and "cookpot" symbols remaining lit. To set the timer to switch ON immediately and OFF automatically after a set cook period: Ensure the correct time of day is set. Place food onto the correct shelf position and close the oven door. Turn the oven control to the required temperature. Press and hold the cook period button; the display will show 0.00 and the "cookpot" symbol will light up. While holding, set the required cook period using the "+" and "-" buttons. The 'A' symbol will light up. Release all buttons. The timer display will revert to the time of day with the 'A' and "cookpot" symbols remaining lit.
Always turn off the mains before cleaning and allow the appliance to cool. Never mix different cleaning products. For the exterior, use a damp cloth and avoid sharp instruments, abrasive household cleaners, or detergents. For the ceramic hob, clean daily to prevent soilage from burning on. Use a cleaning agent that does not scratch the ceramic glass surface, such as Hob Brite Ceramic Hob Cleaner. Rinse fully with a clean cloth and wipe dry. Do not use steel wool, abrasive powders, detergents, or bleach-based cleaning agents. A ceramic hob scraper can be used for stubborn marks. Sugar-based food spills should be scraped off immediately to prevent permanent damage. For the control panel, wipe with a damp cloth and polish with a dry cloth. Do not use oven cleaners, aerosols, scouring pads, or abrasive powder. Do not attempt to remove control knobs. For the grill interior, wipe the grill elements with a damp cloth (when cool) to remove fat splashes. For the oven interior, remove rod shelves for washing. Use a fine steel wool soap pad for stubborn stains. Take care not to damage the thermostat sensor. Catalytic liners should not require cleaning if very hot temperatures are used regularly. For grill/oven doors, wipe outer panels with a cloth wrung out in hot soapy water, then with a clean cloth, and dry with a soft clean cloth. Do not use scouring pads or abrasive powder. Take care not to damage or distort the door seal. Ensure the door seal is dry after cleaning and do not lift it.
Ensure the appliance is switched off at the mains supply before replacing the lamp to avoid electric shock. Switch off at the mains. Remove the protective glass cover by turning it anti-clockwise. Remove the bulb by turning it anti-clockwise. Install the correct replacement bulb and reinstall the protective glass. Replacement light bulbs can be obtained from a local electrical or DIY store.
If the cooker does not work, check if the power supply is on, the fuse has blown/circuit breaker has tripped/main distribution switch has been turned off, the control has been set correctly, and the oven programmer has been reset. If the appliance is still not operating, refer to the "How to Obtain Service" section. A charge will be made if no fault is found after these checks. When using the appliance for the first few times, an odour and/or smoke may be emitted, which is normal. Metal parts may produce noise due to expansion and contraction. Steam may be produced during use, and a momentary puff of steam when the oven door is opened is normal. Condensation on cool surfaces on the outside of the appliance is also normal. Slight discolouration of liners and other surfaces may occur over time, which does not affect the functioning of the appliance. Discolourations and marks on the ceramic hob are normal and not a fault.
| Fuel Type | Electric |
|---|---|
| Hob Type | Ceramic |
| Energy Efficiency Class | A |
| Width | 60 cm |
| Grill | Yes |
| Timer | Yes |
| Dimensions (H x W x D) | 60 x 60 cm |