19
5.
people entering the working area. Always let the product come to complete
stop before leaving it unattended.
6. Do not overwork yourself. Take regular breaks to ensure you can concentrate
on the work and have full control over the product.
WARNING:
and on what special days products are allowed to be used and what restrictions
apply! Ask your community for detailed information and observe the regulations
in order to preserve a peaceful neighbourhood and avoid committing
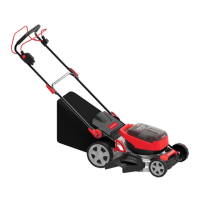
STARTING/STOPPING
1. Insert batteries.
2. Plug the safety key into the slot fully.
3. Stand behind the starting lever.
4.
towards the handle.
5.
6. Press and hold (1), you can move forward at a constant speed,
but cannot go back (Fig. 11).
7. Release the start lever to stop the mower.
USING THE SELF PROPELLING FEATURE
1. Self-propelling is controlled by holding the starter level down (1) to the handle
and pulling the self-propelling lever (2) to the handle. (Fig. 11).
2. To stop forward motion without stopping the engine, release the self-propelling
bar (2). Hold the starter level (1) down against the handle to continue mowing
without self-propelling. (Fig. 11).
NOTE: After releasing the self-propelling bar, if the mower will not roll backwards,
push the mower forward slightly to disengage the drive wheels.
5125-016k EnProdManual P.indd 19 2020-12-17 2:09 PM
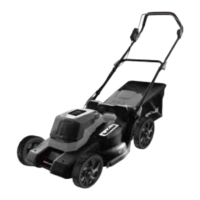
ADJUSTING THE “SELF PROPELLING” CABLE
This lawnmower is equipped with a cable (1) (Fig. 12) that engages the self-propel-
ling feature. The cable tension is set at the factory, however, if needed it can be
adjusted using the rotating adjustment nut located on the cable.
If the lawnmower is NOT self-propelling or is not self-propelling as desired, then
adjust the tension on the cable as follows:
When standing behind the lawnmower, turn the rotating adjustment nut (2)
(Fig.12) on the cable clockwise to tighten the cable. Then lock the adjustment nut
(2) (Fig.12) into position by tightening the small nut (3) (Fig.12).
To loosen the cable, turn the adjustment nut (2) (Fig.12) counterclockwise and
then lock into position by tightening the small nut (3) (Fig.12).