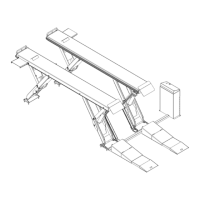
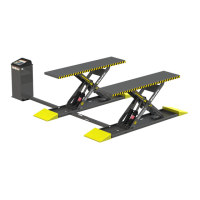
SP-7XE/F Full-Rise Scissor Lift 16 P/N 5900010 — Rev. B3 — September 2023
3. Install a Thermal Disconnect Switch. A Thermal Disconnect Switch automatically shuts
down the Lift in the event of an overload or an overheated motor. Refer to Install a Thermal
Disconnect Switch for more information.
Tools
You may need some or all of the following tools:
• Rotary Hammer Drill or similar
• 3/4", 3/8", 1 1/4" Masonry Drill
Bits
• Hammer
• Open-end Wrench set: 1/2",
15/16" – 1 1/8"
• Socket and ratchet set, 1 1/8"
• Medium adjustable wrench
• White lithium grease
• Crowbar
• Chalk line
• Medium flat screwdriver
• Tape measure (25-foot
recommended)
• Forklift or Shop Crane
• Quikrete® Fastset® or equal
structural grout
Select a Site
Keep the following in mind when selecting a site for your Lift:
⚠ DANGER Risk of explosion. This equipment has internal arcing or sparking parts which
should not be exposed to flammable vapors.
• Clearance. You must have adequate space on all sides, plus enough space above for the
Vehicles you will be raising. See Clearance Around the Lift for more information.
• No overhead obstructions. The site must be free of overhead obstructions.
• Operator. The operator at the Console must have a full, unobstructed view of the SP-7XE.
• Console. The Console must be positioned near the Lift; the Hydraulic Hoses that are supplied
with the SP-7XE models support up to 40 inches between the Lift and the Console.
• Concrete specifications. BendPak strongly recommends consulting a Concrete
Specialist early in your planning process for Lift installations. The
recommendations presented in this manual are generic in nature and cannot
cover all situations. A Concrete Specialist will adjust these recommendations to
account for national, state, and local building codes as well as local weather
conditions, soil composition, base preparation, load bearing, seismic
requirements and any other structural concerns that may arise.
Evaluate the concrete at the installation location, Do not install the Lift on cracked or defective
concrete. It is critical to determine the thickness and compression strength of the existing Concrete
floor. Concrete floors must have a compression strength of at least 3,000 psi to support the Lift. A
minimum of 4.25 in. / 108 mm of concrete is required under the Lift Frames. Drill and test a core
sample to determine if the Concrete in your location meets the minimum requirements specified
here. Concrete must be cured for at least 28 days (if newly poured). Verify the floor is defect-free,
dry, and level. Note that for Flush-Mount models SP-7XEF require a greater depth of concrete;
there must be 4.25 inches of Concrete below the bottom of the Concrete Cutout. If you
intend to run the Hydraulic and Air Lines to some location farther than 40 inches from the Lift,