11/ 2018
BENNING IT 105
21
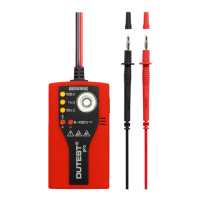
- The BENNING IT 105 switches off automatically after approx. 5 minutes (APO, Auto-Power-Off). It
switches on again, if the rotary switch
1
is switched on from switch position “OFF”.
8.1.2 Testing the battery condition
During switch-on and operation, the BENNING IT 105 performs an automatic battery test. Discharged
batteries are indicated by a battery symbol I on the LC display
2
. As soon as the battery symbol
I flashes, the batteries have to be replaced by new ones immediately (see section 9.3 “Battery replace-
ment”).
8.1.3 Test probe with TEST key
The test probe with integrated TEST key can be used instead of the red 4 mm measuring lead. Thus, the
measuring process can be started via the TEST key
4
of the BENNING IT 105 or via the test probe.
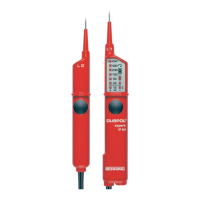
8.2 Voltage (V), Frequency (Hz), rotary field (phase sequence)
- Select the desired function (V) A with the rotary switch
1
.
- Connect the measuring lead to the BENNING IT 105 as shown in figures 3, 4, 5 or 7 and apply them
to the test object.
- Voltage measurement starts automatically. There is no need to press the TEST key
4
or the function
keys F1 to F4
3
.
- The main display K shows the voltage potential between the red L/L1
5
and the black N/L3
7
meas-
uring input.
- For alternating voltage (AC), the secondary display J additionally shows the frequency (Hz).
- In a three-phase mains, the phase sequence (rotary field) is indicated additionally. Clockwise phase
sequence (phase 1 before phase 2) is given if the symbol “L1 L2 L3” H is shown and the measuring
inputs are connected to the external conductors (phases) as follows:
Red
5
to L1, green
6
to L2 and black
7
to L3.
Counter-clockwise phase sequence (phase 2 before phase 1) is indicated by the symbol “L1 L3 L2” H.
8.3 Low-impedance resistance (RLOW) with 200 mA test current
Measurements of the protective conductor resistance must be carried out at idle system
parts only.
The protective conductor resistance measurement might be distorted by impedances con-
nected in parallel of additional operating circuits and by transient currents.
If a voltage of > 30 V AC/DC is applied to the test object, a flashing warning symbol and
an acoustic signal will warn you of an external voltage being applied. The external voltage
is indicated on the digital display
2
and measurement will be blocked. Make sure that the
circuit is free of voltage and repeat the measurement.
- Select the desired function (RLOW) E with the rotary switch
1
.
- The symbols of the function keys F1 A to F4 D are briefly shown on the digital display
2
. You can use
the function keys F1 to F4
3
to make the following settings which will be stored until they are changed
for the next time:
F1 F2 F3 F4
– AUTO
Buzzer (F1):
With the buzzer being enabled, an acoustic signal will be emitted at a measured value of < 20 Ω.
Null balance (F3):
In order to carry out a null balance of the measuring lead resistance, connect the measuring leads with
each other by means of the alligator clips and press the function key F3
3
until the symbol C is shown
on the digital display
2
.
Measuring lead resistances can be compensated by up to 10 ohms.