EasyManua.ls Logo

Bestop Pavement Ends 56844 User Manual

Bestop Pavement Ends 56844
27 pages
To Next Page IconTo Next Page
Page #1 background imageLoading...
Page #1 background image
Sprint Top
Installation Instructions
For: Jeep Wrangler JK 2 Door
2007 – 2009
Part Number: 56844
Installation Tips
For a smooth fit:
For easier installation, the top should be installed at a temperature above 72º
F. Below this temperature, the fabric may contract an inch or more, making it
difficult to fit the vehicle.
It is normal for the fabric to contract and wrinkle when stored in the shipping
carton. Within a few days after installation, the fabric will relax and the wrinkles
will disappear.
Tools Needed
Safety Glasses
Phillips Screwdriver
Masking Tape
T25 & T30 Torx
3/8" Wrench
Question and Answer IconNeed help?

Do you have a question about the Bestop Pavement Ends 56844 and is the answer not in the manual?

Bestop Pavement Ends 56844 Specifications

General IconGeneral
ColorBlack Diamond
Compatible Vehicle MakeJeep
Includes HardwareYes
Manufacturer Part Number56844
Compatible Vehicle ModelWrangler
Installation TypeDirect Fit

Summary

Introduction and Safety Information

Critical Safety Warnings and Precautions

Essential safety notices for correct product usage and adherence to instructions.

Section 2 Remove Fabric and Side Bows from Header

Section 4 Install Sprint Top Fabric on Header

Step One: Position Fabric on Lower Header

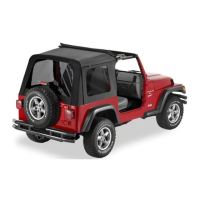
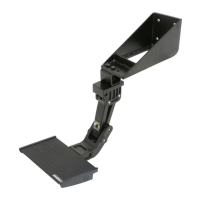
Laying the Lower Header and positioning the new fabric in its original location.

Step Two: Install Fabric Extrusion into Header Channel

Inserting the fabric's extrusion into the header channel and securing with tape.

Step Three: Attach Upper Header

Placing the Upper Header onto the Lower Header and reinstalling screws.

Section 5 Attach Side Bows to Header/Fabric Assembly

Step One: Insert Side Bows into Header

Inserting side bows into the header assembly, ensuring quick release knobs face inward.

Step Two: Mount Side Bows to Header

Using screws to mount each side bow to the header assembly.

Step Three: Complete Side Bow Installation

Rotating the header assembly and using screws to finish side bow attachment.

Step Four: Secure Header Assembly

Rotating the header assembly back and securing it using previously removed screws.

Section 7 Replace Latch with Quick Release Bracket on Door Surround

Step One: Remove Latch from Door Surround

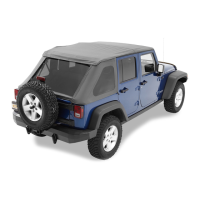
Using a T25 Torx to remove the existing latch from the door surround.

Step Two: Install Quick Release Bracket

Using a screwdriver and wrench to install the quick release bracket.

Section 8 Install Door Surround

Step One: Insert Door Surround Pin

Inserting the pin at the bottom of the door surround into the belt rail hole.

Step Two: Secure Door Surround to Sport Bar

Pressing channels around the sport bar and tightening knobs to secure the door surround.

Section 9 Install Tailgate Bar Mounts

Step One: Attach Tailgate Bar Mounts

Orienting and clipping tailgate bar mounts under the belt rail on the vehicle.

Section 10 Mount Header Assembly to Quick Release Bracket

Step One: Position Header Assembly

Folding fabric forward and placing the header assembly on the vehicle with side bows.
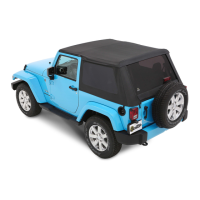
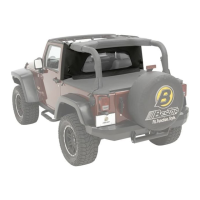
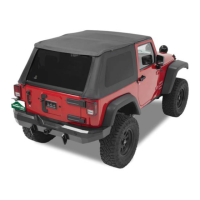
Section 11 Install Rear Bow

Section 13 Secure Center Strap

Section 15 Install Rear Window

Section 16 Install Side Window

Section 17 Install and Secure Tailgate Bar

Section 18 Secure Rear Window

Section 19 Secure Header Latches

Section 20 Secure Top Above Door Openings

Related product manuals