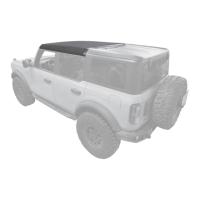
Do you have a question about the Bestop Supertop NX and is the answer not in the manual?
Tips for optimal fabric fit, recommending installation above 72°F and explaining wrinkle relaxation.
Essential safety warnings including wearing safety glasses and seat belts during installation.
Lists all hardware and fasteners required for the installation of the Supertop NX.
Details the specific parts for Section 1: Bow Mount Brackets, including left and right brackets.
Lists parts for Section 2, covering door rails and knobs for the Supertop NX installation.
Parts for Sections 3 & 4, focusing on the top arch and tailgate bar mounts.
Components for Side Bows and the #2 Bow Assembly, covering Sections 5 through 8.
Parts for Rear Bow Assembly, Foam Seals, and Foam Strips for Sections 9 through 14.
Parts list for Tailgate Bar, Strap Kit, Fabric, and Windows for Sections 17 through 21.
Installs the right-side bow mount bracket onto the Jeep's sport bar down-tube using screws.
Replaces the sport bar protective cover, ensuring bow mount brackets align with openings.
Attaches the right door rail assembly to the Jeep belt rail using an alignment pin.
Secures left and right rear door rails to the Jeep sport bar using knobs.
Inserts the top arch into the slotted tabs on the door rails, flexing to connect both ends.
Removes the protective peel-off strip from the top surface of the installed top arch.
Snaps left and right tailgate bar mounts onto the Jeep belt rail, securing them under the bottom edge.
Lays out the header/fabric assembly and removes screws from the protective flap.
Connects the right side bow to the header/fabric assembly using screws and aligning spring catches.
Replaces protective flaps on both sides of the header/fabric assembly and re-inserts screws.
Lifts and positions the fabric/header/side bow assembly onto the Jeep, draping fabric over the hood.
Releases spring catches on side bows and connects them to the lower leg of the bow mount brackets.
Places the #2 bow assembly on side bows, aligning holes with plastic spacers and side bow tubing.
Secures the #2 bow assembly to side bows using screws, plastic bushings, and nylock nuts.
Aligns the header/fabric/bow assembly locking flange with the door rail's spring-loaded locking pin and secures.
Assembles the rear bow, ensuring spring catches face outward, and fastens it to the hoop with screws.
Connects the rear bow to the bow mount bracket by sliding the spring catch over the upper leg.
Positions and attaches stay straps to the top of the rear bow using pan head washer screws.
Secures the stay straps to the rear bow by attaching them with screws to pre-drilled holes.
Folds the top fabric back and positions the long fabric bow flap in front of the #2 bow.
Wraps the flap under the #2 bow and secures it with pan head washer screws in pre-drilled holes.
Lifts and drapes the fabric over the Jeep, pulling it over the rear bow and stay strap.
Wraps fabric flaps around the rear bow from underneath and secures them with pan head washer screws.
Folds the header/fabric assembly back over the Jeep, resting it above the #2 bow.
Attaches the free end of the cable spring to the bottom hole in the #2 bow corner bracket.
Crimps the end of the cable spring where it passes through the corner bracket to prevent it from coming loose.
Applies foam seals and foam tape strips to the inside of the header in specified locations.
Folds the front portion of the top back into a partially open position.
Tucks the plastic tabs at the rear corners of the top under the Jeep belt rail.
Pulls down the header and pivots the latch handle to allow the hook to engage the windshield loop.
Closes the latch by pivoting it forward once the hook is engaged with the windshield loop.
Locates and orients the rear window, ensuring zipper pulls are at the bottom left corner.
Zips the rear window into place by pulling the top zipper pull around the frame from left to right.
Locates and zips side windows halfway, with zipper pull at the top right corner.
Tucks the plastic angle strip along the front edge of the side window into the vertical channel.
Finishes zipping the right and left side windows completely closed.
Tucks the bottom edge of the right and left side windows under the Jeep belt rail.
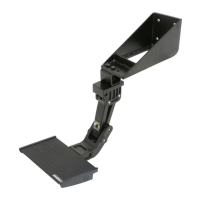
Locates the tailgate bar and slides it onto the tubing attached to the bottom inside of the rear window.
Slides the round channel on the side of the tailgate bar over the corresponding tubing.
Snaps the front edge of the tailgate bar into the channel on the tailgate bar mount.
Tucks the plastic tabs at the bottom corners of the rear window under the Jeep belt rail.
Removes side windows, rolls up rear window, and releases windshield latches.
Lifts and swings the fabric/bow assembly to the rear, tucking fabric neatly around the bows.
Instructions for cleaning and protecting the fabric of the Supertop NX using recommended products.
Guidelines for cleaning vinyl windows to prevent scratches and damage, especially in cold weather.
Tips for cleaning and lubricating zippers to ensure smooth operation and prevent damage.
Advice on cleaning and lubricating snaps to prevent sticking and damage.
Details the warranty period, coverage, and procedures for Bestop products.
| Brand | Bestop |
|---|---|
| Model | Supertop NX |
| Category | Motorized Toy Car |
| Language | English |