EasyManua.ls Logo

Bestop Supertop Ultra User Manual

Bestop Supertop Ultra
33 pages
To Next Page IconTo Next Page
Page #1 background imageLoading...
Page #1 background image
Installation Instructions
Supertop Ultra
Vehicle Application:
Jeep® JL Wrangler Unlimited 2019 - Current
Part Number 54725
P1 - 54725 Rev. B 0320
Installation Instructions - Supertop Ultra
© 2020 Bestop, Inc.
Installation TimeTools
Skill Level
3 - Moderately Difcult
4 hours
Safety
Glasses
Step
Ladder
Support
We’re here to help! Go to:
https://www.bestop.com
and click on Need Help?
https://www.bestop.com/video-library
10mm Socket
10mm Wrench
Ratchet
- OR -
3mm-4mm-5mm
Allen Wrenches
Phillips Screwdriver
Flat Blade Screwdriver
Super Glue
T8-T20-T25-T30-T40-
T50 Torx Drivers
Before you begin installing your new Supertop Ultra,
please read all the instructions thoroughly.
For a smooth t:
For easier installation, the top should be installed at a temperature above
72°F. Below this temperature, the fabric may contract an inch or more, making
it difcult to t the vehicle.
It is normal for the fabric to contract and wrinkle when stored in the shipping
carton. Within a few days after installation, the fabric will relax and the
wrinkles will disappear.
Do not rely in any way on the components of this
product to protect against injury or death in the event of an accident.
Never operate the vehicle in excess of manufacturer’s specications.
Read and follow, precisely, all installation instructions provided when
installing this product. Failure to do so may result in a poor t and could
place occupants of the vehicle in a potentially dangerous situation.
WEAR SEAT BELTS AT ALL TIMES
Safety glasses should be worn at all
times when installing this product.
WARNING
Installation Tips
Torque Wrench

Table of Contents

Question and Answer IconNeed help?

Do you have a question about the Bestop Supertop Ultra and is the answer not in the manual?

Bestop Supertop Ultra Specifications

General IconGeneral
CategoryAutomobile Accessories
TypeSoft Top
WarrantyLimited Lifetime
WindowsRemovable, Tinted
HardwareIncluded
Color OptionsBlack

Summary

Installation Tips and Preparation

Pre-Installation Advice

Describes temperature and fabric behavior for optimal fit.

Safety Precautions and Warnings

Highlights important safety advice and warnings.

Tools, Time, Skill, and Support

Lists required tools, estimated time, skill level, and support resources.

Parts List: Door Rails and Kit Components

Door Rails and Kit Components

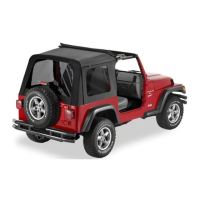
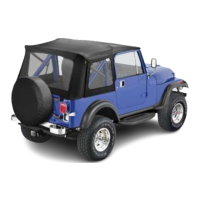
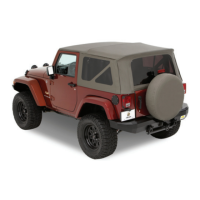
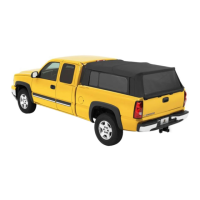
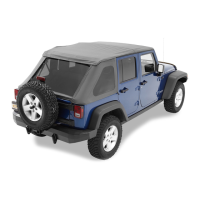
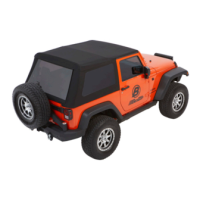
Details door rails and parts included in Kit #574.62.

Parts List: Brackets and Bow Assemblies

Sport Bar Brackets, Retainers, and Bow Assemblies

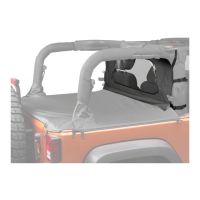
Lists parts for sport bar, tailgate, and bow structures.

Parts List: Bows, Covers, and Windows

Bows, Covers, and Windows

Details bow components, rail covers, seals, and windows.

Parts List: Small Hardware Kit

Small Parts Kit #587.70 Contents

Lists contents of the miscellaneous hardware kit.

Assembly: Section 1 - Rear Door Rails

Step 1: Attach U-Clips to Rails

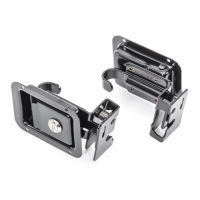
Securing U-clips to the upper rear door rails.

Step 2: Assemble Rear Door Rails

Connecting upper and lower rear door rails using screws.

Assembly: Section 2 - Grilles to Rear Door Rails

Step 1: Attach Grilles

Fastening grilles to the assembled rear door rails.

Assembly: Section 3 - Door Rail Assemblies

Step 1: Mount Rear Door Rail Assemblies

Attaching the assembled rear door rail units to the vehicle.

Step 2: Mount Front Door Rails

Installing the front door rails onto the sport bar.

Assembly: Section 4 - Brackets to Sport Bar

Step 1: Remove Trim Panels

Snapping off trim panels.

Step 2: Attach Sport Bar Mounting Brackets

Securing brackets to downtubes.

Assembly: Section 5 - Tailgate Bar Retainers

Step 1: Install Tailgate Bar Retainers

Securing tailgate bar retainers to the vehicle's belt rail.

Assembly: Section 6 - Lift Assist Assemblies

Step 2: Attach Lift Assist Assemblies

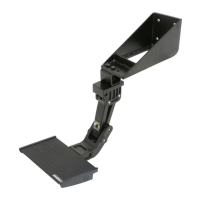
Connecting lift assist mechanisms and tie-down straps.

Assembly: Section 7 - #6 Bow to Brackets

Step 1: Attach #6 Bow

Connecting the #6 Bow assembly to the sport bar mounting brackets.

Assembly: Section 8 - #5 Bow and Pivot Brackets

Step 1: Attach #5 Bow

Connecting the #5 Bow to lift assist mechanisms.

Step 2: Attach #5 Bow Pivot Brackets

Securing pivot brackets to the #5 Bow.

Assembly: Section 9 - Side Bow Assembly Rollers

Step 1: Insert Side Bow Rollers

Sliding side bow assembly rollers into rear door rail channels.

Assembly: Section 10 - Pivot Brackets and Cover Plates

Step 2: Attach Pivot Brackets & Cover Plates

Connecting pivot brackets and attaching rear door rail cover plates.

Assembly: Section 11 - #4 and #3 Bows

Step 1: Attach #4 Bow

Connecting the #4 Bow to the side bow assemblies.

Step 2: Attach #3 Bow

Connecting the #3 Bow to the side bow assemblies.

Assembly: Section 12 - #2 Bow and Grommets

Step 1: Attach #2 Bow

Connecting the #2 Bow to the side bow assemblies.

Step 2: Install Grommets

Installing grommets into #6 Bow flanges.

Assembly: Section 13 - #1 Bow-Fabric Deck

Step 1: Release Tabs on #1 Bow

Releasing tabs on the #1 Bow-Fabric Deck.

Step 2: Place #1 Bow on Header

Positioning the #1 Bow-Fabric Deck on the windshield header.

Assembly: Section 14 - Side Bow Assemblies to Header

Step 1: Attach Side Bow Assemblies

Connecting side bow assemblies to the #1 Bow-Fabric Deck.

Assembly: Section 15 - Fabric Tension and Tab Re-attachment

Step 1: Pull Fabric Across Jeep

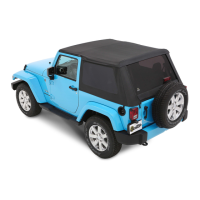
Pulling fabric across the Jeep and installed bows.

Step 2: Re-Attach Tabs

Re-attaching tabs to the underside of the #1 Bow-Fabric Deck.

Assembly: Section 16 - Seals, Cables, and Straps

Step 1: Attach Foam Seals

Attaching foam seals to the Jeep.

Step 2: Attach Cable to #6 Bow Plate

Attaching cables to the #6 Bow Plate.

Assembly: Section 17 - Stay Straps and Fabric Flap

Step 1: Attach Stay Straps to #6 Bow

Securing rear stay straps and fabric flap.

Step 2: Attach Stay Straps to #5 Bow

Securing front stay straps.

Assembly: Section 18 - Sunrider Operation

Steps 1-3: Close and Latch Sunrider

Folding top, latching, and tightening lift assist nuts.

Assembly: Section 19 - Bow Wrapping and Quarter Windows

Step 1: Wrap Bows with Fabric

Wrapping bows with fabric.

Step 2: Install Quarter Windows

Installing quarter windows.

Assembly: Section 20 - Secure Quarter Window Edges

Step 1: Tuck Front Edge

Tucking front edge of quarter windows.

Step 2: Tuck Bottom Edge

Tucking bottom edge of quarter windows.

Assembly: Section 21 - Quarter Panel Pins and Stiffeners

Step 1: Insert Quarter Panel Pin

Inserting quarter panel pins into grommets.

Step 2: Attach Quarter Panel Stiffeners

Attaching quarter panel stiffeners.

Assembly: Section 22 - Secure Rear Tabs and Window Sides

Step 1: Secure Rear Corner Tabs

Tucking rear corner tabs under the belt rail.

Step 2: Secure Quarter Window Sides

Tucking quarter window bottom edges under the belt rail.

Assembly: Section 23 - Rear Window and Tailgate Bar

Step 1: Slide Rear Window onto Rail

Sliding the rear window onto the attachment rail.

Step 2: Attach Tailgate Bar

Attaching the tailgate bar to the rear window.

Assembly: Section 24 - Tailgate Bar and Rear Window Securing

Step 1: Snap Tailgate Bar

Snapping the tailgate bar into retainers.

Step 2: Secure Rear Window

Securing the rear window into the channels.

Step 3: Tuck Rear Window Tab

Tucking the rear window tab under the belt rail.

Assembly: Section 25 - Snug Corners and Open Sunrider

Step 1: Snug Rear Corners

Securing rear corners using hook & loop strips.

Step 2: Open Sunrider Mode

Releasing latches to allow top to normalize.

Warranty Information: Terms and Conditions

What Bestop Warrants

States what the warranty covers.

Limited Warranty Exclusions

Lists conditions not covered.

Sole Remedy for Claims

Outlines repair or replacement process.

Warranty Information: Covered Products and Periods

Covered Products and Warranty Periods

Lists products and their respective warranty durations.

Related product manuals